InterSystems 数据平台和性能 - 第 5 篇 使用 SNMP 进行监控
InterSystems 数据平台和性能 - 第 5 部分 使用 SNMP 进行监控
在之前的帖子中,我展示了如何使用 pButtons 收集历史性能指标。 我首选 pButtons 是因为我知道它随每个数据平台实例(Ensemble、Caché、...)一起安装。 不过,还有其他方法可以实时收集、处理和显示 Caché 性能指标,以进行简单的监视,或进行更重要的并且复杂得多的运营分析和容量计划。 最常见的数据收集方法之一是使用 SNMP(简单网络管理协议)。
SNMP 是 Caché 向各种管理工具提供管理和监控信息的标准方式。 Caché 在线文档包含了 Caché 和 SNMP 之间接口的详细信息。 虽然 SNMP 应该可以直接与 Caché 配合工作,但仍有一些配置技巧和陷阱。 我经历了很多次错误的开始,并且在 InterSystems 其他同事的帮助下,才让 Caché 与操作系统 SNMP 主代理建立对话,所以我写了这篇帖子,希望您可以避免同样的痛苦。
在本帖中,我将介绍如何为 Red Hat Linux 上的 Caché 设置和配置 SNMP,您应该能够对其他 *nix 版本使用相同步骤。 我使用 Red Hat 写这篇文章是因为在 Linux 上进行设置更棘手一些;在 Windows 上,Caché 会自动安装一个 DLL 来与标准 Windows SNMP 服务连接,所以应该更容易配置。
在服务器端设置 SNMP 后,就可以使用任意数量的工具开始监控。 我将展示如何使用流行的 PRTG 工具进行监控,但还有许多其他工具 - 这是部分列表。
注意 Caché 和 Ensemble 的 MIB 文件包含在 Caché_installation_directory/SNMP 文件夹中,这两个文件为:ISC-CACHE.mib 和 ISC-ENSEMBLE.mib。
本系列的前几个帖子:
从这里开始...
首先查看 Caché 在线文档中的“使用 SNMP 监视 Caché”。
1. Caché 配置
按照 Caché 在线文档的“在 Caché 中管理 SNMP”部分中的步骤,启用 Caché 监视服务,并将 Caché SNMP 子代理配置为在 Caché 启动时自动启动。
检查 Caché 进程是否正在运行,例如查看进程列表或操作系统:
ps -ef | grep SNMP
root      1171  1097  0 02:26 pts/1    00:00:00 grep SNMP
root     27833     1  0 00:34 pts/0    00:00:05 cache -s/db/trak/hs2015/mgr -cj -p33 JOB^SNMP
就是这样,Caché 配置完成了!
2. 操作系统配置
这里的工作会多一些。 首先检查 snmpd 守护程序是否已安装并且正在运行。 如果结果为否,则安装并启动 snmpd。
检查 snmpd 状态:
service snmpd status
启动或停止 snmpd:
service snmpd start|stop
如果未安装 snmp,则必须按照操作系统说明进行安装,例如:
yum -y install net-snmp net-snmp-utils
3. 配置 snmpd
如 Caché 文档中所述,在 Linux 系统上,最重要的任务是验证系统上的 SNMP 主代理是否与 Agent Extensibility (AgentX) 协议兼容(Caché 以子代理的形式运行),并且主代理处于活动状态,并在标准 AgentX TCP 端口 705 上侦听连接。
我在这里遇到了问题。 我在 snmp.conf 文件中犯了一些初级错误,意味着 Caché SNMP 子代理未与操作系统主代理进行通信。 以下示例 /etc/snmp/snmp.conf 文件已配置为启动 agentX 并提供对 Caché 和 Ensemble SNMP MIB 的访问。
请注意,您必须确认以下配置是否符合您的组织的安全策略。
至少必须编辑以下几行以反映您的系统设置。
例如,将:
syslocation "System_Location"
更改为
syslocation "Primary Server Room"
此外,至少编辑以下两行:
syscontact  "Your Name"
trapsink  Caché_database_server_name_or_ip_address public
编辑或替换现有 /etc/snmp/snmp.conf 文件以匹配以下内容:
###############################################################################
#
# snmpd.conf:
#   An example configuration file for configuring the NET-SNMP agent with Cache.
#
#   This has been used successfully on Red Hat Enterprise Linux and running
#   the snmpd daemon in the foreground with the following command:
#
#   /usr/sbin/snmpd -f -L -x TCP:localhost:705 -c./snmpd.conf
#
#   You may want/need to change some of the information, especially the
#   IP address of the trap receiver of you expect to get traps. I've also seen
#   one case (on AIX) where we had to use  the "-C" option on the snmpd command
#   line, to make sure we were getting the correct snmpd.conf file.
#
###############################################################################

###########################################################################
# SECTION: System Information Setup
#
#   This section defines some of the information reported in
#   the "system" mib group in the mibII tree.

# syslocation: The [typically physical] location of the system.
#   Note that setting this value here means that when trying to
#   perform an snmp SET operation to the sysLocation.0 variable will make
#   the agent return the "notWritable" error code.  IE, including
#   this token in the snmpd.conf file will disable write access to
#   the variable.
#   arguments:  location_string

syslocation  "System Location"

# syscontact: The contact information for the administrator
#   Note that setting this value here means that when trying to
#   perform an snmp SET operation to the sysContact.0 variable will make
#   the agent return the "notWritable" error code.  IE, including
#   this token in the snmpd.conf file will disable write access to
#   the variable.
#   arguments:  contact_string

syscontact  "Your Name"

# sysservices: The proper value for the sysServices object.
#   arguments:  sysservices_number

sysservices 76

###########################################################################
# SECTION: Agent Operating Mode
#
#   This section defines how the agent will operate when it
#   is running.

# master: Should the agent operate as a master agent or not.
#   Currently, the only supported master agent type for this token
#   is "agentx".
#
#   arguments: (on|yes|agentx|all|off|no)

master agentx
agentXSocket tcp:localhost:705

###########################################################################
# SECTION: Trap Destinations
#
#   Here we define who the agent will send traps to.

# trapsink: A SNMPv1 trap receiver
#   arguments: host [community] [portnum]

trapsink  Caché_database_server_name_or_ip_address public

###############################################################################
# Access Control
###############################################################################

# As shipped, the snmpd demon will only respond to queries on the
# system mib group until this file is replaced or modified for
# security purposes.  Examples are shown below about how to increase the
# level of access.
#
# By far, the most common question I get about the agent is "why won't
# it work?", when really it should be "how do I configure the agent to
# allow me to access it?"
#
# By default, the agent responds to the "public" community for read
# only access, if run out of the box without any configuration file in
# place.  The following examples show you other ways of configuring
# the agent so that you can change the community names, and give
# yourself write access to the mib tree as well.
#
# For more information, read the FAQ as well as the snmpd.conf(5)
# manual page.
#
####
# First, map the community name "public" into a "security name"

#       sec.name  source          community
com2sec notConfigUser  default       public

####
# Second, map the security name into a group name:

#       groupName      securityModel securityName
group   notConfigGroup v1           notConfigUser
group   notConfigGroup v2c           notConfigUser

####
# Third, create a view for us to let the group have rights to:

# Make at least  snmpwalk -v 1 localhost -c public system fast again.
#       name           incl/excl     subtree         mask(optional)
# access to 'internet' subtree
view    systemview    included   .1.3.6.1

# access to Cache MIBs Caché and Ensemble
view    systemview    included   .1.3.6.1.4.1.16563.1
view    systemview    included   .1.3.6.1.4.1.16563.2
####
# Finally, grant the group read-only access to the systemview view.

#       group          context sec.model sec.level prefix read   write  notif
access  notConfigGroup ""      any       noauth    exact  systemview none none
编辑 /etc/snmp/snmp.conf 文件后,重启 snmpd 守护程序。
service snmpd restart
检查 snmpd 状态,注意出现状态行 Turning on AgentX master support,说明 AgentX 已启动。
h-4.2# service snmpd restart
Redirecting to /bin/systemctl restart  snmpd.service
sh-4.2# service snmpd status
Redirecting to /bin/systemctl status  snmpd.service
● snmpd.service - Simple Network Management Protocol (SNMP) Daemon.
   Loaded: loaded (/usr/lib/systemd/system/snmpd.service; disabled; vendor preset: disabled)
   Active: active (running) since Wed 2016-04-27 00:31:36 EDT; 7s ago
 Main PID: 27820 (snmpd)
   CGroup: /system.slice/snmpd.service
           └─27820 /usr/sbin/snmpd -LS0-6d -f

Apr 27 00:31:36 vsan-tc-db2.iscinternal.com systemd[1]: Starting Simple Network Management Protocol (SNMP) Daemon....
Apr 27 00:31:36 vsan-tc-db2.iscinternal.com snmpd[27820]: Turning on AgentX master support.
Apr 27 00:31:36 vsan-tc-db2.iscinternal.com snmpd[27820]: NET-SNMP version 5.7.2
Apr 27 00:31:36 vsan-tc-db2.iscinternal.com systemd[1]: Started Simple Network Management Protocol (SNMP) Daemon..
sh-4.2#
重启 snmpd 后,必须使用 ^SNMP 例程重启 Caché SNMP 子代理:
%SYS>do stop^SNMP()

%SYS>do start^SNMP(705,20)
操作系统 snmpd 守护程序和 Caché 子代理此时应该正在运行并且可访问。
4. 测试 MIB 访问
可以在命令行中使用以下命令检查 MIB 访问。 snmpget 返回一个值:
snmpget -mAll -v 2c -c public vsan-tc-db2 .1.3.6.1.4.1.16563.1.1.1.1.5.5.72.50.48.49.53

SNMPv2-SMI::enterprises.16563.1.1.1.1.5.5.72.50.48.49.53 = STRING: "Cache for UNIX (Red Hat Enterprise Linux for x86-64) 2015.2.1 (Build 705U) Mon Aug 31 2015 16:53:38 EDT"
snmpwalk 将“遍历”MIB 树或分支:
snmpwalk -m ALL -v 2c -c public vsan-tc-db2 .1.3.6.1.4.1.16563.1.1.1.1

SNMPv2-SMI::enterprises.16563.1.1.1.1.2.5.72.50.48.49.53 = STRING: "H2015"
SNMPv2-SMI::enterprises.16563.1.1.1.1.3.5.72.50.48.49.53 = STRING: "/db/trak/hs2015/cache.cpf"
SNMPv2-SMI::enterprises.16563.1.1.1.1.4.5.72.50.48.49.53 = STRING: "/db/trak/hs2015/mgr/"
etc
etc
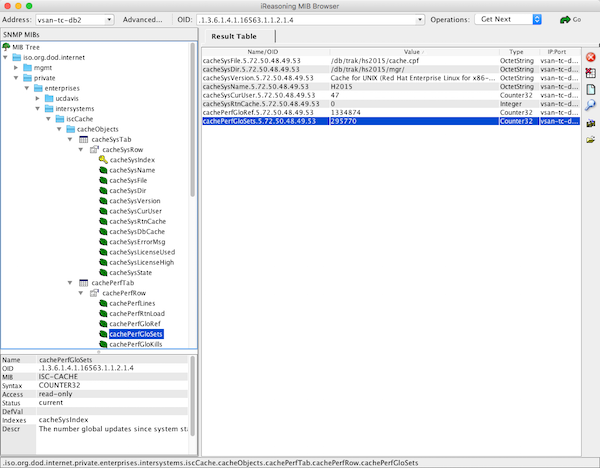
还有几个 Windows 和 *nix 客户端可用于查看系统数据。 我使用免费的 iReasoning MIB Browser。 您需要将 ISC-CACHE.MIB 文件加载到客户端中,以便它了解 MIB 的结构。
下图显示了 OSX 上的 iReasoning MIB Browser。
包括在监视工具中
这里是实施过程中可能有较大差异的地方。 监视或分析工具由您选择。
请为本帖留下评论,详细说明您使用的工具,以及通过该工具获得的系统监视和管理数值。 这将对其他社区成员有很大帮助。
下面是流行的 PRTG 网络监视器的截图,其中显示了 Caché 指标。 将 Caché 指标包括在 PRTG 中的步骤与其他工具类似。
示例工作流程 - 将 Caché MIB 添加到监视工具中。
第 1 步.
确保您可以连接到操作系统 MIB。 一个提示是针对操作系统而非 Caché 进行故障排除。 监视工具很可能已经了解常见的操作系统 MIB 并针对它们进行了预先配置,因此更容易获得供应商或其他用户的帮助。
根据您选择的监视工具,您可能需要添加 SNMP“模块”或“应用程序”,它们通常是免费或开源的。 我发现供应商对此步骤的说明相当简单直接。
监视操作系统指标后,就该添加 Caché 了。
第 2 步.
将 ISC-CACHE.mib 和 ISC-ENSEMBLE.mib 导入到工具中,以便其了解 MIB 结构。
这里的步骤各不相同,例如 PRTG 有一个“MIB Importer”实用工具。 基本步骤是在工具中打开文本文件 ISC-CACHE.mib,然后将其导入为工具内部格式。 例如,Splunk 使用 Python 格式等。
注:我发现如果试图添加一个带有所有 Caché MIB 分支的传感器,PRTG 工具会超时。 我假定它在遍历整个树,并在处理进程列表等某些指标时超时,我没有花时间进行故障排除,而是通过只从 ISC-CACHE.mib 中导入性能分支 (cachePerfTab) 来解决这个问题。
MIB 经过导入/转换后可以重复使用,以收集网络中其他服务器的数据。 上图显示了 PRTG 使用 Sensor Factory 传感器将多个传感器组合成一个图表。
总结
有许多监视工具、报警工具和一些非常智能的分析工具可用,一些是免费的,另一些需要购买许可证来获得支持和各种功能。
您必须监视您的系统,并了解哪个活动是正常的,哪个活动超出正常范围且必须被调查。 SNMP 是揭示 Caché 和 Ensemble 指标的一种简单方法。