使用 IRIS 后端创建简单的 React Web 应用程序 - 解决 CORS 问题
通过 REST API 将前端 React 应用程序与 IRIS 数据库等后端服务集成,是构建健壮网络应用程序的强大方法。但是,开发人员经常遇到的一个障碍是跨源资源共享(CORS)问题,由于网络浏览器强制执行的安全限制,该问题可能会阻止前端访问后端的资源。在本文中,我们将探讨在将 React Web 应用程序与 IRIS 后端服务集成时如何解决 CORS 问题。
创建Schema
我们首先定义一个名为 Patients 的简单Schema:
Class Prototype.DB.Patients Extends %Persistent [ DdlAllowed ]
{

Property Name As %String;

Property Title As %String;

Property Gender As %String;

Property DOB As %String;

Property Ethnicity As %String;
}
您可以在表中插入一些虚假数据进行测试。我个人认为 Mockaroo 在创建假数据时非常方便。它可以让你把虚拟数据下载为 .csv 文件,直接导入管理门户。
定义 REST 服务
然后,我们定义几个 REST 服务
Class Prototype.DB.RESTServices Extends %CSP.REST
{

Parameter CONTENTTYPE = "application/json";

XData UrlMap [ XMLNamespace = "http://www/intersystems.com/urlmap" ]
{


}

ClassMethod GetPatients() As %Status
{
    #Dim tStatus As %Status = $$$OK

    #Dim tSQL As %String = "SELECT * FROM Prototype_DB.Patients ORDER BY Name"

    #Dim tStatement As %SQL.Statement = ##class(%SQL.Statement).%New()

    Set tStatus = tStatement.%Prepare(tSQL)

    If ($$$ISERR(tStatus)) Return ..ReportHttpStatusCode(..#HTTP400BADREQUEST, tStatus)

    #Dim tResultSet As %SQL.StatementResult

    Set tResultSet = tStatement.%Execute()

    #Dim tPatients As %DynamicArray = []

    While (tResultSet.%Next()) {
        #Dim tPatient As %DynamicObject = {}
        Set tPatient.ID = tResultSet.ID
        Set tPatient.Name = tResultSet.Name
        Set tPatient.Title = tResultSet.Title
        Set tPatient.Gender = tResultSet.Gender
        Set tPatient.DOB = tResultSet.DOB
        Set tPatient.OrderedBy = tResultSet.OrderedBy
        Set tPatient.DateOfOrder = tResultSet.DateOfOrder
        Set tPatient.DateOfReport = tResultSet.DateOfReport
        Set tPatient.Ethnicity = tResultSet.Ethnicity
        Set tPatient.HN = tResultSet.HN
        Do tPatients.%Push(tPatient)
    }
    Do ##class(%JSON.Formatter).%New().Format(tPatients)
    Quit $$$OK
}

ClassMethod UpdatePatientName(pID As %Integer)
{
    #Dim tStatus As %Status = $$$OK
    #Dim tPatient As Prototype.DB.Patients = ##class(Prototype.DB.Patients).%OpenId(pID,, .tStatus)
    If ($$$ISERR(tStatus)) Return ..ReportHttpStatusCode(..#HTTP404NOTFOUND, tStatus)
    #Dim tJSONIn As %DynamicObject = ##class(%DynamicObject).%FromJSON(%request.Content)
    Set tPatient.Name = tJSONIn.Name
    Set tStatus = tPatient.%Save()
    If ($$$ISERR(tStatus)) Return ..ReportHttpStatusCode(..#HTTP400BADREQUEST, tStatus)
    #Dim tJSONOut As %DynamicObject = {}
    Set tJSONOut.message = "patient name updated successfully"
    Set tJSONOut.patient = ##class(%DynamicObject).%New()
    Set tJSONOut.patient.ID = $NUMBER(tPatient.%Id())
    Set tJSONOut.patient.Name = tPatient.Name
    Do ##class(%JSON.Formatter).%New().Format(tJSONOut)
    Quit $$$OK
}

}
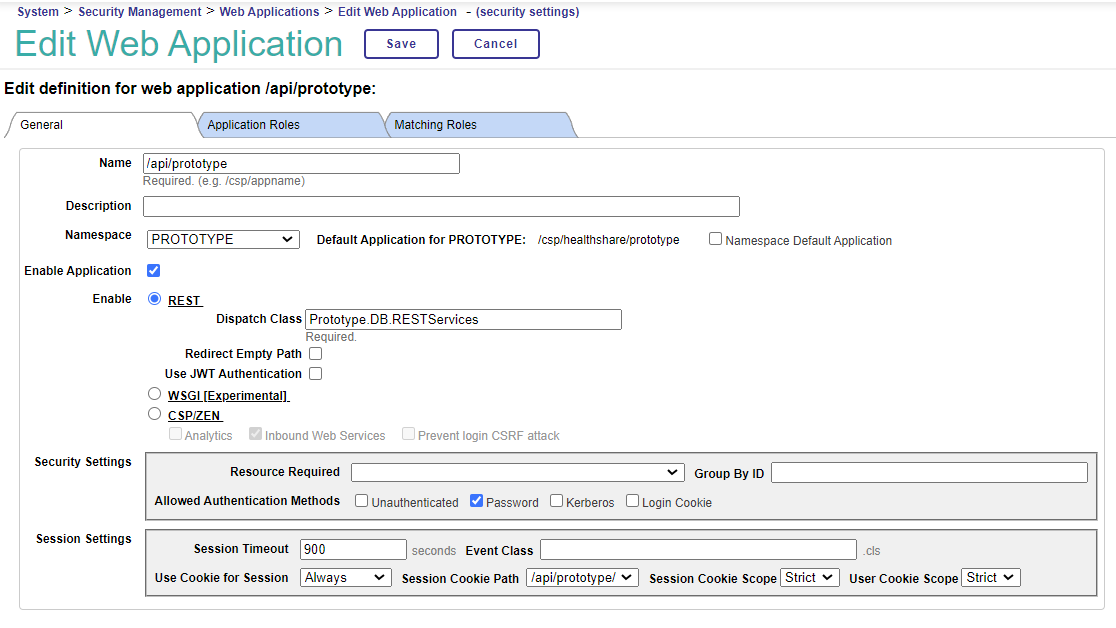
然后,我们继续在管理门户上注册网络应用程序
- 在管理门户上导航至 系统管理 -> 安全 -> 应用程序 -> Web 应用程序 -> 创建 Web 应用程序"。
- 填写下表
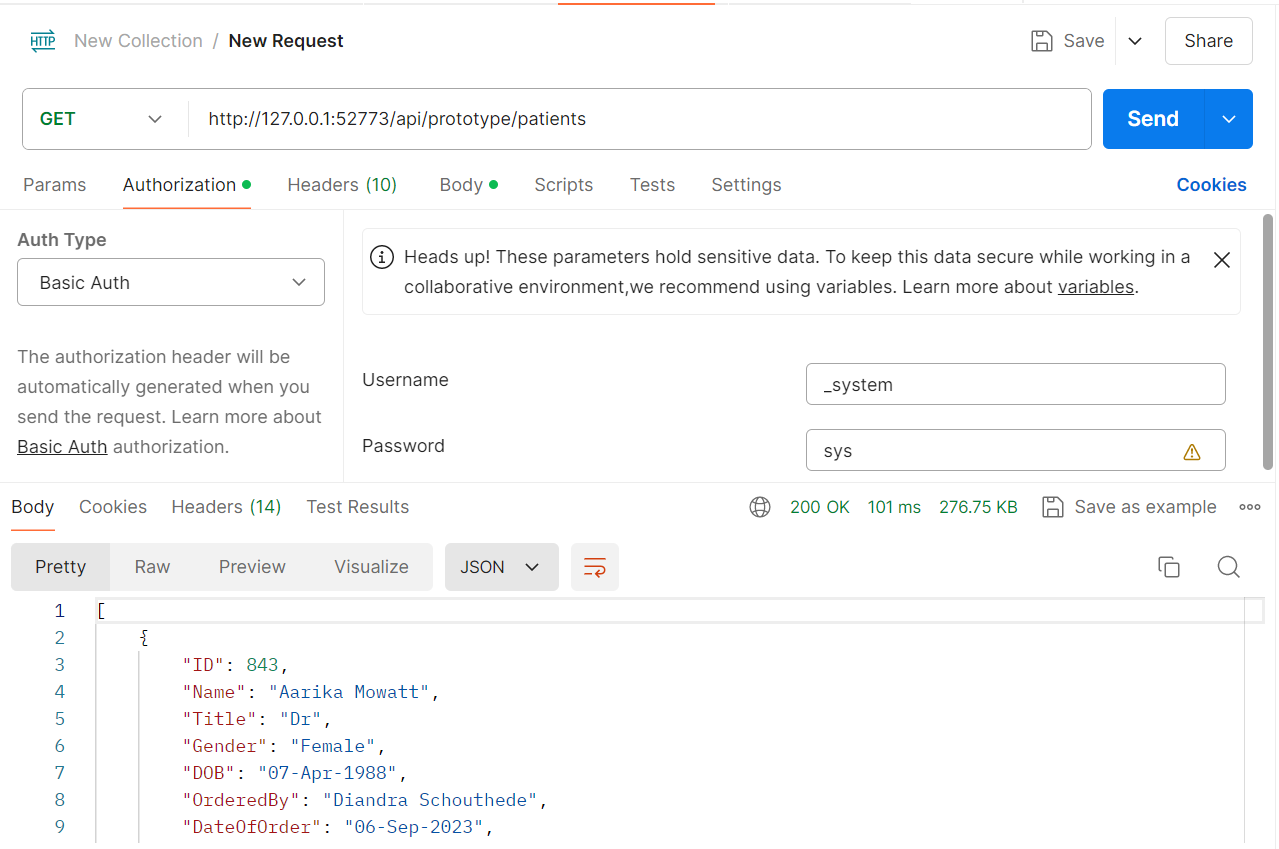
- 在
Prototype/DB/RESTServices.cls中定义的 API 将在http://localhost:52773/api/prototype/*中提供。 - 现在,我们可以使用 Postman 请求端点,以验证 API 是否可用
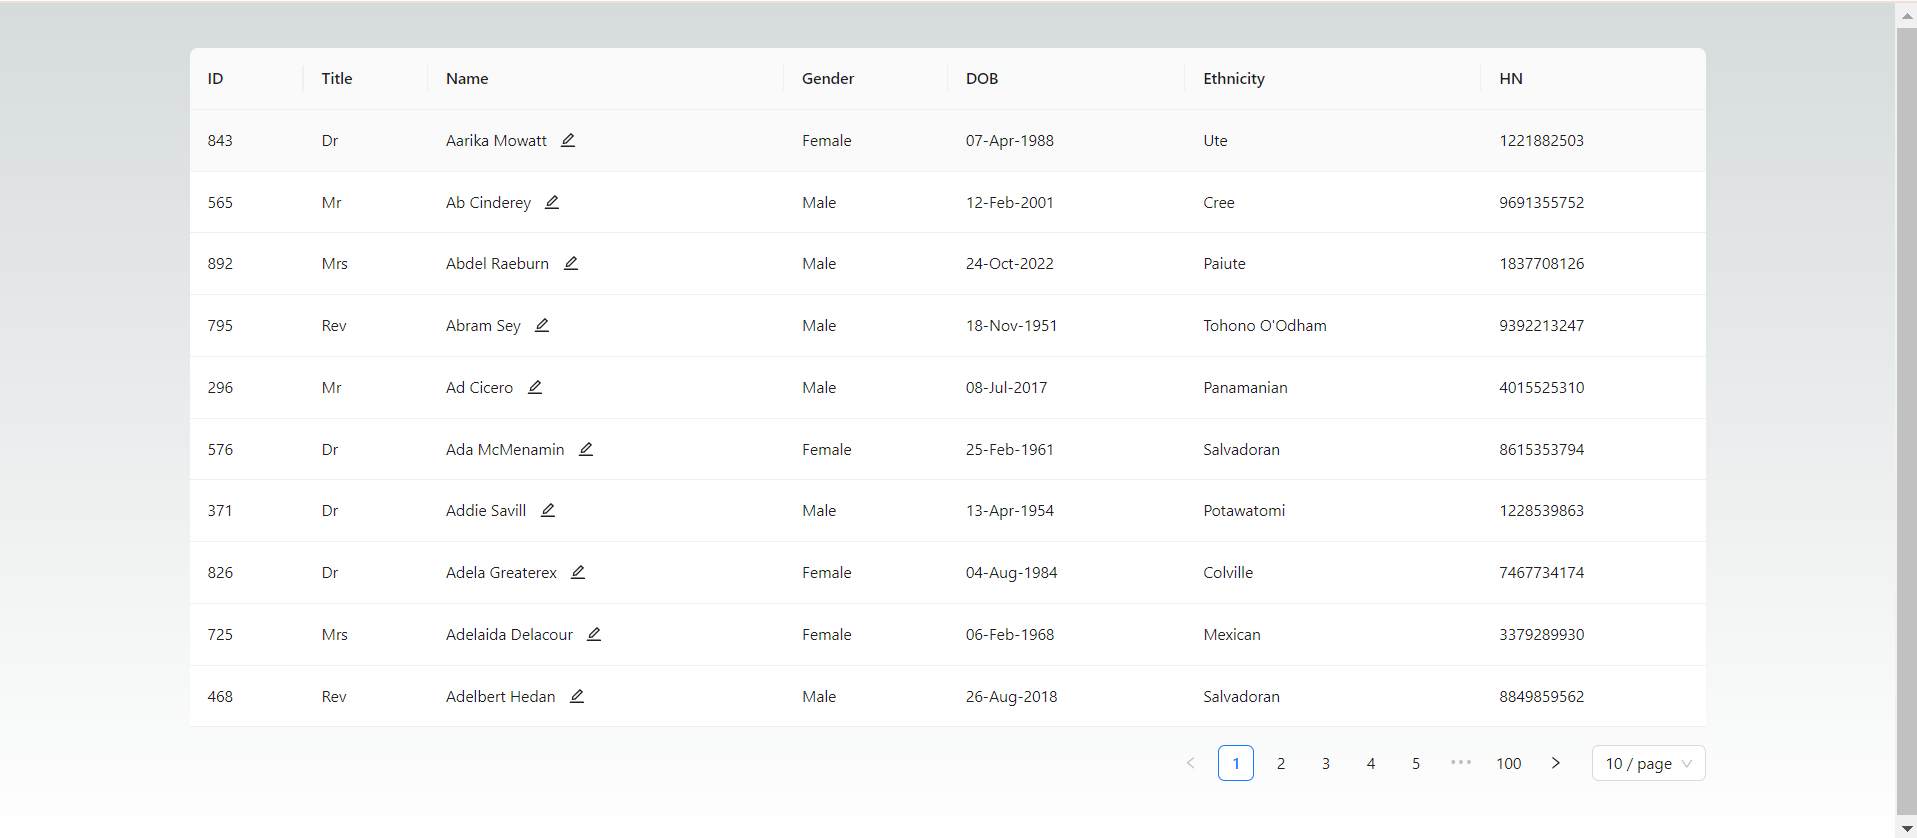
创建前端
我使用 Next.js 创建了一个简单的前端,Next.js 是一个流行的 React 框架,它能让开发人员轻松创建服务器端渲染(SSR)的 React 应用程序。
我的前端是一个简单的表格,用于显示存储在 IRIS 中的患者数据,并提供更新患者姓名的功能。
 const getPatientData = async () => {
    const username = '_system'
    const password = 'sys'
    try {
        const response: IPatient[] = await (await fetch("http://localhost:52773/api/prototype/patients", {
        method: "GET",
        headers: {
          "Authorization": 'Basic ' + base64.encode(username + ":" + password),
          "Content-Type": "application/json"
        },
      })).json()
      setPatientList(response);
    } catch (error) {
      console.log(error)
    }
  }
看似一切准备就绪,但如果直接运行 "npm run dev",就会出现 CORS :(
解决 CORS 问题
当网络应用程序尝试向不同域上的资源发出请求,而服务器的 CORS 策略限制了客户端的访问,导致请求被浏览器阻止时,就会发生 CORS 错误。我们可以在前台或后台解决 CORS 问题。
设置响应标头(后台方法)
首先,我们在定义 API 端点的同一个 Prototype/DB/RESTServices.cls 调度器类中添加 HandleCorsRequest 参数。
Parameter HandleCorsRequest = 1;
然后,我们在派发器类中定义 OnPreDispatch 方法来设置响应头。
   ClassMethod OnPreDispatch() As %Status
    {
        Do %response.SetHeader("Access-Control-Allow-Credentials","true")
        Do %response.SetHeader("Access-Control-Allow-Methods","GET, PUT, POST, DELETE, OPTIONS")
        Do %response.SetHeader("Access-Control-Max-Age","10000")
        Do %response.SetHeader("Access-Control-Allow-Headers","Content-Type, Authorization, Accept-Language, X-Requested-With")
        quit $$$OK
    }
使用 Next.js 代理(前端方法)
在next.config.mjs文件中添加重写函数:
 /** @type {import('next').NextConfig} */
        const nextConfig = {
            async rewrites() {
                return [
                    {
                        source: '/prototype/:path',
                        destination: 'http://localhost:52773/api/prototype/:path'
                    }
                ]
            }
        };

        export default nextConfig;
并将所有提取 url 从 http://127.0.0.1:52773/api/prototype/:path 更新为 `/prototype/:path
最终产物
在这里,我放置了前台页面的代码:
'use client'
import { NextPage } from "next"
import { useEffect, useState } from "react"
import { Table, Input, Button, Modal } from "antd";
import { EditOutlined } from "@ant-design/icons";
import type { ColumnsType } from "antd/es/table";
import base64 from 'base-64';
import fetch from 'isomorphic-fetch'
const HomePage: NextPage = () => {
const [patientList, setPatientList] = useState([]);
const [isUpdateName, setIsUpdateName] = useState(false);
const [patientToUpdate, setPatientToUpdate] = useState()
const [newName, setNewName] = useState('')
const getPatientData = async () => {
const username = '_system'
const password = 'sys'
try {
const response: IPatient[] = await (await fetch("http://localhost:52773/api/prototype/patients", {
method: "GET",
headers: {
"Authorization": 'Basic ' + base64.encode(username + ":" + password),
"Content-Type": "application/json"
},
})).json()
setPatientList(response);
} catch (error) {
console.log(error)
}
}
const updatePatientName = async () => {
let headers = new Headers()
const username = '_system'
const password = 'sys'
const ID = patientToUpdate?.ID
try {
headers.set("Authorization", "Basic " + base64.encode(username + ":" + password))
const response: { message: string, patient: { ID: number, Name: string } } =
await (await fetch(`http://127.0.0.1:52773/api/prototype/patient/${ID}`, {
method: "POST",
headers: headers,
body: JSON.stringify({Name: newName})
})).json()
let patientIndex = patientList.findIndex((patient) => patient.ID == response.patient.ID)
const newPatientList = patientList.slice()
newPatientList[patientIndex] = {...patientList[patientIndex], Name: response.patient.Name}
setPatientList(newPatientList);
setPatientToUpdate(undefined);
setNewName('')
setIsUpdateName(false)
} catch (error) {
console.log(error)
}
}
const columns: ColumnsType = [
{
title: 'ID',
dataIndex: 'ID',
},
{
title: "Title",
dataIndex: "Title"
},
{
title: 'Name',
dataIndex: 'Name',
render: (value, record, index) => {
return (
{value}
{
setIsUpdateName(true)
setPatientToUpdate(record)
}}>
)
}
},
{
title: "Gender",
dataIndex: 'Gender'
},
{
title: "DOB",
dataIndex: "DOB"
},
{
title: "Ethnicity",
dataIndex: "Ethnicity"
},
{
title: 'HN',
dataIndex: "HN"
}
]
useEffect(() => {
getPatientData();
}, [])
return (
<>
{
setIsUpdateName(false);
setPatientToUpdate(undefined);
setNewName('')
}}>
Update name for patient {patientToUpdate?.ID}
Original Name: { patientToUpdate?.Name}
setNewName(event.target.value)} />
{patientList.length > 0 && }
>
)
}
export default HomePage
现在访问 http://localhost:3000, 可见如下效果:
项目的Github存储库: https://github.com/xili44/iris-react-integration
感谢 Bryan (@Bryan Hoon), Julian(@Julian Petrescu) 和 Martyn (@Martyn Lee),感谢新加坡办事处提供的支持和专业知识。