在本地的K8s 上部署一台FHIR服务器

这是一个使用 IKO 在 k3d 上部署 iris-oauth-fhir 的示例。
* iris-oauth-fhir 是一个示例,用于部署带有 OAuth2 身份验证功能的 FHIR 服务器,InterSystems IRIS for Health 作为资源服务器,Google OpenId 则作为授权服务器。
* k3d 作为一个轻量级封装器,用于在 docker 中运行 k3s (Rancher Lab 的最小 Kubernetes 发行版)
* IKO 是一个在 Kubernetes 上部署 InterSystems IRIS for Health 的工具。
2. 目录表
- 1. K3D + iris-operator + iris-oauth-fhir
- 2. Table of Contents
- 2.1. Prerequisites
- 2.2. Installation
- 2.2.1. Warning
- 2.2.2. Build iris-oauth-fhir image
- 2.2.3. Download k3d
- 2.2.4. Create a registry
- 2.3. Start the culster
- 2.3.1. Check the cluster
- 2.3.2. Install iris-operator
- 2.3.3. Install iriscluster
- 2.3.4. Deploy iriscluster
- 2.3.5. Deploy ingress
- 2.4. Easy scale
- 2.5. Quick init
- 2.6. Quick deployment
2.1 须知
2.2 安装
2.2.1 警告
这将是很值得经历的一段漫长的过程,您将学到很多关于 Kubernetes 和 InterSystems IRIS for Health 的知识。
2.2.2 构建 iris-oauth-fhir 镜像
首先克隆下面这个存储库
git clone https://github.com/grongierisc/iris-oauth-fhir
然后按照 README.md 中的说明构建 iris-oauth-fhir 镜像。
接下来我们安装 k3d。
2.2.3 下载k3d
curl -s https://raw.githubusercontent.com/rancher/k3d/main/install.sh | bash
2.2.4 创建一个注册表
我们必须创建一个注册表,因为目前 Docker Desktop 还没有将其内部注册表用作容器 ID 注册表。有一项实验性功能可将 Docker Desktop 注册表用作容器 ID 注册表,但目前还不稳定。因此,我们将使用 k3d 创建一个注册表。
k3d registry create registry.localhost --port 5000
该命令将在端口 5000 上创建一个注册表。我们将用它来推送图像。这是在 k3d 中使用图像的唯一方法。
现在,我们将把注册表添加到 hosts 文件中。这样,我们就能将其用作 DNS 名称。这一点很重要,因为我们将在部署中使用它。这个 DNS 名称对于我们的主机和 Kubernetes 都是一样的。
2.2.4.1 将注册表添加到主机中
2.2.4.1.1. mac
sudo sh -c 'echo "127.0.0.1 k3d-registry.localhost" >> /etc/hosts'
2.2.4.1.2 windows
- Open Notepad as an administrator.
- Open the file C:\Windows\System32\Drivers\etc\hosts.
- Add the following line to the end of the file: 127.0.0.1 k3d-registry.localhost.
- Save the file and close Notepad.
2.3 启动群集
现在,我们将使用此命令行启动群集:
k3d cluster create demo --servers 1 --agents 2 --volume $(pwd)/k8s/data:/var/lib/rancher/k3s/storage@all --registry-use k3d-registry.localhost:5000 -p "8081:80@loadbalancer" -p "4443:443@loadbalancer" --api-port 6550 --volume "$(pwd)/k8s/config/traefik-config.yaml:/var/lib/rancher/k3s/server/manifests/traefik-config.yaml"
有哪些选项
--servers 1will create one server node, server nodes are the master nodes.--agents 2will create two agent nodes, agent nodes are the worker nodes.--volume $(pwd)/k8s/data:/var/lib/rancher/k3s/storage@allwill mount thek8s/datafolder to the cluster. This is where we will store our data.--registry-use k3d-registry.localhost:5000will use the registry we created before.-p "8081:80@loadbalancer" -p "4443:443@loadbalancer"will expose the port 8081 and 4443 to the host. This is where we will access our cluster.--api-port 6550will expose the port 6550 to the host. This is where we will access the Kubernetes API.--volume "$(pwd)/k8s/config/traefik-config.yaml:/var/lib/rancher/k3s/server/manifests/traefik-config.yaml"will mount thek8s/config/traefik-config.yamlfile to the cluster. This is the configuration file for the ingress controller. This will configure the ingress controller to allowtraefikto route the data on the secure port without verification of the certificate.
# k8s/config/traefik-config.yaml
apiVersion: helm.cattle.io/v1
kind: HelmChartConfig
metadata:
  name: traefik
  namespace: kube-system
spec:
  valuesContent: |-
    globalArguments:
    - "--serversTransport.insecureSkipVerify=true"
2.3.1 检查群集
为了让你了解 Kubernetes 集群的样子,下面是一个示意图:

kubectl get nodes
你应该看到如下的内容
NAME                       STATUS   ROLES                  AGE   VERSION
k3d-demo-server-0          Ready    control-plane,master   10m   v1.21.2+k3s1
k3d-demo-agent-0           Ready    <none>                 10m   v1.21.2+k3s1
k3d-demo-agent-1           Ready    <none>                 10m   v1.21.2+k3s1
这意味着集群已准备就绪。现在,您拥有了一个包含一个主节点和两个工作节点的 Kubernetes 集群。
2.3.2 安装 iris-operator
我们现在开始安装 iris-operator。iris-operator是一个 Kubernetes 操作器,用于在 Kubernetes 上部署 InterSystems IRIS for Health。它可在 WRC 或 InterSystems Container Registry 上获取。
我们将使用 3.6.6.100 版本。
例如,如果容器注册表有 IKO,可以使用此命令行:
docker pull containers.intersystems.com/intersystems/iris-operator-amd:3.6.6.100
现在,我们将标记这个image,将其推送到注册表中:
docker tag intersystems/iris-operator-amd:3.6.6.100 k3d-registry.localhost:5000/intersystems/iris-operator-amd:3.6.6.100
继续推送
docker push k3d-registry.localhost:5000/intersystems/iris-operator-amd:3.6.6.100
要安装 Iko 操作员,我们将使用 helm。Helm 是 Kubernetes 的软件包管理器。可在here下载。
2.3.2.1 安装 helm
curl -fsSL -o get_helm.sh https://raw.githubusercontent.com/helm/helm/main/scripts/get-helm-3 chmod 700 get_helm.sh ./get_helm.sh
2.3.2.2 安装 iris-operator
helm install intersystems k8s/iris_operator_amd-3.6.6.100/chart/iris-operator
要检查 operator 是否正在运行,可以使用此命令行:
kubectl --namespace=default get deployments -l "release=intersystems, app=iris-operator-amd"
你应该看到👇🏻的内容
NAME                        READY   UP-TO-DATE   AVAILABLE   AGE
intersystems-iris-operator  1/1     1            1           2m
2.3.3 安装 iriscluster
2.3.3.1 我们要部署什么
我们需要部署👇🏻的架构
- One data node
- One web gateway node
正是我们在这个 docker-compose 文件中看到的内容:
# docker-compose.yaml
version: '3.6'
services:
  iris:
    image: iris-oauth-fhir-iris:latest
    build:
      context: .
      dockerfile: Dockerfile
    restart: always
    ports:
      - 1972
      - 8083:52773
      - 53773
    volumes:
      - ./:/irisdev/app/
      - ./data:/data
    environment:
      - ISC_CPF_MERGE_FILE=/irisdev/app/common.cpf
      - ISC_OAUTH_SECRET_PATH=/irisdev/app/misc/auth/secret.json
      - ISC_DATA_DIRECTORY=/data/iris

  webgateway:
    build:
      context: ./webgateway
      args:
        link: 'iris'
        port: '52773'
    image: proxyiris:latest
    ports:
    - "8080:80"
    - "4443:443"
    volumes:
    - ./webgateway/CSP.ini:/opt/webgateway/bin/CSP.ini
    - ./webgateway/httpd-csp.conf:/usr/local/apache2/conf/extra/httpd-csp.conf
几个注意的点:
- 我们在数据节点中使用了 iris-oauth-fhir-iris:latest 镜像。
- 该镜像使用三个环境变量:
- ISC_CPF_MERGE_FILE 用于合并 common.cpf 文件。
- ISC_OAUTH_SECRET_PATH 用于设置秘密文件的路径。
- ISC_DATA_DIRECTORY 用于设置数据目录。
- 网络网关节点使用 proxyiris:latest 映像。
- 该镜像使用两个volumes:
- CSP.ini 用于配置 CSP 应用程序。
- httpd-csp.conf 用于配置 apache 服务器。
因此,在 Kubernetes 部署中,我们必须做同样的事情。
这意味着我们必须
- 数据节点
- 向数据节点提供 common.cpf 文件。
- 同样也要提供 secret.json 文件,以配置 OAuth2 身份验证。
- 数据目录将作为volume加载。
- 对于网络网关节点:
- 向网络网关节点提供一些 CSP.ini 文件。
- 同样,httpd-csp.conf 文件用于配置 apache 服务器。
2.3.3.2 准备数据节点的部署
为了向数据节点提供 common.cpf 文件,我们将使用配置映射。配置映射是用于存储配置文件的 Kubernetes 对象。我们将使用本版本库中的 common.cpf 文件。
下面是配置映射的示意图:
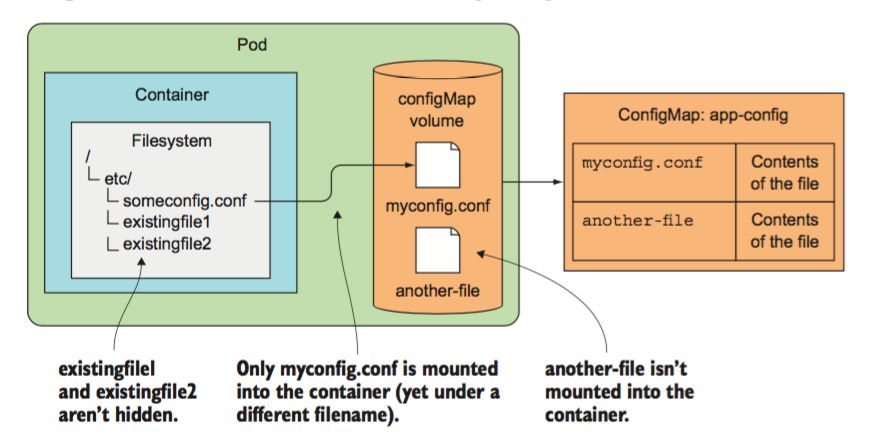
要创建配置映射,我们将使用以下命令行:
kubectl create cm iriscluster-config --from-file common.cpf 为了向数据节点提供 secret.json 文件,我们将使用一个secret。secret是用于存储敏感数据的 Kubernetes 对象。我们将使用该版本库中的 secret.json 文件。
要创建secret,我们将使用以下命令行:
kubectl create secret generic iriscluster-secret --from-file misc/auth/secret.json
要将数据目录挂载为volume,这将是自动的。我们将使用 IrisCluster 定义拓扑部分的存储字段,并将其作为默认设置。
我们仍需将 iris-oauth-fhir-iris:latest 映像推送到注册表。我们将使用与之前相同的命令行:
docker tag iris-oauth-fhir-iris:latest k3d-registry.localhost:5000/iris-oauth-fhir-iris:latest
docker push k3d-registry.localhost:5000/iris-oauth-fhir-iris:latest
2.3.3.3 准备网络网关节点的部署
网络网关节点有点不同,因为我们不会使用 proxyiris:latest 映像。我们将使用 intersystems/webgateway:2023.1.1.380.0-linux-amd64 映像。该镜像可从 InterSystems Container Registry. 上获取。
该镜像是原始 Web 网关镜像。
原始网络网关镜像与 proxyiris 镜像有何不同?
- proxyiris 已用自签证书预配置了 https。
因此,我们必须配置网络网关使用 https。为此,我们将使用一个secret。secret是一个用于存储敏感数据的 Kubernetes 对象。我们将使用该版本库中的 tls.crt 和 tls.key 文件。
要创建secret,我们将使用以下命令行:
kubectl create secret tls tls-secret --key k8s/tls/tls.key --cert k8s/tls/tls.crt
好消息是,我们无需配置 CSP 应用程序和 apache 服务器。我们将使用 IrisCluster 定义中拓扑部分的 applicationPaths 和 alternativeServers 字段,并将它们作为默认设置。
在 docker-compose.yaml 文件中,我们必须配置 CSP.ini 文件和 httpd-csp.conf 文件。在 Kubernetes 部署中,我们不需要这样做,因为我们无法提前知道数据节点的 IP 地址。但我们仍然需要告诉 IKO 连接到数据节点的登录名和密码。为此,我们将使用一个secret。secret是一个用于存储敏感数据的 Kubernetes 对象。我们将使用该版本库中的 iris-webgateway-secret 文件。
要创建secret,我们将使用以下命令行:
kubectl create secret generic iris-webgateway-secret --from-literal='username=CSPSystem' --from-literal='password=]]]U1lT'
我们仍然需要将 intersystems/webgateway:2023.1.1.380.0-linux-amd64 映像推送到注册表中。我们将使用与之前相同的命令行
docker tag containers.intersystems.com/intersystems/webgateway:2023.1.1.380.0-linux-amd64 k3d-registry.localhost:5000/intersystems/webgateway:2023.1.1.380.0-linux-amd64
docker push k3d-registry.localhost:5000/intersystems/webgateway:2023.1.1.380.0-linux-amd64
2.3.4 部署 iriscluster
现在,我们将安装 IrisCluster。IrisCluster 是一种 Kubernetes 自定义资源,用于在 Kubernetes 上部署 InterSystems IRIS for Health。
它定义在 k8s/config/iris-sample.yaml 文件中。
# k8s/config/iris-sample.yaml
## uncommented fields deploy one InterSystems IRIS data server

## WARNING: default password is not reset, to do so include
## configSource below

## include commented fields for purposes described; see documentation at
## https://docs.intersystems.com/irislatest/csp/docbook/Doc.View.cls?KEY=AIKO_clusterdef_sample

## update image tags (from ":tag") before using; see list of available images at
## https://docs.intersystems.com/components/csp/docbook/Doc.View.cls?KEY=PAGE_containerregistry

apiVersion: intersystems.com/v1alpha1
kind: IrisCluster
metadata:
  name: sample
spec:

## provide InterSystems IRIS license key if required
#     licenseKeySecret:
#       name: iris-key-secret

## specify files used to customize the configurations of
## InterSystems IRIS nodes, including passwordHash parameter
## to set the default password, securing InterSystems IRIS
  configSource:
    name: iriscluster-config

## provide repository credentials if required to pull images
#     imagePullSecrets:
#       - name: iris-pull-secret

## provide VolumeSource specifications for certificates for each desired TLS feature
## "common" enables all TLS features, but each particular feature's property is given priority over "common"
  tls:
#       common:
#         secret:
#           secretName: tls-certs
#       mirror:
#         csi:
#           driver: secrets-store.csi.k8s.io
#           readOnly: true
#           volumeAttributes:
#             secretProviderClass: "my-provider"
    webgateway:
      secret:
        secretName: tls-secret

## specify platform-specific storage class used to allocate storage
## volumes (default: use platform-defined class)
#     storageClassName: iris-ssd-storageclass

## select update strategy (default: RollingUpdate)
#     updateStrategy:
#       type: RollingUpdate

## create external IP address(es)for the cluster
## ("type: LoadBalancer" and "externalTrafficPolicy: Local" are required)
#     serviceTemplate:
#       spec:
#         type: LoadBalancer
#         externalTrafficPolicy: Local

## define persistent volumes (to be mounted by "volumeMounts:" in node definitions)
#  volumeClaimTemplates:
#    - metadata:
#        name: extra-disk
#      spec:
#        accessModes:
#          - ReadWriteOnce
#        resources:
#          requests:
#            storage: 2Gi

## define ephemeral volumes (to be mounted by "volumeMounts:" in node definitions)
  volumes:
    - name: auth-config
      secret:
        secretName: iriscluster-secret

## topology: defines node types to be deployed; only "data:" is required

  topology:
    data:
      image: k3d-registry.localhost:5000/iris-oauth-fhir-iris:latest
      ## set enviroment variable for the container
      podTemplate:
        spec:
          env:
            - name: ISC_OAUTH_SECRET_PATH
              value: /auth/secret.json

## deploy a sharded cluster of data nodes and (optionally) compute
## nodes; if not included, "data:" definition in "topology:" deploys
## a single data server, "compute:" adds application servers
#         shards: 2

## deploy mirrored data nodes or data server (default: nonmirrored)
#         mirrored: true

## override default size and other attributes of predefined storage
## volumes for data nodes (additional volume names: storageWIJ,
## storageJournal1, storageJournal2); can also be included in
## "compute:" definition
#         storageDB:
#           resources:
#             requests:
#               storage: 10Gi
#           storageClassName: my-storageclass

## constrain nodes to platform-specific availability zones (can be
## included in other node definitions)
#         preferredZones:
#           - us-east1-a
#           - us-east1-b

## mount volumes defined in "volumeClaimTemplates:" (persistent) and "volumes:" (ephemeral)
      volumeMounts:
        - mountPath: "/auth"
          name: auth-config

## deploy webgateway (web server) nodes
    webgateway:
      image: k3d-registry.localhost:5000/intersystems/webgateway:2023.1.1.380.0-linux-amd64
      type: apache
      replicas: 1
      applicationPaths:
        - /csp/sys
        - /fhir/r4
      alternativeServers: LoadBalancing
      loginSecret:
        name: iris-webgateway-secret

## deploy System Alerting and Monitoring (SAM) with InterSystems IRIS
#      sam:
#        image: containers.intersystems.com/intersystems/sam:tag

## deploy InterSystems API Manager (IAM) with InterSystems IRIS
#      iam:
#        image: containers.intersystems.com/intersystems/iam:tag
内容太多了!别担心,我们一一做解释
让我们从 configSource 部分开始:
## specify files used to customize the configurations of
## InterSystems IRIS nodes, including passwordHash parameter
## to set the default password, securing InterSystems IRIS
  configSource:
    name: iriscluster-config
这是我们之前创建的配置映射。我们将在这里找到 common.cpf 文件。
接下来是 tls 部分:
## provide VolumeSource specifications for certificates for each desired TLS feature
## "common" enables all TLS features, but each particular feature's property is given priority over "common"
  tls:
    webgateway:
      secret:
        secretName: tls-secret
这是我们之前创建的secret。我们将在这里找到 tls.crt 和 tls.key 文件。
接下来是volumes部分:
## define ephemeral volumes (to be mounted by "volumeMounts:" in node definitions)
  volumes:
    - name: auth-config
      secret:
        secretName: iriscluster-secret
这是我们之前创建的secret。我们将在这里找到 secret.json 文件。
IrisCluster 定义了如何在 Kubernetes 上部署 InterSystems IRIS for Health。重要的部分是拓扑部分。该部分定义了要部署的节点。在本例中,我们将部署一个数据节点和一个网络网关节点。
让我们看看数据节点的定义:
## topology: defines node types to be deployed; only "data:" is required

  topology:
    data:
      image: k3d-registry.localhost:5000/iris-oauth-fhir-iris:latest
      ## set enviroment variable for the container
      podTemplate:
        spec:
          env:
            - name: ISC_OAUTH_SECRET_PATH
              value: /auth/secret.json
      volumeMounts:
        - mountPath: "/auth"
          name: auth-config
图像字段定义了要使用的图像。我们将使用之前构建的映像。podTemplate 字段定义 Kubernetes pod 模板。env 字段定义要在容器中设置的环境变量。我们将使用该环境变量来设置将创建的秘密文件的路径。
podTemplate 相当于 docker-compose.yaml 文件中的 podTemplate。
volumeMounts 字段定义了要挂载到容器中的卷。我们将挂载之前创建的秘密。
现在让我们看看网络网关节点的定义:
## deploy webgateway (web server) nodes
    webgateway:
      image: k3d-registry.localhost:5000/intersystems/webgateway:2023.1.1.380.0-linux-amd64
      type: apache
      replicas: 1
      applicationPaths:
        - /csp/sys
        - /fhir/r4
      alternativeServers: LoadBalancing
      loginSecret:
        name: iris-webgateway-secret
图像字段定义了要使用的图像。类型字段定义要部署的网络网关类型。我们将使用 apache。副本字段定义要部署的网络网关的数量。我们将部署一个。applicationPaths 字段定义路由到网络网关的应用程序路径。我们将把 /csp/sys 和 /fhir/r4 路由到网络网关。alternativeServers 字段定义要使用的替代服务器。我们将使用 LoadBalancing。loginSecret 字段定义连接网关和数据节点的登录名和密码。
要部署 IrisCluster,我们将使用以下命令行:
kubectl apply -f k8s/config/iris-sample.yaml
要检查 IrisCluster 是否正在运行,可以使用此命令行:
kubectl get iriscluster
几分钟后,可以看到👇🏻这些信息
NAME     SHARDS   MIRRORED   STATUS     AGE
sample                       Running   2m16s
要了解 IrisCluster 的详细信息,可以使用此命令行:
kubectl describe iriscluster sample
要检查 pod 是否正在运行,可以使用此命令行:
kubectl get pods
几分钟后,可以看到👇🏻这些信息
NAME                                             READY   STATUS              RESTARTS   AGE
intersystems-iris-operator-amd-87c955c9c-4zmrj   1/1     Running             0          44m
sample-data-0                                    1/1     Running             0          4m19s
sample-webgateway-0                              0/1     ContainerCreating   0          17s
要获取 pod 的详细信息,可以使用以下命令行
kubectl describe pod sample-data-0
2.3.5 部署 ingress

现在,我们将部署一个ingress。ingress 是一个 Kubernetes 对象,用于将流量路由到正确的 pod。我们将使用 k8s/config/ingress.yaml 文件。
apiVersion: networking.k8s.io/v1
kind: Ingress
metadata:
  name: ingress
  namespace: default
spec:
  rules:
  - http:
      paths:
      - path: /
        pathType: Prefix
        backend:
          service:
            name: sample-webgateway
            port:
              number: 443
该ingress将把流量路由到端口为 443 的 sample-webgateway 服务。
要部署ingress,我们将使用以下命令行
kubectl apply -f k8s/config/ingress.yaml
要检查ingress是否正在运行,可以使用此命令行:
kubectl get ingress
要测试整个过程,可以使用以下命令行:
curl -k https://localhost:4443/fhir/r4/metadata
恭喜您!已成功的在 Kubernetes 上部署了 iris-oauth-fhir。
2.4 Easy Scale
如果要创建一个新租户,可以使用 iris-demo.yaml 文件。
基本上,它与 iris-sample.yaml 文件相同,只是改变了租户的名称。
你可以使用此命令行进行部署:
kubectl apply -f k8s/config/iris-demo.yaml
您可以使用新的 ingress 将流量路由到新租户。
apiVersion: traefik.containo.us/v1alpha1
kind: Middleware
metadata:
  name: strip-prefix
  namespace: default
spec:
  stripPrefix:
    prefixes:
      - /sample
      - /demo
---
apiVersion: networking.k8s.io/v1
kind: Ingress
metadata:
  name: ingress
  namespace: default
  annotations:
    traefik.ingress.kubernetes.io/router.middlewares: default-strip-prefix@kubernetescrd
spec:
  rules:
  - http:
      paths:
      - path: /sample
        pathType: Prefix
        backend:
          service:
            name: sample-webgateway
            port:
              number: 443
      - path: /demo
        pathType: Prefix
        backend:
          service:
            name: demo-webgateway
            port:
              number: 443
新增两条路线
/sampleto route the traffic to thesample-webgatewayservice./demoto route the traffic to thedemo-webgatewayservice.
您可以缩放 Compte 节点,但需要License Key。
2.5 快速 init
Tag images
docker tag iris-oauth-fhir-iris:latest k3d-registry.localhost:5000/iris-oauth-fhir-iris:latest
docker tag containers.intersystems.com/intersystems/webgateway:2023.1.1.380.0-linux-amd64 k3d-registry.localhost:5000/intersystems/webgateway:2023.1.1.380.0-linux-amd64
docker tag intersystems/iris-operator-amd:3.6.6.100 k3d-registry.localhost:5000/intersystems/iris-operator-amd:3.6.6.100
Push image
docker push k3d-registry.localhost:5000/iris-oauth-fhir-iris:latest
docker push k3d-registry.localhost:5000/intersystems/webgateway:2023.1.1.380.0-linux-amd64
docker push k3d-registry.localhost:5000/intersystems/iris-operator-amd:3.6.6.100
2.6 快速部署
删除 cluster
k3d cluster delete demo
创建 cluster
k3d cluster create demo --servers 1 --agents 2 --volume $(pwd)/k8s/data:/var/lib/rancher/k3s/storage@all --registry-use k3d-registry.localhost:5000 -p "8081:80@loadbalancer" -p "4443:443@loadbalancer" --api-port 6550 --volume "$(pwd)/k8s/config/traefik-config.yaml:/var/lib/rancher/k3s/server/manifests/traefik-config.yaml"
安装 iris-operator
helm install intersystems k8s/iris_operator_amd-3.6.6.100/chart/iris-operator
创建配置和Secret
kubectl create cm iriscluster-config --from-file common.cpf
kubectl create secret generic iriscluster-secret --from-file misc/auth/secret.json
kubectl create secret tls tls-secret --key k8s/tls/tls.key --cert k8s/tls/tls.crt
kubectl create secret generic iris-webgateway-secret --from-literal='username=CSPSystem' --from-literal='password=]]]U1lT'
部署 IrisCluster:
kubectl apply -f k8s/config/iris-sample.yaml
部署 Ingress
kubectl apply -f k8s/config/ingress.yaml