构建 AI 智能体:从小白到大神
学习如何使用 LangGraph 设计结合了推理、矢量搜索和工具集成的可扩缩自主 AI 智能体。

概括
- AI 智能体是一种超越简单的聊天机器人的自主系统,它结合了记忆库、上下文,并具有自动完成任务的主动性。
- LangGraph 是一种框架,它使我们能够利用具有内置状态管理的节点(任务)和边缘(连接),构建复杂的 AI 工作流。
- 本指南将指导您构建 AI 赋能的客户支持智能体,该智能体可以划分优先级,识别相关主题,并确定是上报还是自动回复。
那么,AI 智能体究竟是什么?
让我们直面它吧 —“AI 智能体”听起来就像可以接管会议室的机器人。 实际上,它们是您得力的助手,可以简化复杂的工作流,消除重复性任务。 您可以把它们看作是聊天机器人的下一个进化阶段:它们不只是简单地等待提示;它们可以发起行动,协调多个步骤,并随时进行调整。
过去,打造一个“智能”系统意味着兼顾语言理解、代码生成、数据查找等各种不同的模型,然后将它们粘合在一起。 您的一半时间花在了集成上,另一半时间则花在了调试上。
智能体彻底颠覆了这一切。 它们将上下文、主动性和适应性融合在一个精心编排的流程中。 它们不仅实现了自动化,更是肩负使命的智者。 借助 LangGraph 之类的框架,我相信,组建一支自己的智能体团队实际上会很有趣。

LangGraph 究竟是什么?
LangGraph 是一种创新型框架,它彻底改变了我们构建涉及大语言模型 (LLM) 的复杂应用程序的方式。
想象一下,您正在指挥一支管弦乐队:每种乐器(或“节点”)都需要知道何时演奏,声音有多大,顺序如何。 这种情况下,LangGraph 就是您的指挥棒,为您提供以下内容:
- 图结构:它采用具有节点和边缘的图结构,使开发者能够设计适应各种分支和循环的灵活非线性工作流。 它可以反映复杂的决策过程,类似于神经通路的运作方式。
- 状态管理:LangGraph 提供了各种内置工具,可以实现状态保持和错误恢复,简化了应用程序中各个阶段的上下文数据的维护。 借助 Zep 等工具,它可以在短期记忆和长期记忆之间高效切换,提高了交互质量。
- 工具集成:借助 LangGraph,LLM 智能体可以轻松与外部服务或数据库协作,获取真实的数据,从而改进应用程序的功能和响应性。
- 人机协同:除了可以实现自动化外,LangGraph 还可以适应工作流中的人为干预,这对于需要分析监督或伦理考虑的决策过程至关重要。
无论您是在构建具有真实记忆的聊天机器人、交互式故事引擎,还是能够处理复杂问题的智能体团队,LangGraph 都可以将令人头疼的管道工程转变成简单明了、直观的状态机。
开始
要开始使用 LangGraph,您需要进行基本的设置,通常包括安装 langgraph 和 langchain-openai 等必要的库。 然后,您可以定义图中的节点(任务)和边缘(连接),有效地实现短期记忆的检查点,并利用 Zep 满足更持久的记忆需求。
操作 LangGraph 时,请记住以下几点:
- 具有灵活性的设计:利用强大的图结构来解释并非严格线性的潜在工作流分支和交互。
- 以深思熟虑的方式与工具交互:利用外部工具增强 LLM 功能,而不是取而代之。 为每个工具提供全面的描述,以实现精确使用。
- 采用丰富的记忆解决方案:高效地使用记忆库,留意 LLM 的上下文窗口,并考虑集成外部解决方案,以实现自动事实管理。
现在,我们已经介绍 LangGraph 的基础知识,我们来看一个实例。 为此,我们将开发一个用于提供客户支持的 AI 智能体。
这个智能体将接收电子邮件请求,分析电子邮件正文中的问题描述,然后确定请求的优先级和适当的主题/类别/部门。
系好安全带,我们开始吧!

首先,我们需要定义什么是“工具”。 可以把它看作是智能体的专属“助理”,使其能够与外部功能进行交互。
@tool 装饰器在这里必不可少。 LangChain 简化了自定义工具的创建,这意味着首先,定义一个 Python 函数,然后应用 @tool 装饰器。

为了进行说明,我们来创建第一个工具。 这个工具将帮助智能体根据电子邮件内容划分 IT 支持工单的优先级:
    from langchain_core.tools import tool

    @tool
    def classify_priority(email_body: str) -> str:
        """Classify the priority of an IT support ticket based on email content."""
        prompt = ChatPromptTemplate.from_template(
            """Analyze this IT support email and classify its priority as High, Medium, or Low.

            High: System outages, security breaches, critical business functions down
            Medium: Non-critical issues affecting productivity, software problems
            Low: General questions, requests, minor issues

            Email: {email}

            Respond with only: High, Medium, or Low"""
        )
        chain = prompt | llm
        response = chain.invoke({"email": email_body})
        return response.content.strip()
太棒了! 现在,我们有一个提示,指示 AI 接收电子邮件正文,对其进行分析,并将其优先级分为“高”、“中”或“低”。
就是这样! 您刚刚编写了一个智能体可以调用的工具!
接下来,我们创建一个类似的工具来识别支持请求的主要主题(或类别):
    @tool
    def identify_topic(email_body: str) -> str:
        """Identify the main topic/category of the IT support request."""
        prompt = ChatPromptTemplate.from_template(
            """Analyze this IT support email and identify the main topic category.

            Categories: password_reset, vpn, software_request, hardware, email, network, printer, other

            Email: {email}

            Respond with only the category name (lowercase with underscores)."""
        )
        chain = prompt | llm
        response = chain.invoke({"email": email_body})
        return response.content.strip()
现在,我们需要创建一个状态,在 LangGraph 中,这一小部分非常重要。
把它想象成图的中枢神经系统。 这就是节点之间的通信方式,就像优等生在课堂上传递纸条一样。
文档中显示:
“状态是表示应用程序当前快照的共享数据结构。”
在实践中呢? 状态是在节点之间移动的结构化消息。 它将一个步骤的输出作为下一个步骤的输入。 基本上,它是将整个工作流粘合在一起的粘合剂。
因此,在构建图之前,我们必须先定义我们的状态结构。 本例中,我们的状态包括以下内容:
- 用户请求(电子邮件正文)
- 指定的优先级
- 确定的主题(类别)
它简单明了,因此您可以像专业人士一样浏览图。
    from typing import TypedDict

    # Define the state structure
    class TicketState(TypedDict):
        email_body: str
        priority: str
        topic: str


    # Initialize state
    initial_state = TicketState(
        email_body=email_body,
        priority="",
        topic=""
    )
节点与 边缘:LangGraph 的关键组成部分
LangGraph 的基本要素包括节点和边缘。
- 节点:它们是图中的操作单元,执行实际工作。 节点通常由可以执行任何逻辑(从计算到与语言模型 (LLM) 或外部集成交互)的 Python 代码组成。 从本质上讲,节点就像传统编程中的个别函数或智能体。
- 边缘:边缘定义节点之间的执行流,决定接下来会发生什么。 它们充当连接器,允许状态根据预定义条件从一个节点转换到另一个节点。 在 LangGraph 中,边缘在协调节点之间的序列和决策流方面至关重要。
为了掌握边缘的功能,我们来看一个消息传递应用程序的简单类比:
- 节点类似于积极参与对话的用户(或他们的设备)。
- 边缘代表着用户之间能够促进沟通的聊天主题或连接。
当用户选择一个聊天主题来发送消息时,会有效地创建一个边缘,将他们与另一个用户连接在一起。 与 LangGraph 状态的结构化模式类似,每次交互(无论是发送文本、语音还是视频消息)都遵循预定义的顺序。 它确保了沿边缘传递的数据的一致性和可解释性。
不同于事件驱动型应用程序的动态特性,LangGraph 采用在整个执行过程中保持一致的静态模式。 它简化了节点之间的通信,使开发者可以依赖稳定的状态格式,从而确保无缝的边缘通信。
设计基本工作流
可以将 LangGraph 中的流工程理解为设计一个状态机。 在这个情境中,每个节点代表一个不同的状态或处理步骤,而边缘定义了这些状态之间的转换。 这种方式对想要在 AI 的确定性任务序列与动态决策能力之间取得平衡的开发者特别有用。 我们来使用前面定义的 TicketState 类初始化 StateGraph,开始构建流程。
    from langgraph.graph import StateGraph, START, END

    workflow = StateGraph(TicketState)
节点添加:节点是基本要素,用于执行划分工单优先级或识别其主题等特定任务。
每个节点函数均接收当前状态,执行其操作,并返回一个字典以更新状态:
   def classify_priority_node(state: TicketState) -> TicketState:
        """Node to classify ticket priority."""
        priority = classify_priority.invoke({"email_body": state["email_body"]})
        return {"priority": priority}

    def identify_topic_node(state: TicketState) -> TicketState:
        """Node to identify ticket topic."""
        topic = identify_topic.invoke({"email_body": state["email_body"]})
        return {"topic": topic}


    workflow.add_node("classify_priority", classify_priority_node)
    workflow.add_node("identify_topic", identify_topic_node)
classify_priority_node 和 identify_topic_node 方法将更改 TicketState 并发送参数输入。
边缘创建:定义连接节点的边缘:
    workflow.add_edge(START, "classify_priority")
    workflow.add_edge("classify_priority", "identify_topic")
    workflow.add_edge("identify_topic", END)
classify_priority 确定起点,而 identify_topic 确定到目前为止工作流的终点。
编译与执行:配置节点和边缘后,编译并执行该工作流。
    graph = workflow.compile()
    result = graph.invoke(initial_state)
太好了! 您还可以生成 LangGraph 流的可视化表示。
graph.get_graph().draw_mermaid_png(output_file_path="graph.png")
如果将代码运行到此点,您就会看到一个与下面类似的图:
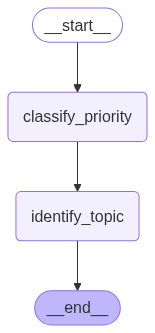
这幅图直观地显示了一次顺序执行:开始,然后划分优先级,接着确定主题,最后结束。
LangGraph 最强大的一个方面是它的灵活性,这让我们可以创建更复杂的流程和应用程序。 例如,我们可以修改工作流,使用以下行将 START 中的边缘添加到两个节点:
    workflow.add_edge(START, "classify_priority")
    workflow.add_edge(START, "identify_topic")
这一更改意味着智能体将同时执行 classify_priority 和 identify_topic。
LangGraph 中另一个非常有用的功能是能够使用条件边缘。 它们允许工作流根据对当前状态的评估进行分支,实现任务的动态路由。
我们来增强工作流。 我们将创建一个新工具,分析请求的内容、优先级和主题,以确定它是否为需要上报(例如,为人工团队提交工单)的高优先级问题。 如果不需要,将为用户生成一个自动响应。
    @tool
    def make_escalation_decision(email_body: str, priority: str, topic: str) -> str:
        """Decide whether to auto-respond or escalate to IT team."""
        prompt = ChatPromptTemplate.from_template(
            """Based on this IT support ticket, decide whether to:
            - "auto_respond": Send an automated response for simple/common or medium priority issues
            - "escalate": Escalate to the IT team for complex/urgent issues

            Email: {email}
            Priority: {priority}
            Topic: {topic}

            Consider: High priority items usually require escalation, while complex technical issues necessitate human review.

            Respond with only: auto_respond or escalate"""
        )
        chain = prompt | llm
        response = chain.invoke({
            "email": email_body,
            "priority": priority,
            "topic": topic
        })
        return response.content.strip()
此外,如果请求被确定为低优先级或中等优先级(导致“auto_respond”决策),我们将执行矢量搜索来检索历史回答。 然后,将使用此信息来生成适当的自动回答。 不过,这需要两个额外的工具:
    @tool
    def retrieve_examples(email_body: str) -> str:
        """Retrieve relevant examples from past responses based on email_body."""
        try:
            examples = iris.cls(__name__).Retrieve(email_body)
            return examples if examples else "No relevant examples found."
        except:
            return "No relevant examples found."

    @tool
    def generate_reply(email_body: str, topic: str, examples: str) -> str:
        """Generate a suggested reply based on the email, topic, and RAG examples."""
        prompt = ChatPromptTemplate.from_template(
            """Generate a professional IT support response based on:

            Original Email: {email}
            Topic Category: {topic}
            Example Response: {examples}

            Create a helpful, professional response that addresses the user's concern.
            Keep it concise and actionable."""
        )
        chain = prompt | llm
        response = chain.invoke({
            "email": email_body,
            "topic": topic,
            "examples": examples
        })
        return response.content.strip()
现在,我们为这些新工具定义相应的节点:
    def decision_node(state: TicketState) -> TicketState:
        """Node to decide on escalation or auto-response."""
        decision = make_escalation_decision.invoke({
            "email_body": state["email_body"],
            "priority": state["priority"],
            "topic": state["topic"]
        })
        return {"decision": decision}


    def rag_node(state: TicketState) -> TicketState:
        """Node to retrieve relevant examples using RAG."""
        examples = retrieve_examples.invoke({"email_body": state["email_body"]})
        return {"rag_examples": examples}

    def generate_reply_node(state: TicketState) -> TicketState:
        """Node to generate suggested reply."""
        reply = generate_reply.invoke({
            "email_body": state["email_body"],
            "topic": state["topic"],
            "examples": state["rag_examples"]
        })
        return {"suggested_reply": reply}


    def execute_action_node(state: TicketState) -> TicketState:
        """Node to execute final action based on decision."""
        if state["decision"] == "escalate":
            action = f"🚨 ESCALATED TO IT TEAM\nPriority: {state['priority']}\nTopic: {state['topic']}\nTicket created in system."
            print(f"[SYSTEM] Escalating ticket to IT team - Priority: {state['priority']}, Topic: {state['topic']}")
        else:
            action = f"✅ AUTO-RESPONSE SENT\nReply: {state['suggested_reply']}\nTicket logged for tracking."
            print(f"[SYSTEM] Auto-response sent to user - Topic: {state['topic']}")

        return {"final_action": action}


    workflow.add_node("make_decision", decision_node)
    workflow.add_node("rag", rag_node)
    workflow.add_node("generate_reply", generate_reply_node)
    workflow.add_node("execute_action", execute_action_node)
然后,条件边缘将使用 make_decision 节点的输出来定向流:
    workflow.add_conditional_edges(
        "make_decision",
        lambda x: x.get("decision"),
        {
            "auto_respond": "rag",
            "escalate": "execute_action"
        }
    )
如果 make_escalation_decision 工具(通过 decision_node)产生“auto_respond”,工作流将继续通过 RAG 节点(检索示例),然后是 generate_reply 节点(设计回答),最后是 execute_action 节点(记录 auto-response)。
相反,如果决策是“escalate”,流程将绕过 RAG 和生成步骤,直接转到 execute_action 来处理上报。 要添加剩余的标准边缘来完成图,请执行以下操作:
    workflow.add_edge("rag", "generate_reply")
    workflow.add_edge("generate_reply", "execute_action")
    workflow.add_edge("execute_action", END)
数据集注释:对于此项目,我们用于支持检索增强生成 (RAG) 的数据集来自 Hugging Face 上的 Customer Support Tickets 数据集。 对该数据集进行了筛选,以便只包含分类为技术支持并限制为英语的条目。 它确保 RAG 系统只为技术支持任务检索高度相关的特定领域的示例。
此时,我们的图应当与下图类似:
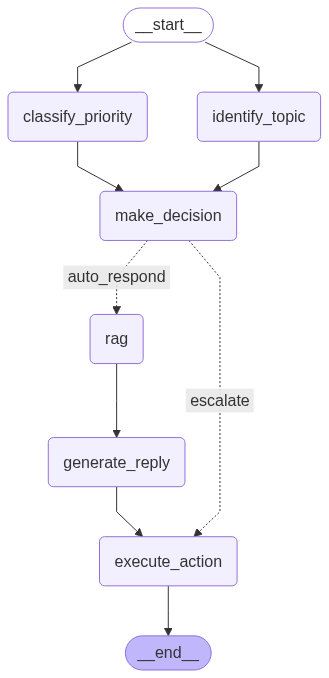
当您使用一封电子邮件来执行此图,并导致高优先级分类和“escalate”决策时,您将看到以下响应:
.png)
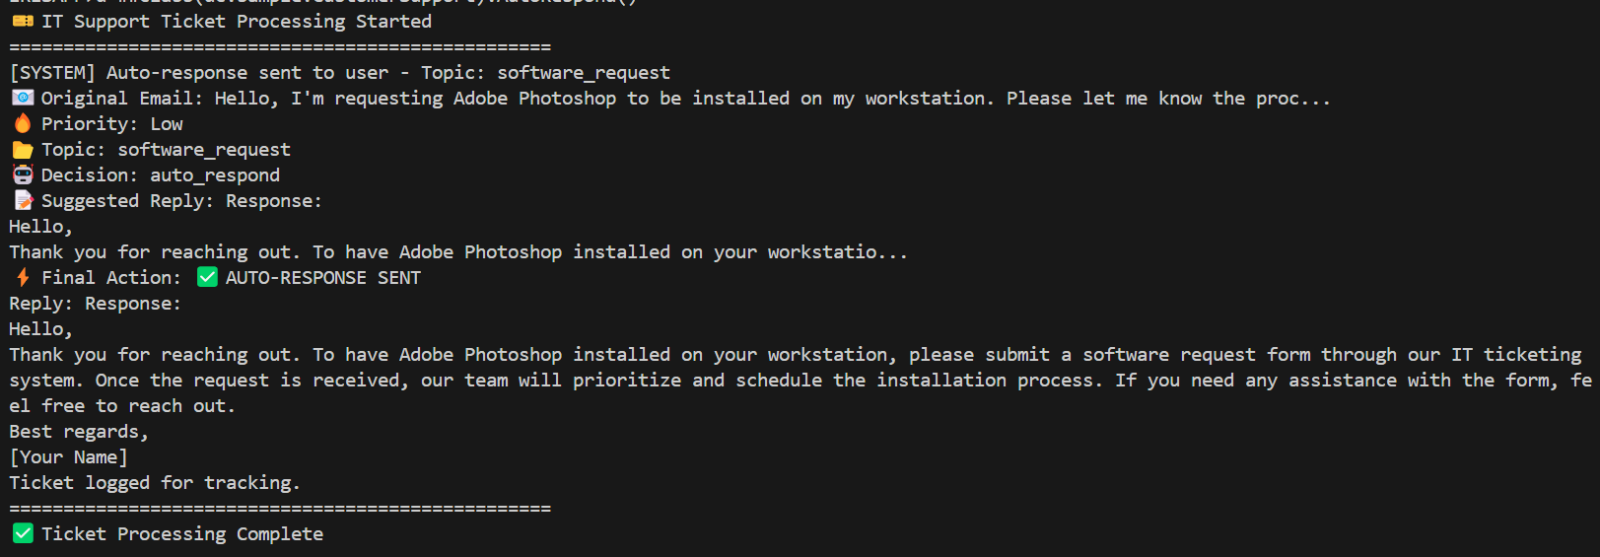
同时,被分类为低优先级并导致“auto_respond”决策的请求将触发与下面类似的回复:
那么… 这一路都很顺利吗?
并不完全是。 有一些问题需要注意:
- 数据隐私:小心敏感信息 — 这些智能体需要防护。
- 计算成本:某些高级设置需要大量资源。
- 幻觉:LLM 偶尔也会编造一些内容(不过仍然比大多数实习生聪明)。
- 非确定性:相同的输入可能会返回不同的输出,这对创造力来说是好事,但对严格的流程来说却很棘手。
不过,大多数缺点都可以通过良好的规划、合适的工具和一点点思考加以控制。
LangGraph 将 AI 智能体从流行语变成实实在在的有效解决方案。 无论您是要自动执行客户支持,处理 IT 工单,还是构建自主应用程序,这个框架都让操作变得可行,甚至有趣。
您有任何问题或反馈吗? 请说出来。 AI 革命需要像您这样的建设者。