WebGateway系列(2): 配置Apache连接IRIS
检查Apache工作状态
确认Apache正常工作, apache的版本已经安装路径。
[root@centos7 ~]# httpd -v
Server version: Apache/2.4.6 (CentOS)
Server built:   Apr 24 2019 13:45:48
[root@centos7 ~]# systemctl status httpd
● httpd.service - The Apache HTTP Server
  Loaded: loaded (/usr/lib/systemd/system/httpd.service; enabled; vendor preset: disabled)
  Active: active (running) since Mon 2020-06-15 16:46:36 CST; 5min ago
    Docs: man:httpd(8)
          man:apachectl(8)
Main PID: 6506 (httpd)
  Status: "Total requests: 0; Current requests/sec: 0; Current traffic:   0 B/sec"
    Tasks: 272
  Memory: 31.3M
  CGroup: /system.slice/httpd.service
          ├─6506 /usr/sbin/httpd -DFOREGROUND
          ├─6592 /usr/sbin/httpd -DFOREGROUND
          ├─6607 /usr/sbin/httpd -DFOREGROUND
          ├─6608 /usr/sbin/httpd -DFOREGROUND
          ├─6609 /usr/sbin/httpd -DFOREGROUND
          ├─6610 /usr/sbin/httpd -DFOREGROUND
          ├─6611 /usr/sbin/httpd -DFOREGROUND
          ├─6612 /usr/sbin/httpd -DFOREGROUND
          ├─6613 /usr/sbin/httpd -DFOREGROUND
          ├─6622 /usr/sbin/httpd -DFOREGROUND
          ├─6623 /usr/sbin/httpd -DFOREGROUND
          └─6633 /usr/sbin/httpd -DFOREGROUND

Jun 15 16:46:36 centos7 systemd[1]: Starting The Apache HTTP Server...
Jun 15 16:46:36 centos7 systemd[1]: Started The Apache HTTP Server.
[root@centos7 ~]#
确认httpd.conf的位置。 在CentOS7中此位置为/etc/httpd/conf, 其他linux系统可能有其他位置, 如果不确认,可以使用 find命令寻找.
[root@centos7 ~]# ll /etc/httpd/conf
total 56
-rw-r--r-- 1 root root   890 Jun 26  2019 healthshare.conf
-rw-r--r-- 1 root root     0 Jun 26  2019 healthshare.conf_save
-rw-r--r-- 1 root root 11786 Jun 30  2019 httpd.conf
-rw-r--r-- 1 root root 11753 Jun 26  2019 httpd.conf.bak
-rw-r--r-- 1 root root 11746 Jun 30  2019 httpd.conf2
-rw-r--r-- 1 root root 13077 Apr 24  2019 magic
[root@centos7 ~]#
从Caché所在服务器用浏览器检查Apache测试页面可以访问。如果在Apache本地服务器访问, 网址为127.0.0.1(如果远端无法访问,请首先检查防火墙,后面步骤中有介绍)
picture testing123
关闭SELinux配置
查询确认SELinux状态为disabled
[root@centos7 ~]# getenforce
Disabled
如果非disabled状态,需要修改配置文件实现, 下图为修改后的文件内容,修改后重启电脑生效。
[root@centos7 ~]# cat /etc/selinux/config
# This file controls the state of SELinux on the system.
# SELINUX= can take one of these three values:
#     enforcing - SELinux security policy is enforced.
#     permissive - SELinux prints warnings instead of enforcing.
#     disabled - No SELinux policy is loaded.
SELINUX=disabled
# SELINUXTYPE= can take one of three two values:
#     targeted - Targeted processes are protected,
#     minimum - Modification of targeted policy. Only selected processes are protected.
#     mls - Multi Level Security protection.
SELINUXTYPE=targeted

[root@centos7 ~]#
检查防火墙
确认apache所在服务器的防火墙打开了80端口。(为简化步骤, 这里不讨论Web Server的SSL接入)
[root@centos7 ~]# systemctl status firewalld
● firewalld.service - firewalld - dynamic firewall daemon
  Loaded: loaded (/usr/lib/systemd/system/firewalld.service; disabled; vendor preset: enabled)
  Active: active (running) since Mon 2020-06-15 17:24:15 CST; 2s ago
    Docs: man:firewalld(1)
Main PID: 27433 (firewalld)
    Tasks: 2
  Memory: 25.1M
  CGroup: /system.slice/firewalld.service
          └─27433 /usr/bin/python -Es /usr/sbin/firewalld --nofork --nopid

Jun 15 17:24:15 centos7 systemd[1]: Starting firewalld - dynamic firewall daemon...
Jun 15 17:24:15 centos7 systemd[1]: Started firewalld - dynamic firewall daemon.
[root@centos7 ~]# firewall-cmd --state
running
[root@centos7 ~]# firewall-cmd --zone=public --list-ports

[root@centos7 ~]# firewall-cmd --zone=public --add-port=80/tcp --permanent
Success
[root@centos7 ~]# firewall-cmd --reload
success
[root@centos7 ~]# firewall-cmd --zone=public --list-ports
80/tcp
[root@centos7 ~]
如果Caché安装在另一台服务器, Web gateway和Caché间的通信通过Caché的superserver端口(默认1972), 因此Caché所在服务器的防火墙必须运行此端口访问。
对Apache调优
如果apache的工作模式为Prefork, 通过修改配置文件后重启服务,将工作模式改成“worker”(下面cat命令显示修改后的配置文件)
[root@centos7 ~]# apachectl -V | grep MPM
Server MPM:     prefork
[root@centos7 ~]# vim /etc/httpd/conf.modules.d/
[root@centos7 ~]# cat /etc/httpd/conf.modules.d/00-mpm.conf
# Select the MPM module which should be used by uncommenting exactly
# one of the following LoadModule lines:

# prefork MPM: Implements a non-threaded, pre-forking web server
# See: http://httpd.apache.org/docs/2.4/mod/prefork.html
#LoadModule mpm_prefork_module modules/mod_mpm_prefork.so

# worker MPM: Multi-Processing Module implementing a hybrid
# multi-threaded multi-process web server
# See: http://httpd.apache.org/docs/2.4/mod/worker.html
#
LoadModule mpm_worker_module modules/mod_mpm_worker.so

# Worker MPM parameters
ServerLimit	40
StartServers 	10
MaxRequestWorkers	1000
MinSpareThreads	75
MaxSpareThreads	250
ThreadsPerChild	25

# event MPM: A variant of the worker MPM with the goal of consuming
# threads only for connections with active processing
# See: http://httpd.apache.org/docs/2.4/mod/event.html
#
#LoadModule mpm_event_module modules/mod_mpm_event.so

[root@centos7 ~]# systemctl restart httpd
[root@centos7 ~]# apachectl -V | grep MPM
Server MPM:     worker
[root@centos7 ~]#
安装Web Gateway
最新的IRIS或者HealthConnect安装包可能不包含让用户选择是否安装csp/web gateway的选项, 因此大多数情况, 用户更多的是使用专门的Web/CSP gateway的安装包来安装, 无论Apach Server 和Caché/IRIS Server是否在同一台服务器上。
以下的介绍是用WebGateway 2020.1版本安装的过程。
-
解压缩安装包到一个临时文件夹 [root@centos7 ~]# tar -xzf WebGateway-2020.1.0.197.0-lnxrhx64.tar.gz
-
使用touch命令在/etc/httpd/conf.d目录下创建空配置文件isc.conf
Apaceh启动时会调用主配置文件/etc/httpd/conf/httpd.conf。 该文件的默认配置项中会自动include目录/etc/httpd/conf.d下的*.conf文件, 因此不同的应用创建不同的conf文件放在conf.d目录下是方便管理的通常做法。 这个.conf的文件名可以任意名字,isc.conf只是示意。(下一步安装Web Gateway时需要输入此名字)。
[root@centos7 httpd]# touch /etc/httpd/conf.d/isc.conf
同理手动 在 /opt/webgateway/bin 下面建立CSP.ini文件,并且赋予读写权限
-
到解压后的安装包目录下的install子目录, 执行以下命令:
[root@centos7 ~]# cd WebGateway-2020.1.0.197.0-lnxrhx64/ [root@centos7 WebGateway-2020.1.0.197.0-lnxrhx64]# ls install lnxrhx64 [root@centos7 WebGateway-2020.1.0.197.0-lnxrhx64]# cd install/ [root@centos7 install]# ./GatewayInstall Starting Web Gateway installation procedure.
Please select WebServer type. Choose "None" if you want to configure your WebServer manually.
- Apache
- None WebServer type? [2] 1
Please enter location of Apache configuration file [/etc/httpd/conf/httpd.conf]: /etc/httpd/conf.d/isc.conf
Enter user name used by Apache server to run its worker processes
: Please enter location of Apache executable file : Apache version 2.4 is detected.
Please enter destination directory for Web Gateway files [/opt/webgateway]:
Do you want to create directory /opt/webgateway [Y]:
Please enter hostname of your InterSystems IRIS server [localhost]: HCDEMO
Please enter superserver port number for your InterSystems IRIS server [51773]:
Please enter InterSystems IRIS configuration name [IRIS]: HCDEMO (注 这里的 configuration name 其实是csp.ini 中服务器的配置代称,可以任意起,不一定必填为服务器本身的hostname)
Please enter directory for static CSP content [/opt/webgateway/hcdemo]:
Do you want to create directory /opt/webgateway/hcdemo [Y]:
Installing InterSystems IRIS Web Gateway for Apache:
Apache configuration file: /etc/httpd/conf.d/isc.conf InterSystems IRIS configuration name: HCDEMO InterSystems IRIS server address: HCDEMO InterSystems IRIS server port number: 51773 Web Gateway installation directory: /opt/webgateway
Do you want to continue and perform the installation [Y]:
Updating Apache configuration file ...
- /etc/httpd/conf.d/isc.conf

* You need to restart your Apache server before any
  configuration changes will take effect.
Web Gateway configuration completed! [root@centos7 install]#
安装结束后
- 检查安装目录被生成,并包含CSPGateway文件
- 检查isc.conf文件,确认文件已经被写入配置信息。
- 登录CSP Gateway管理页面查看: http://WebServer:80/csp/bin/Systems/Module.cxw
如果不是在Apache服务器访问而是远程登录该页面,此时会出现错误提示,显示CSP Gateway的版本信息和“You are not authorized to use this facility”的提醒。这是CSP Gateway的安全策略。默认不允许远程的访问,对于需要远程访问的源IP地址或者源网段,用户必须手工在CSP.ini配置文件的[SYSTEM]块里添加,比如添加 ”System_Manager=172.16.58.100",或者"System_Manger=172.16.."。虽然不推荐,但"System_Manager=...”允许任意地址远程访问的远程访问。如果CSP.ini没有自动生成,那需要手动 在 /opt/webgateway/bin 下面建立此文件,并且赋予读写权限。 下面是添加System_Manager后的CSP.ini例子:
[root@centos7 bin]# cat /opt/webgateway/bin/CSP.ini
[SYSTEM_INDEX]
HCDEMO=Enabled
LOCAL=Enabled

[HCDEMO]
Ip_Address=HCDEMO
TCP_Port=51773
Minimum_Server_Connections=3
Maximum_Session_Connections=6

[APP_PATH_INDEX]
/=Enabled
/csp=Enabled
/hcdemo=Enabled

[APP_PATH:/]
Default_Server=HCDEMO
Alternative_Server_0=1~~~~~~HCDEMO

[APP_PATH:/csp]
Default_Server=HCDEMO
Alternative_Server_0=1~~~~~~HCDEMO

[APP_PATH:/hcdemo]
Default_Server=HCDEMO
Alternative_Server_0=1~~~~~~HCDEMO

[SYSTEM]
SM_Timeout=28800
Server_Response_Timeout=60
No_Activity_Timeout=86400
Queued_Request_Timeout=60
Configuration_Initialized=Tue Nov 17 07:58:29 2020
Configuration_Initialized_Build=2001.1740
System_Manager=*.*.*.*

[LOCAL]
Ip_Address=127.0.0.1
TCP_Port=1972
Minimum_Server_Connections=3
Maximum_Session_Connections=6
[root@centos7 bin]#
登录Web Gateway管理页面的抓图
检查Web Gateway的配置文件位置,版本,log位置
配置CSP Gateway到IRIS的连接,并测试从Apache登录IRIS维护界面
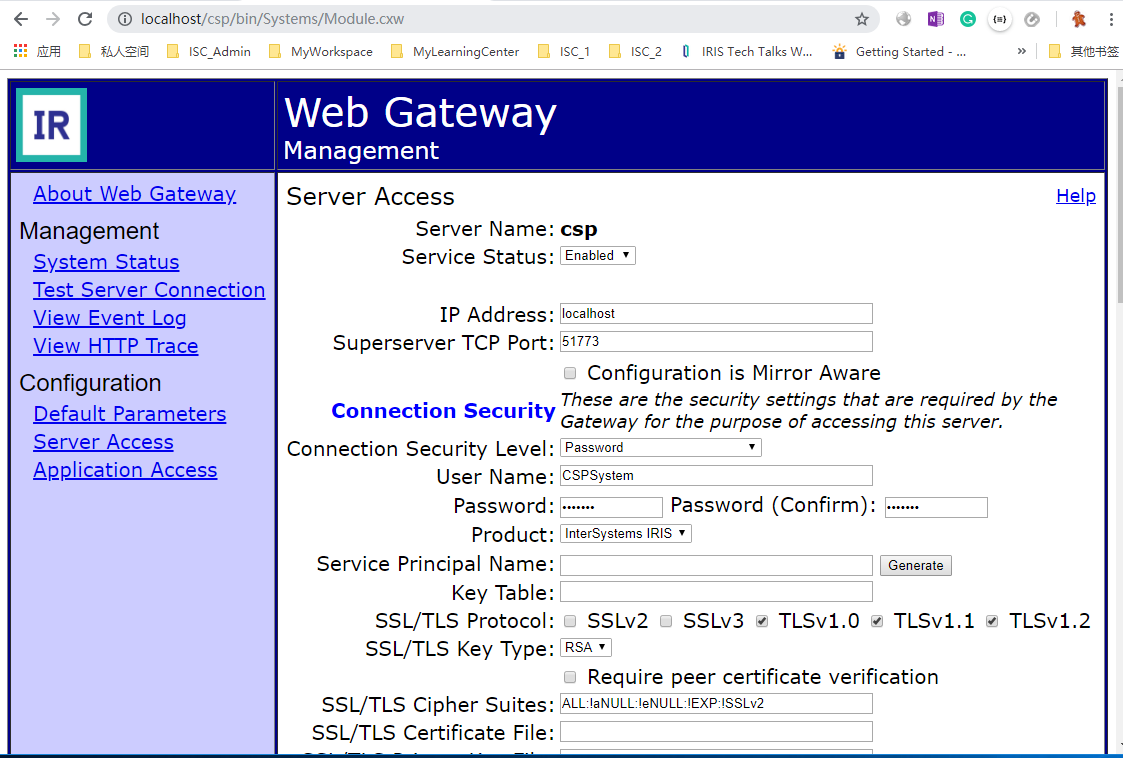
在CSP Gateway配置页面,查看Server Access。
Server Access中会列出这本CSP Gateway连接的IRIS实例的列表。在上面的安装步骤中,当问到了“ Please enter hostname of your InterSystems IRIS server [localhost]: HCDEMO ”选择了HCDEMO, 这时这个列表中会显示有两个Server, localhost和HCDEMO. (localhost无法被删除,遗憾)
下面检查HCDEMO Server的配置
- 检查服务器地址为127.0.0.1
- 添加到Caché服务器的账号密码,默认为CSPSystem, SYS
如果IIS服务器+Web Gateway和Caché位于两个不同的服务器, 或者需要添加到另一Caché Server的连接, 需要添加Server, 如下图, 需要的配置: Caché服务器的IP,superserver端口号, CSPSystem用于的密码,服务器的类型(可选)
测试Caché Server连接成功
双击左边菜单栏的"Test Server Connection", 确认结果中收到"Server connection test was successful: ...."的结果。
访问IRIS维护主页 (可选)
从链接 http://WebServer/csp/sys/Utilhome.csp 访问IRIS维护主页System Management Portal应该可以成功了,但您会发现有部分网页内容(element)无法加载。这是因为在默认的安装中,isc.conf中CSP Gateway路径的
[root@centos7 conf.d]# cat isc.conf
#### BEGIN-ApacheCSP-SECTION ####
LoadModule csp_module_sa "/opt/webgateway/bin/CSPa24.so"
CSPModulePath "/opt/webgateway/bin/"
CSPConfigPath "/opt/webgateway/bin/"
Alias /csp/ "/opt/webgateway/hcdemo/csp/"

  SetHandler csp-handler-sa


  SetHandler csp-handler-sa


  CSPFileTypes *
  AllowOverride None
  Options MultiViews FollowSymLinks ExecCGI
  Require all granted

    Require all denied


  AllowOverride None
  Options None
  Require all granted

    Require all denied


#### END-ApacheCSP-SECTION ####
#### BEGIN-ApacheCSP-SECTION-HCDEMO ####
Alias /hcdemo/csp/ "/opt/webgateway/hcdemo/csp/"
#### END-ApacheCSP-SECTION-HCDEMO ####
[root@centos7 conf.d]#
注意isc.conf修改后需要重启apache server [root@centos7 conf.d]# systemctl restart httpd [root@centos7 conf.d]#
访问IRIS上的其他Web Application
IRIS上其他的Web Application需要经过配置才可以发送到IRIS Server。这些Web Application可能是一个访问HTTP, REST的URL, 或者是一个用户自己定义的SOAP,甚至可能是一个简单的CSP文件。要确保他们被发送给IRIS Server, 用户需要:
- 配置Apache配置文件isc.conf, 保证请求被发送给了CSP Gateway。 可以通过CSP Gateway管理页面的HTTP Trace来确认。
- 如果需要,配置CSP Gateway, 将请求发送给IRIS.
访问带文件后缀的应用
在isc.conf中的
Alias /csp/ "/opt/webgateway/hcdemo/csp/"

      CSPFileTypes *
      AllowOverride None
      Options MultiViews FollowSymLinks ExecCGI
      Require all granted

        Require all denied
对于其他的Web Application, 比如如果需要将"http://WebServer/test/Hello.csp"成功发送给CSP Gateway, 需要添加以下配置,它把路径为”/test/"的URL发送给CSP Gateway处理。
Alias /test/ "/opt/webgateway/hcdemo/csp/"
测试连接一个SOAP服务,注意这个服务要在IRIS的Web Applicatin里配置正确,它至少可以从PWS用匿名用户访问。(关于Web Application的配置另行文档, 简单说, 要匿名访问, 要使用%Security_WebGateway的资源).测试结果:
[root@centos7 conf.d]# curl http://172.16.58.100/test/test.webservice1.cls?soap_method=winter


  Winter is Coming...

[root@centos7 conf.d]#
访问其他URL应用
对于 “http://172.16.58.100/api/mgmnt/v2/”这样的URL地址, 映射到CSP Gateway处理需要的配置是
      SetHandler csp-handler-sa
      CSP on
请求的结果如下:
[root@centos7 ~]# curl -X GET "http://172.16.58.100/api/mgmnt/v2/" [{"name":"%Api.IAM.v1","webApplications":"/api/iam","dispatchClass":"%Api.IAM.v1.disp","namespace":"%SYS","swaggerSpec":"/api/mgmnt/v2/%25SYS/%25Api.IAM.v1"},{"name":"%Api.Mgmnt.v2","webApplications":"/api/mgmnt","dispatchClass":"%Api.Mgmnt.v2.disp","namespace":"%SYS","swaggerSpec":"/api/mgmnt/v2/%25SYS/%25Api.Mgmnt.v2"},{"name":"PetStore","dispatchClass":"PetStore.disp","namespace":"DEMO","swaggerSpec":"/api/mgmnt/v2/DEMO/PetStore"}][root@centos7 ~]#
备注: 如果得到了{"msg":"错误 #8754: Unable to use namespace: USER."},或者403 forbidden, 需要在IRIS上给Web Application "/api/mgmnt"添加”%DB_USER"的权限;或者,也可以将应用的“安全设置”设成"密码",然后使用下面的命令查看:
[root@centos7 conf.d]# curl -i -X GET http://172.16.58.100/api/mgmnt/v2/ -u "_system:SYS"
HTTP/1.1 200 OK。。。(后面省略)
[{"name":"%Api.IAM.v1","webApplications":"/api/iam","dispatchClass":"%Api.IAM.v1.disp","namespace":"%SYS","swaggerSpec":"/api/mgmnt/v2/%25SYS/%25Api.IAM.v1"},{"name":"%Api.Mgmnt.v2","webApplications":"/api/mgmnt","dispatchClass":"%Api.Mgmnt.v2.disp","namespace":"%SYS","swaggerSpec":"/api/mgmnt/v2/%25SYS/%25Api.Mgmnt.v2"},{"name":"PetStore","dispatchClass":"PetStore.disp","namespace":"DEMO","swaggerSpec":"/api/mgmnt/v2/DEMO/PetStore"}][root@centos7 conf.d]#
CSP Gateway配置 "Application Access"
通常情况下,CSP Gateway测试成功连接IRIS Server后,会发现IRIS上的Web Application列表,并添加到自己的”APPlicaiton Access"列表里。如下图所示。每次用户在IRIS添加一个新的Web应用, 只需要在isc.conf上做相应的配置,无需人工去更新CSP Gateway的配置。
特殊的情况,如果发现某个URL无法发送到IRIS。先打开了CSP Gateway的HTTP Trace,确认CSP Gateway可以收到请求消息但无法发送到IRIS, 这是需要人工检查并且配置"Application Access".