Introduction
The recent addition of FIFO groups allows First-In, First-Out (FIFO) message processing to be maintained in an interoperability production even when a Pool Size is greater than 1, enabling higher performance without sacrificing correctness. This feature first appears in InterSystems IRIS® data platform, InterSystems IRIS® for Health, and InterSystems Health Connect™ in version 2025.3.
First-In, First-Out message processing is critical in many integration scenarios, especially in healthcare. Traditionally, FIFO ordering is enforced by configuring each business host to process only one message at a time (Pool Size = 1). While effective, this approach can limit throughput and underutilize system resources. FIFO groups preserve FIFO ordering where needed without requiring a Pool Size of 1.
FIFO Groups: The Key to Parallelism with FIFO Ordering
FIFO groups provide a way to preserve ordering within a defined group of related messages, while still allowing parallel processing across unrelated groups.
Instead of enforcing FIFO globally, FIFO groups allow you to:
- Maintain FIFO ordering for messages that depend on each other.
- Process independent message streams concurrently.
How FIFO Groups Work
- Determine a FIFO Group Identifier Identify a value in the message that defines dependency such as patient MRN (Medical Record Number). Choosing an appropriate FIFO group identifier is crucial. In healthcare a common example is using a patient ID, but any business-specific identifier can be used.
- Assign Messages to FIFO Groups Use a Data Transformation or custom code to assign each message a FIFO group identifier based on the value in the message. Messages with the same identifier are guaranteed to be processed in FIFO order.
- Enable Parallel Processing Across Groups Messages belonging to different FIFO groups can be processed at the same time. The Pool Size determines how many FIFO groups can be processed concurrently.
- Control When FIFO Constraints End Completion hosts can be defined to release FIFO constraints once ordering is no longer required downstream.
When to Use FIFO Groups
Consider FIFO groups when:
- Pool Size = 1 does not meet performance requirements.
- FIFO ordering is required for subsets of messages, not globally.
- CPU utilization is below 80% capacity and parallelism would improve throughput.
- Message dependencies can be clearly identified (such as by Patient ID, Account Number, or Order ID).
Example: FIFO Group Identifier is Patient ID and Pool Size = 2
Consider a healthcare message scenario with Pool Size = 2:
- Patient 55, Patient 66 and Patient 77 each have a Pre-admit, Admit and Discharge message sent into the production in that order.
- Pre-admit, Admit and Discharge messages for Patient 55, Patient 66 and Patient 77 must each be processed in order for that patient.
- Messages for Patient 55, Patient 66 and Patient 77 are independent.
With FIFO groups:
- All messages for each patient are processed sequentially.
- One message for any patient can be processed in parallel with any other patient’s message.
- For example, the Pre-admits for both Patient 55 and Patient 66 can be processed at the same time.
- No patient’s message sequence is violated, even though two messages are being processed at the same time.
This approach provides correctness and performance.
For details about processing these messages for Patient 55, Patient 66 and Patient 77, refer to the A Closer Look at How FIFO Groups are Processed section at the end.
Configuring FIFO Group with Pool Size > 1 Example
Production description: Production accepts the data, transforms the data as needed for the downstream system, and sends data to the downstream system. Messages for each patient must be processed in the order received (FIFO).

Step 1: Identify the FIFO Group Identifier
- Determine what defines message ordering. This value becomes the FIFO group identifier, for example, Patient ID, Account Number, or Order ID.
This example: MRN for the FIFO Group Identifier.
Step 2: Choose the Starting Host
- Identify where FIFO grouping should begin:
- Often a business process or routing engine.
- This is the first business host where messages must be ordered.
This example: Example.MessageRouter

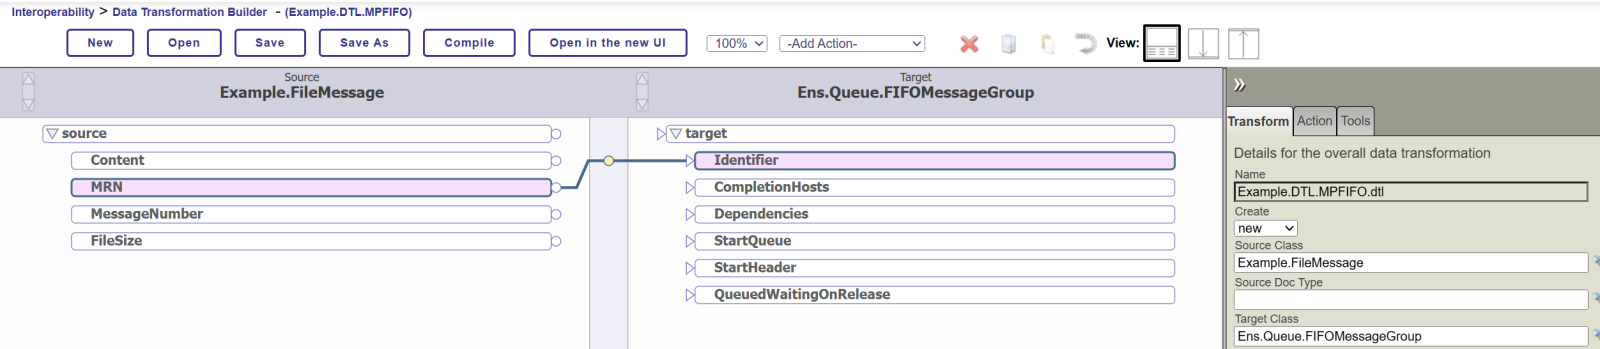
Step 3: Create a Data Transformation to compute the FIFO Group Calculation
- Create a Data Transformation with:
- Source: the request message type
- Target: Ens.Queue.FIFOMessageGroup.Data
- Create=new for the target message
- Set the following required property:
- Identifier A string derived from the message (for example, Patient ID).
- Set any necessary optional properties. Refer to Defining FIFO Groups documentation for details regarding using these properties:
- Dependencies (optional) Other FIFO groups that must complete first.
- CompletionHosts (optional) Hosts responsible for releasing FIFO constraints.
Step 4: Configure the Starting Host
- On the starting business host:
- Set Group Calculation to the Data Transformation name.
- This activates FIFO grouping for incoming messages.
This example:

Step 5: Set Pool Size > 1
- Set Pool Size > 1 on the starting host.
- Pool Size determines how many FIFO groups can process concurrently.
- For example, Pool Size = 2 allows up to two FIFO groups to be active at once. This determines how many independent messages can be processed at one time.
This example:

Conclusion
By using FIFO groups, productions can safely increase Pool Size beyond 1, allowing parallel processing where possible while preserving strict ordering where necessary. This design is especially valuable in high-volume integrations, where both correctness and scalability are essential.
A Closer Look at How FIFO Groups are Processed
This section reviews how the processing with FIFO groups works, step by step.
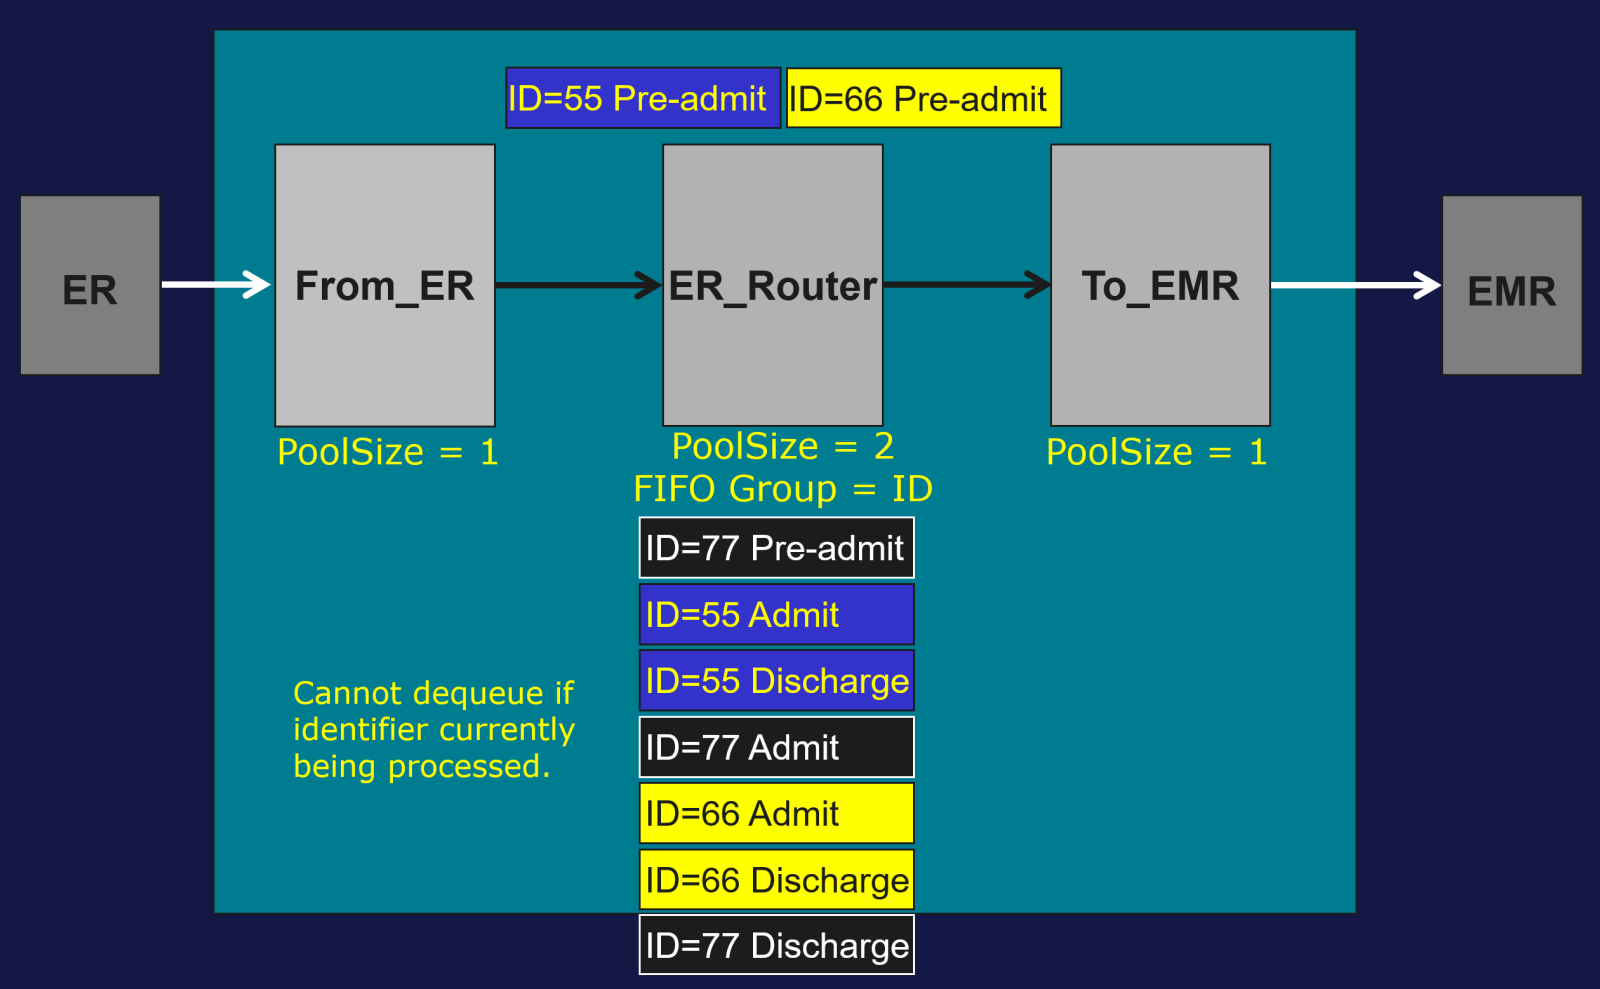
In the diagram below, the current message queue for ER_Router contains the messages in the order they were received from the business service. If ER_Router processes these messages in this exact order, that would preserve FIFO for all messages. However, with FIFO groups in place, ER_Router will not follow this exact order but will still preserve FIFO processing for related messages that require it. The following example illustrates how this works, one step at a time.
Below is an example of simultaneously processing messages for Patient 55, Patient 66 and Patient 77 while maintaining FIFO for each patient. Using Pool Size =2, two messages can be processed at the same time.
START
- Currently processing two messages: Pre-admit for Patient 55 and Pre-admit for Patient 66.
NEXT
- Pre-admit for Patient 66 completes and Pre-admit for Patient 55 is still being processed.

- Find next message to process:
- Dequeue Pre-admit for Patient 77 from the top of the queue. Valid to dequeue since no message is currently being processed for Patient 77.

NEXT
- Pre-admit for Patient 77 completes and Pre-admit for Patient 55 is still being processed.

- Find next message to process:
- Cannot dequeue Admit or Discharge for Patient 55 from the top of the queue since a message for Patient 55 is still being processed.
- This is the key to maintaining FIFO: a message cannot be dequeued if another message with the same FIFO group identifier is currently being processed.
- Can dequeue Admit for Patient 77 since no message for Patient 77 is being processed.
- Cannot dequeue Admit or Discharge for Patient 55 from the top of the queue since a message for Patient 55 is still being processed.

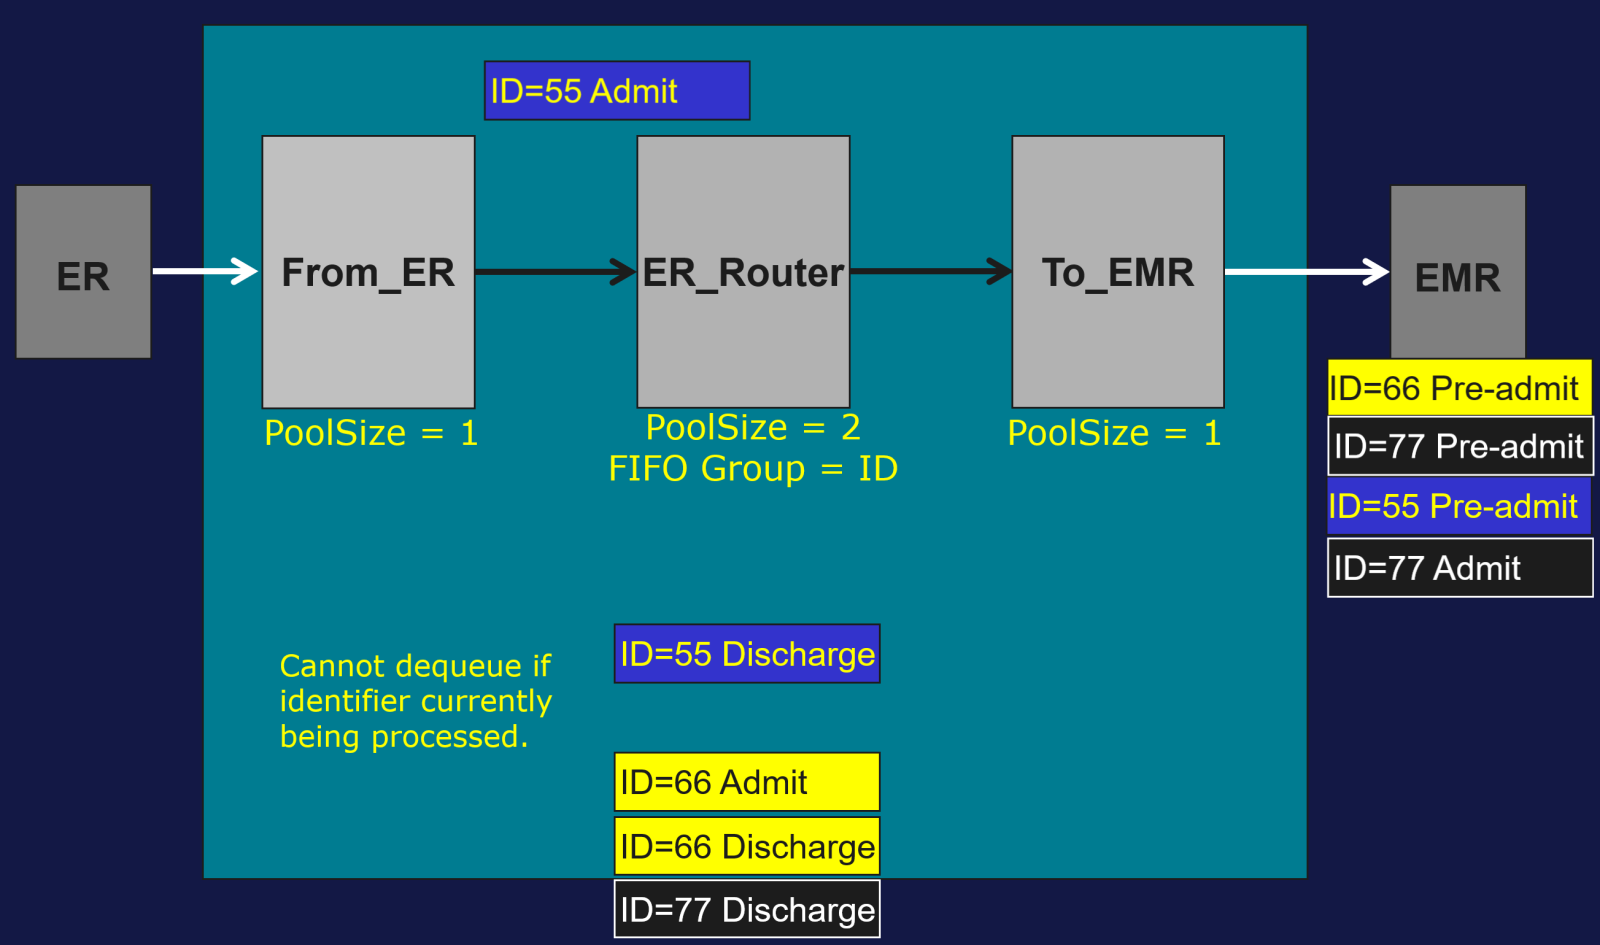
NEXT
- Pre-admit for Patient 55 completes and Admit for Patient 77 is still being processed.

- Find next message to process:
- Can dequeue Admit for Patient 55 from top of the queue since no message for Patient 55 is being processed.

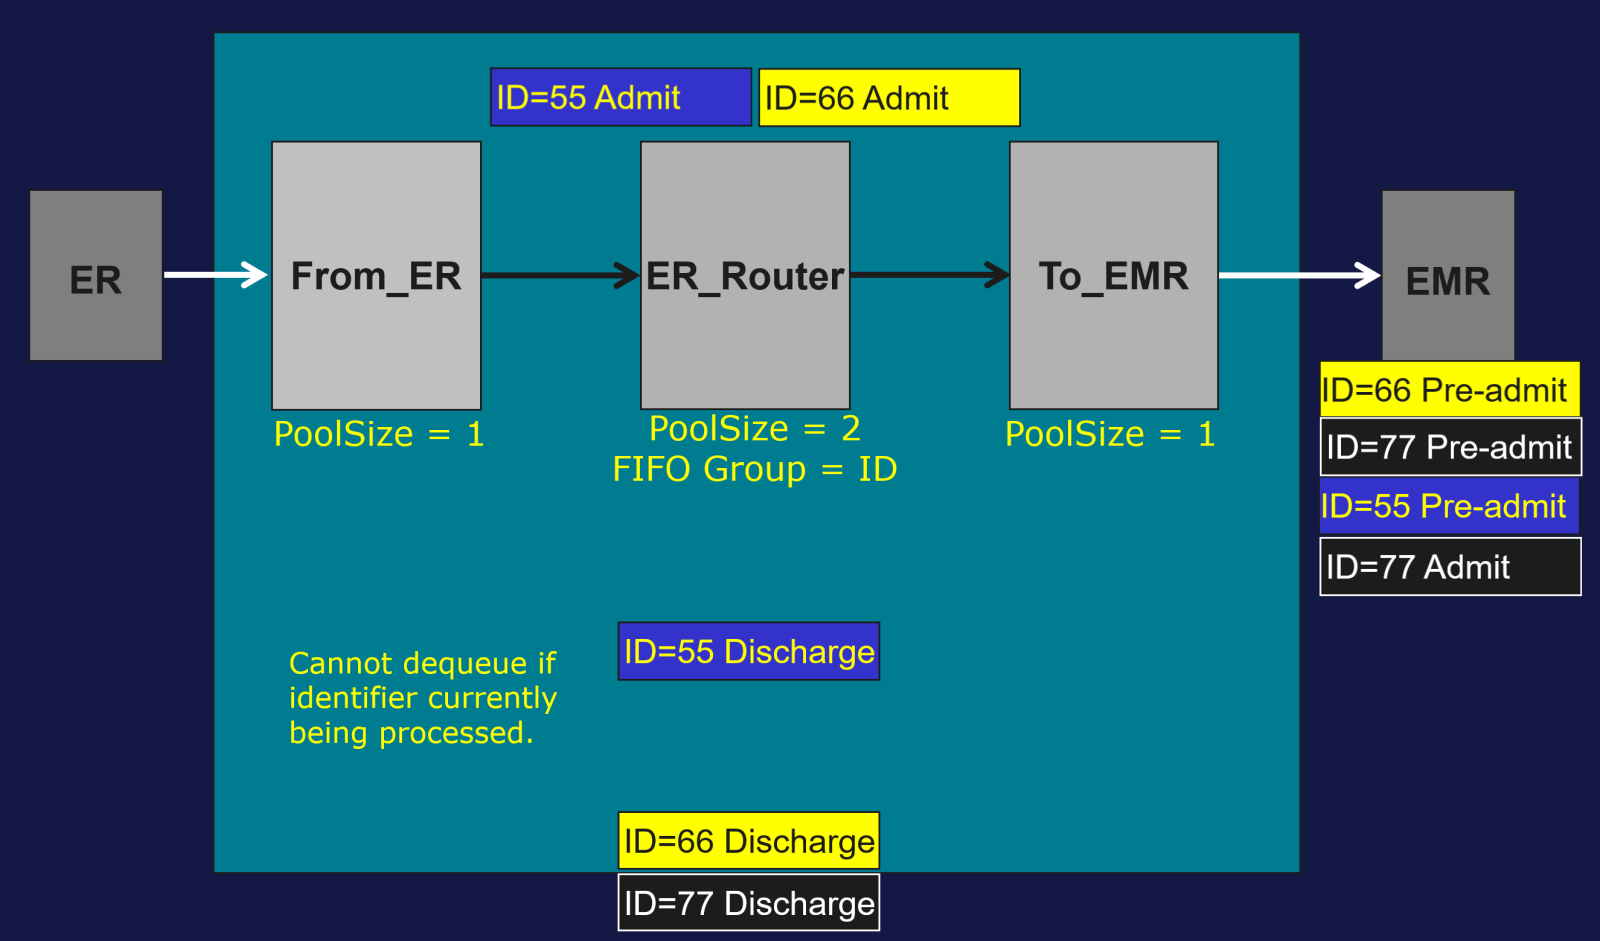
NEXT
- Admit for Patient 77 completes and Admit for Patient 55 is still being processed.
- Find next message to process:
- Cannot dequeue Discharge for Patient 55 from top of the queue since a message for Patient 55 is still being processed.
- Can dequeue Admit for Patient 66 since no message for Patient 66 is being processed.
 Open Exchange