清除过滤器
公告
Michael Lei · 一月 9, 2022
a {color:#2a2e78;}
嘿,社区。 这里是2021年度开发社区问题摘要。 让我们来看看InterSystems开发人员提出的最受欢迎的问题。
统计
✓ 2021年提出了980 个问题✓ 社区总共提出了5,699 问题
最多浏览问题
WINDOWS ODBC CACHE 驱动 by Fernando Zañartu
2,113
SOAP 错误 CONTENT-TYPE 返回 text/html 而不是 text/xml by Kurro Lopez
741
如何用xmlns 和 xsi:type 属性解析xml by water huang
733
ODBC 驱动 by Brian Bechard
667
VS Code中的意外Token错误 by David Hockenbroch
646
Log4j 脆弱性 by JOSE PALAU
597
如何在SQL查询中获得行编号? by Anderson Negreli
541
httpRequest POST 文件上传by Emanuel Lazar
527
Log4Shell Apache 影响 / Intersystems产品by Andy Stobirski
486
Intersystems Cache Studio 下载 by Joseph Lovato
461
如何在httpResponse对象中设置HTTP Response 状态编码 by Mike Yackanich
441
JSON解析空值null values in by Lucas Macori
398
如何快速简单从老的Dot Scoping转化为新的Parentleses Scoping? by Dominic Chui
397
从Caché 数据库到 IRIS数据库的转化. by Сергей Марушко
383
JSON Web Token令牌 授权与不记名令牌Tokensby Neil Thaiss
371
在另一个命名空间中调用类的方法 by Nigel Salm
371
超出License 限制? by yeung elijah
364
锁 /解锁 by Matjaz Murko
352
JWT/OAuth2.0 by M C
344
转化 ISO-8859-1 输入文件 by Michoel Reach
332
显示所有英文社区问题 »
显示所有中文社区问题 »
讨论最多的
Debugging功能不见了 by Anna Golitsyna
24
在 %SYS 命名空间外获得用户属性 by Evgenii Ermolaev
22
从 VS studio终端运行Python脚本 by Akshay Pandey
20
VS Code中的意外Token错误 by David Hockenbroch
20
JSON对象上的SQL 搜索索引. by Güvenal
20
锁 /解锁 by Matjaz Murko
19
IRIS - 原生 API 和 .NET Provider - 回归到 Cache .net Provider ?by Emanuel Lazar
18
&sql(.....) 不工作且返回SQLCODE -400 by prashanth ponugoti
18
修改 %Stream 内容 by Marlin Mixon
17
收到错误 #9406 by Rick Prichett
16
在VSCode转化 ObjectScript格式 by Julian Matthews
16
从Caché 数据库到 IRIS数据库的转化. by Сергей Марушко
15
Ensemble用SQL批量插入 by Jimmy Christian
14
#5003 没有实施by Gary Koester
14
动态 SQL 参数化 UPDATE vs INSERT的问题 by Jonathan Anglin
14
如何区分命名空间 Globals 和 Routines 数据库 ? by Muhammad Waseem
14
如何测试从虚拟文档到FLR的转化 by Werner Beukes
14
第一个REST 操作 - 定制Header by Scott Roth
14
vscode 新 routines 没有显示 by Paul Price
14
显示 %GlobalCharacterStream by Rochdi Badis
13
显示所有英文社区问题 »
显示所有中文社区问题 »
文章
Hao Ma · 十一月 14, 2022
# ZPM介绍
有Developer听闻了InterSystems的包管理器ZPM, 希望我能介绍一下。正好刚刚看到一个开发者论坛的新闻:[ Open Exchange ZPM is now InterSystems Package Manager ](https://community.intersystems.com/post/zpm-now-intersystems-package-manager-ipm), 觉得更有必要了。
## zpm是什么
简单说:zpm, 全称InterSystems ObjectScript Package Manager, 是一个包管理器, 开发者是Nikolay Soloviev和Dmitry Maslennikov。它先是在开发者社区里得到认可,以至于InterSystems开发者社区最近的一些比赛,要求参赛作品用zpm打包。然后就有了上面的链接的内容:InterSystems决定把它做为自己官方的打包工具, 将它改名字叫IPM(InterSystems Package Manager),同时保持它的开源状况不变。
这里我还是用zpm称呼它。两个原因。1. 操作的命令还是zpm, 所谓ipm,只是官方给的名字。2. ipm新的注册中心还不太了解,而且**到目前为止,IPM的注册中心还只对自己的雇员和付费用户开放**。本文的读者应该都还没来得及付费,所以暂时先放放,还是叫它zpm。
考虑到没有程序员背景的读者而对包管理器不熟悉,啰嗦两句。
### 什么是包管理器
大多数开发工具都有自己的包管理器,Java开发使用MAVEN, Python用PIP, NodeJS使用npm, 它们细节有区别,功能大致是一致的,就是安装管理程序包,最基本的工作是:
1. 找到自己要的程序包。 简单的命令能让你在网上找到它,用名字找,或者其他方法搜索。
2. 安装包。
- 这里面最重要的是发现包之间的依赖。比如你要装一个软件包叫“包饺子”,作者在开发的时候使用了另一个软件叫“和面”,这个“和面”可能是作者自己写的,或者是网上其他人写的,注册在包管理器的。这时候作者在”包饺子“里声明,我依赖”和面“。 那么,当您去下载安装"包饺子“的时候,包管理器会自动的把”和面“也给你下载并安装上。
3. 管理包: 比如升级,删除等等。
### ZPM的特点
没有zpm的时候,人们是怎么传递ObjectScript代码的? 大概是这样:发布者把代码从studio导出成一个XML;接受者拿到这个xml, 然后使用Studio或者iris管理门户把它导入到一个命名空间。
这里面有两个问题:1. 麻烦, 2. 没有打包各种类型文件的能力。通常一个项目,除非是只使用ObjectScript, 多数都用到各种文件:前端的css, html, javascript, 图片; 各种配置文件xml或者yaml, 其他语言的包 (iris支持嵌入式python,以及集成多种编程语言工作)等等。
ZPM是怎么工作的?
1. 作者把自己的数据放在一个公网地址上,比如github; 使用zpm生成一个配置文件(module.xml); 把module.xml发布到zpm的registry, 让别人能找到你的软件包。
2. 使用者在Registry搜寻并下载这个程序包,zpm命令自动把它导入到IRIS的一个命名空间。
为什么能自动导入到iris ? 这里有个ZPM和其他包管理器的很大的区别: **ZPM命令是在IRIS的terminal里执行的, 而不是操作系统上。**
还有一个特点:**zpm的设计假设大家开发代码使用的IDE是VSCode而不是Studio**,这非常关键。Studio上的开发是在服务端的开发,没有一个类应该存在哪个文件目录的概念。VSCode相反,你创建一个类:`Demo.Web.Test`, 那么默认的文件保存是在一个这样的目录下: `./src/Dome/Web/Test.cls`
不遵循这样的目录结构,您要额外做很多手工的调整才能使用zpm保存加载程序包。
这里还有很多问题, 我们后面详细说。
## ZPM的下载安装
您可以从github上的InterSystems-Community用户的[zpm Repo](https://github.com/intersystems-community/zpm/wiki/01.-Getting-started)下载zpm-xxx.xml文件, 其中xxx是版本号, 当前(2022年10月)最新的版本是0.4.0。 把下载的xml文件导入到IRIS的**任何**命名空间。这样安装就成功了。
要下载安装软件的时候,您要先进入安装目标的命名空间(比如下面的USER),然后输入zpm, 也就进入了ZPM的操作界面: *ZPM Shell*
```sh
USER>zpm
=============================================================================
|| Welcome to the Package Manager Shell (ZPM). ||
|| Enter q/quit to exit the shell. Enter ?/help to view available commands ||
=============================================================================
zpm:USER>
```
输入help, 您可以看到帮助文件。(帮助文件很长, 我只贴一小段。)
```sh
zpm:USER>help -v
Available commands:
NOTE: [] around a parameter indicates it is optional
arrange [flags] []
■ Description: Rearranges the resources in a module manifest to follow the standard format
# 此处省略许多行
........
For more detail, run:
help
or
help -v
zpm:USER>
```
接着, 我相信您一定想看看安装命令是怎么执行的,比如这样:
```sh
zpm:USER>help install
install [flags] []
...此处省略若干行...
■ Examples
∙ install HS.JSON 1.x
Installs the most recent 1.x version of HS.JSON available in any configured repository in the current namespace.
zpm:USER>quit
USER>
```
好吧,让我们来下载一个最受欢迎的开发者应用“webTerminal”,了解最基本的zpm操作。
## 最基本的ZPM操作
### 搜索package
输入`zpm:USER>search`或者, 您可以使用`zpm:USER>search -r`,“-r"显示数据包所在的repo的位置。我没有贴在这里是因为显示的内容太宽了。在我的帖子的代码框里显示看上去有点乱。
```sh
zpm:USER>zpm:USER>search
registry https://pm.community.intersystems.com:
alwo-goselector 1.0.1
analytics-okr 1.0.0
...此处省略许多行...
zpm-shields 1.0.1
zpmhub 0.3.1
zpmshow 1.0.3
zpm:USER>
```
除了search, 还有个find命令。 它可以使用*,但无法忽略大小写。
```sh
zpm:USER>find *Webt*
registry https://pm.community.intersystems.com:
zpm:USER>find *webt*
registry https://pm.community.intersystems.com:
webterminal 4.9.6
zpm:USER>
```
### 安装package
```sh
zpm:USER>install webterminal
...(省略若干行)...
WebTerminal package successfully mapped into all namespaces.
[USER|webterminal] Compile SUCCESS
[USER|webterminal] Activate START
[USER|webterminal] Configure START
[USER|webterminal] Configure SUCCESS
[USER|webterminal] Activate SUCCESS
zpm:USER>
```
**到这里, 我来再次总结一下ZPM的最基本的功能:原本您想要使用一个其他开发者使用的程序,您要把它从某处,比如一个帖子,InterSystems的OpenExchange网站,或者一个github的主页上下载程序(XML文件),然后导入到IRIS执行。有了ZPM, 你可以在IRIS的terminal里通过ZPM命令,直接获得这个程序并执行。前提是:作者的程序是用ZPM打包并放在ZPM注册中心。**
来先了解一下ZMP的注册中心
## 注册中心(Registry)
默认安装下, zpm的注册中心是这样的
```sh
zpm:USER>repo -list
registry
Source: https://pm.community.intersystems.com
Enabled? Yes
Available? Yes
Use for Snapshots? Yes
Use for Prereleases? Yes
Is Read-Only? No
Deployment Enabled? No
zpm:USER>
```
这也是当前zpm唯一的一个注册中心(配置私服会在后面介绍), 组册的软件包是最近一些年社区开发者写的各种工具和示例代码。说一下它的当前状况:
- 当前能下载到278个软件包。
- 所有的包都放在了github。
- 包都很新。 这么说吧,release能到2.0的都是凤毛麟角
这里有个让人意外的事。我安装完webterminal并开始使用的时候,浏览器跳出这个提示。 “Welcome to WebTerminal! ...New update is available. ”。这说明这个registry并没有给出最新的webterminal版本。 我有点好奇,去看了一下webterminal的github page, 发现WebTerminal当前的版本是4.9.5。而zpm registry上下载的版本是4.9.2, 发行于2019年。
webterminal是一个前台工具,作者理所当然的的在代码里做了版本更新的检查并提醒了用户。而对于纯后台的ObjectScript语言的代码, 我估计大多数程序员都做不到这一点。 那么如果要保证其他人看到的是新版的软件, 就要求软件的作者,除了更新自己Github上的代码,还要把新版本及时更新在zpm的注册中心上。
文章太长了, 先贴一部分,后面会介绍
- 软件的发布
- 定义软件包的依赖
- 配置私服
*to be continued*
期待
文章
Qiao Peng · 十二月 2, 2022
1.数据的价值
数据的核心价值是帮助我们决策。
我们无时无刻不在决策,大到战略决策——为一家新医院选址,还有战术决策——鉴别产品的目标市场或抵押贷款审批,更频繁的是操作决策——决定患者的手术方案或患者药物的调整。
这些决策要求不同的决策速度,传统的数据中心已经能较好地帮助我们做战略决策、战术决策,甚至一些操作决策。但新的业务需求要求我们的决策速度越来越快,甚至借助机器学习自动为我们做出即时的决策,例如批准还是拒绝一笔信用卡交易或基于算法自动交易。
无论是人工决策还是基于机器学习的自动决策,决策的依据是数据。数据的速度和质量决定了决策的速度和质量。要支持决策,需要数据具有如下特征:
(1)完整 :关联且具有完整上下文;
(2)干净 :数据质量没有问题;
(3)及时 :在决策点上没有延迟。
传统数据中心很难在及时性上满足要求。
2.数据挑战
数字化浪潮下,我们面临更大的数据挑战:
数据规模:数据量已经完全超出了人工处理能力。
数据源多样性:数据源不再仅是数据库,流式引擎的消息、物联网、对象存储......它们还带来了越来越多模型种类的数据。
更多的数据孤岛:更多的系统和应用被建设,进一步增加了数据孤岛现象。
跨部门的数据不一致:统计口径和统计时间的差异,造成财务部门统计的数据,总是和业务部门统计的数据对不上。
数据服务对象变化:现在业务分析师、运营数据消费者、数据工程师、数据科学家和普通人群都是服务对象。
部署需求的多样性:传统本地部署、云部署、混合部署......
而由于技术、法律、经济性等原因,传统的数据集中保存无以为继......
数据库、数据仓库、数据湖,这些传统的数据管理技术应对这些需求和挑战,越来越力不从心。数据库能保持数据的热度(良好的数据存取速度),但支持的模型类型和数据来源有限;数据仓库要统一数据质量与格式(Schema on Write),缺乏灵活性;数据湖可以“以原始形态保存一切数据” (Schema on Read),但各种数据进入这样一个湖,全都变成了无法直接分析利用的冷数据!
应对之道 – 数据编织和智能数据编织
数据编织是正在兴起的数据管理技术以应对数据挑战,Gartner将其定为2022年12大战略技术趋势之首。
那什么是数据编织?
Gartner将数据编织定义为一种设计概念,可作为数据和连接流程的集成层(结构)。通过对现有、可发现和可推理的元数据资产进行持续分析,数据编织能够在所有环境(包括混合云和多云平台)中设计、部署和利用可重复使用的集成数据。
智能数据编织(Smart Data Fabric)则更进一步,在结构中直接嵌入各种分析能力,包括数据探索、商业智能、自然语言处理和机器学习,使企业可以更快、更容易地获得全新洞察,为智能预测和规范性服务及应用提供动力。
Gartner的这个名词解释还是有些抽象,如何理解它?为何数据编织/智能数据编织是解决上述挑战的利器? 如何利用现有的产品真实实现智能数据编织的落地?
InterSystems提供的智能数据编织解决方案
今天,智能数据编织(Smart Data Fabric)正被用于许多行业的实际生产中,为各种企业级、关键任务创新提供动力,包括场景规划和决策支持、法规遵从、实时可见性和警报等,作为全球领先的数据技术提供商,为应对当前数据挑战,特别通过InterSystems IRIS新一代数据平台提供智能数据编织解决方案,整合了许多关键特性和能力,以满足客户实施智能数据编织进行数字化转型的需求,该方案在解决数据挑战的同时,允许现有的遗留应用和数据保持原位,最大限度地利用以前的技术投资,包括现有的数据湖和数据仓库,而不需要“撕裂和替换”任何现有技术。
InterSystems IRIS数据编织解决方案把智能数据编织分为3个阶段:
数据互联互通阶段:有能力实时、双向打通各种数据源,将数据源有机编织在一起。
数据集成阶段:对数据本身进行编织,为多模型数据提供高性能存取和转换、加入数据安全控制、建立数据谱系、抽象为干净和统一的语义层供数据用户使用。
智能利用阶段:对建立了统一语义的数据提供紧贴数据的智能利用能力,例如商业智能分析、自然语言分析、机器学习,并使这些智能增强数据编织本身。
InterSystems IRIS数据平台在单一技术栈内提供智能数据编织的这些能力:互联互通、数据集成、自助服务、智能分析和多云 。
传统数据利用的是多级瀑布模式:数据从数据库到数据湖,再到数据中心,数据大批量、高延时地在异构数据平台间移动和拷贝。这是影响数据时效性、一致性的主要原因。所以InterSystems智能数据编织第一就要解决这个问题,而解决之道就是互联互通和数据集成。
1.互联互通
因为数据源和数据模型的多样性,传统的ETL在能力和时效性上都已不能满足需求,需要更完整的互联互通能力。长期以来,InterSystems是互操作技术的领导者,它提供各种适配器实时接入各种数据源,例如流式处理引擎Kafka,并对遗留系统进行现代化,即便有很多遗留系统作为数据源,依然可以通过它将其数据模型多态化和数据服务现代化。
2.数据集成
数据集成(Integration)不追求将数据放在一起,而是要建立数据间的准确关联,建立具有连续上下文的全息数据,甚至丰富数据。InterSystems提供:
(1)多模型
面对多元数据,Gartner表示,要想成功利用数据编织,企业必须确保数据编织能够动态地(通过元数据驱动设计)支持不同数据交付风格的组合,以支持特定的用例。
InterSystems的多模型数据建模和保存能力,让不同的数据以最适合的模型进行操作,它支持原生的对象、表、键值对和JSON文档。
(2)多语言
如何操作多模型的数据?每个数据用户都有熟悉或适合其用途的语言来使用数据,例如很多场景下,SQL是最简单的使用数据的语言。InterSystems让用户可以用SQL操作一切数据,哪怕它是以键值对建模和保存的。
(3)数据转换
不同的数据用户希望得到不同结构的数据。InterSystems提供图形化的高效数据转换工具,为用户构建干净的、单一可信的数据。
3.自助服务
如何发现、探索、推理数据编织平台中的数据?需要借助统一的语义和自助的服务能力。
(1)统一语义
为了数据完整性,无论是数据仓库还是数据湖,都将数据中心化存储。这造成了很多数据障碍:数据的时效性低、数据的质量参差不齐、数据需求严重依赖IT去清洗关联等等。
InterSystems的自适应分析是一个统一的、抽象的语义层,通过建立虚拟/逻辑数据分析立方体,用户可以使用SQL或BI工具访问这个语义层,而自适应分析自动使用SQL访问后台的多InterSystems IRIS数据平台实例获得数据和分析结果,不需要将数据集中保存到一起。
数据无需集中,因此无需ETL,没有数据抽取拷贝的时间成本开销,提供高时效性的数据;而抽象语义层将多数据源的数据建立逻辑关联,向用户提供干净、完整的语义上下文。
(2)行业语义级的数据编织
医疗健康行业面临相较其它行业更复杂的行业数据,在现实业务中要应对不同的语义表达。编织不同语义的数据源,将数据抽象为非标准语义,这会为后面的数据价值利用增加障碍。
FHIR建立统一行业语义的行业数据内容标准、利用标准行业术语和标识符、定义统一的传输标准、并逐步建立隐私和安全标准,让使用行业语义编织数据成为可能。
InterSystems支持所有FHIR的交互范式,提供FHIR服务器和FHIR资源仓库,并通过FHIR SQL构建器,建立基于SQL的FHIR数据访问能力,用最简单的数据操作支持BI/AI。通过FHIR来搭建具有统一行业语义和生态的数据编织平台。
(3)自助服务
长久以来,由于数据源和数据本身的复杂性,专业IT用户把持着数据的使用,商业用户极度依赖于专业用户才能获取、分析和利用数据。
借助统一语义层和对标准的支持,InterSystems让商业用户使用自己熟悉的工具和语言,例如SQL、BI工具和API来探索数据、操作数据和分析数据。
4.智能分析
为数据编织增加智能, InterSystems提供开放的智能分析能力。包括嵌入平台的机器学习、自然语言分析、商业智能特性,对第三方工具和生态的支持,以及对标准的支持——MDX、UIMA、PMML......
InterSystems提供全SQL操作方式的自动化机器学习,并允许使用第三方的自动化机器学习后台,如DataRobot,从而避免学习不同的API,用最简单的SQL就可以获得丰富的机器学习能力:
5.多云
数据编织平台要能支持所有主要的开发和部署环境,使开发人员和运营团队能够在他们选择的环境中工作。并与现有的基础设施和最佳技术无缝集成,支持最广泛的客户环境和应用要求。
公共云、私有云、本地、混合、裸机和虚拟机环境,InterSystems支持所有部署选项,且都只需要一个API,而不需要对你的应用程序进行修改。
6.单一技术栈而不建议不同产品和技术的堆砌与粘合
这一点至关重要。从整个数字化、信息化行业来看,信息部门尤其是最终用户的人员配置是远远不足的,从信息化部/科技部到我们的服务厂商,大部分从业人员工作负载基本都处在一个饱和甚至过饱和的状态,同时,IT从业人员由于薪酬激励的原因,大部分的中高端IT人才集中在少数行业或者少数头部厂商。针对这种情况,在数智底座的技术选择上,应该采取“少就是多”的策略,选择尽可能少的技术和产品种类,或者说一体化的技术架构,用一套技术体系来支持多种业务应用的实现,从而降低管理和学习成本。
另外一个原因,比如传统闭源厂商,很多软件产品都是收购或者是不同团队部门研发的,不同软件之间也需要集成或者胶水(参考文章:统一技术的高效数据架构能帮助客户节约大量成本)成本也是极其昂贵的。如果是选择开源技术栈,除了集成以外,还要考虑更多的比如技术路线的生命周期持久度,比如今天选择的技术会不会很快就过时了,技术支持如何延续?此外开源技术人员的成本普遍高于传统软件,人员流动也比较强,这也是企业选型必须考虑的问题。
总结
InterSystems的智能数据编织解决方案通过对数据源、数据的编织,避免多级瀑布式的大规模、高延迟的数据拷贝。构建抽象的统一语义层,并借助行业标准语义,建立基于标准的数据编织平台,为用户提供简单易用的数据探索和利用能力。利用全面的智能分析能力提升数据质量和数据价值,并降低数据利用的难度。多云的架构确保了对最广泛的客户环境和应用要求的支持,为数智底座的实施部署铺平了道路。
文章
YuHao Wan · 十一月 1, 2022
### 0. 算法概述
SM3密码杂凑算法是中国国家密码管理局2010年公布的中国商用密码杂凑算法标准。该算法于2012年发布为密码行业标准(GM/T 0004-2012),2016年发布为国家密码杂凑算法标准(GB/T 32905-2016)。
SM3适用于商用密码应用中的数字签名和验证,是在[SHA-256]基础上改进实现的一种算法,其安全性和SHA-256相当。SM3和MD5的迭代过程类似,也采用Merkle-Damgard结构。消息分组长度为512位,摘要值长度为256位。
整个算法的执行过程可以概括成四个步骤:**消息填充、消息扩展、迭代压缩、输出结果**。
### 1. 消息填充
SM3的消息扩展步骤是以512位的数据分组作为输入的。因此,我们需要在一开始就把数据长度填充至512位的倍数。具体步骤如下:
1、先填充一个“1”,后面加上k个“0”。其中k是满足(n+1+k) mod 512 = 448的最小正整数。
2、追加64位的数据长度。

### 2. 消息分组扩展
将填充后的消息m′按512比特进行分组:m′ = B(0)B(1)...B(n−1)
其中n=(l+k+65)/512。
SM3的迭代压缩步骤没有直接使用数据分组进行运算,而是使用这个步骤产生的132个消息字。(一个消息字的长度为32位/4个字节/8个16进制数字)概括来说,先将一个512位数据分组划分为16个消息字,并且作为生成的132个消息字的前16个。再用这16个消息字递推生成剩余的116个消息字。

### 3. 迭代压缩
SM3使用消息扩展得到的消息字进行迭代运算。

初值IV被放在A、B、C、D、E、F、G、H八个32位变量中,整个算法中最核心、也最复杂的地方就在于**压缩函数**。压缩函数将这八个变量进行64轮相同的计算。

### 4. 输出结果
将得到的A、B、C、D、E、F、G、H八个变量拼接输出,就是SM3算法的输出。

### 5. 附录


### 6. Caché实现
```
/// SM3密码杂凑算法是中国国家密码管理局2010年公布的中国商用密码杂凑算法标准
/// 该算法于2012年发布为密码行业标准(GM/T 0004-2012),2016年发布为国家密码杂凑算法标准(GB/T 32905-2016)。
/// 对长度为l(l < 2^64)比特的消息m,SM3杂凑算法经过填充和迭代压缩,生成杂凑值,杂凑值长度为256比特。
Class Utility.SM3 Extends %RegisteredObject
{
/// Creator: wyh
/// CreatDate: 2022-11-01
/// Description:SM3加密
/// Input: msg:原文
/// Output: 16进制密文
/// Debug: w ##class(Utility.SM3).Hashsm3("{""appId"":""60C90F3B796B41878B8D9C393E2B6329"",""nonceStr"":""1234567890"",""timestamp"":""60C90F3B796B41878B8D9C393E2B6329"",""version"":""V2.0.0""}F2D8D966CD3D47788449C19D5EF2081B")
ClassMethod Hashsm3(msg)
{
#; 初始值IV =7380166f 4914b2b9 172442d7 da8a0600 a96f30bc 163138aa e38dee4d b0fb0e4e
s V(0) = "01110011100000000001011001101111 01001001000101001011001010111001 00010111001001000100001011010111 11011010100010100000011000000000 10101001011011110011000010111100 00010110001100010011100010101010 11100011100011011110111001001101 10110000111110110000111001001110"
#; 1. 消息填充
s m = ..s2m(msg)
#; 2. 消息分组
#; 将填充后的消息m′按512比特进行分组:m′ = B(0)B(1)...B(n−1)
#; 其中n=(l+k+65)/512。
s n = $l(m)/512
f i = 0 : 1 : n-1 d
.s B(i) = $e(m, 512 * i + 1, 512 * (i + 1))
#; 3. 迭代压缩
#; 对m′按下列方式迭代:
#; FOR i=0 TO n-1
#; V(i+1) = CF(V(i),B(i))
#; ENDFOR
#; 其中CF是压缩函数,V(0)为256比特初始值IV,B(i)为填充后的消息分组,迭代压缩的结果为V(n)。
.s V(i+1) = ..CF(V(i) ,B(i))
#; 4. 杂凑输出
#; ABCDEFGH = V(n)
#; 输出256比特的杂凑值y = ABCDEFGH。
s rtn = ""
f i = 1 : 1 : 8 d
.s bit = $p(V(n), " ", i)
.s num = ..bs2n(bit)
.s hex = $ZHEX(num)
.i $l(hex) < 8 d
..f j = 1 : 1 : 8 - $l(hex) d
...s hex = "0" _ hex
.s rtn = rtn _ hex
s rtn = $zcvt(rtn, "L")
return rtn
}
/// 1. 消息填充
/// 将填充后的消息m′按512比特进行分组:m′ = B(0)B(1)...B(n−1)
/// 其中n=(l+k+65)/512
ClassMethod s2m(msg)
{
s len = $l(msg)
s r = ""
f i = 1 : 1 : len d
.s num = $ascii($e(msg, i))
.s bs = ..n2bs(num)
.s r = r _ bs
s rtn = r
s rtn = rtn _ "1"
s k = 512 - (64 + ($l(r) + 1)) # 512
f i = 1 : 1 : k d
.s rtn = rtn _ "0"
s lenbs = ..n2bs($l(r))
s t = 64 - $l(lenbs)
f i = 1 : 1 : t d
.s rtn = rtn _ "0"
s rtn = rtn _ lenbs
return rtn
}
/// 3. 迭代压缩
/// 令A,B,C,D,E,F,G,H为字寄存器,SS1,SS2,TT1,TT2为中间变量,压缩函数V(i+1) = CF(V(i),B(i)), 0
文章
Michael Lei · 六月 26, 2022
下面的代码允许用户查看其实例的审计设置。通过运行类方法 "test "来运行该代码。:
class objectscript.checkAudit Extends %RegisteredObject
{
classmethod test() {
w "Checking for Auditing...",!
Set SYSOBJ = ##class(Security.System).%OpenId("SYSTEM")
If +SYSOBJ = 0 Set SYSOBJ = ##class(Security.System).%New()
i SYSOBJ.AuditEnabled {
w "Security Auditing is enabled for the following services",!
s rs=##class(%ResultSet).%New("Security.Events:ListAllSystem")
s sc=rs.Execute() If $$$ISERR(sc) Do DisplayError^%apiOBJ(sc) Quit
while rs.%Next() {
d:rs.Data("Enabled")="Yes" rs.%Print()
}
d rs.Close()
s rs=##class(%ResultSet).%New("Security.Events:ListAllUser")
s sc=rs.Execute() If $$$ISERR(sc) Do DisplayError^%apiOBJ(sc) Quit
while rs.%Next() {
d:rs.Data("Enabled")="Yes" rs.%Print()
}
d rs.Close()
}
}
}
这是 GitHub的链接: https://github.com/intersystems-community/code-snippets/blob/master/src/cls/objectscript/checkAudit.cls
问题
li wang · 四月 23, 2022
各位老师,你们好
我在浏览器地址中输入HealtConnect发布的webService地址报 CSP应用程序错误,并记录了此错误,不过该地址还是能正常访问。
我想知道怎么解决这种报错问题,谢谢!
以下图片为HealthConnect的版本,以及具体出现的错误
建议联系我们WRC团队support@intersystems.com 或者电话:4006019890或者对应的客户经理,谢谢! 应该是没开启SOAP测试页能力。搜一下三级等保文章,里面有介绍 https://cn.community.intersystems.com/smartsearch?search=InterSystems+数据平台与三级等保+-+第一篇
文章
姚 鑫 · 五月 2, 2021
# 第一章 简介global
InterSystems IRIS®的核心功能之一是其多维存储引擎。此功能允许应用程序以紧凑、高效的多维稀疏数组存储数据。这些数组称为全局数组。
本章介绍:
- 什么是全局变量(`globals` ),以及可以对其执行的操作。
- 全局变量的逻辑和物理结构,包括在分布式数据库体系结构中使用全局变量。
- 如何使用全局变量在应用程序中存储和检索数据。
- 如何使用全局变量。
# 特点
全局变量提供了一种在持久的多维数组中存储数据的易于使用的方法。
例如,可以使用名为`^Settings`的全局变量将值`“Red”`与键`“Color”`相关联:
```java
SET ^Settings("Color")="Red"
```
可以利用全局变量的多维特性来定义更复杂的结构:
```java
SET ^Settings("Auto1","Properties","Color") = "Red"
SET ^Settings("Auto1","Properties","Model") = "SUV"
SET ^Settings("Auto2","Owner") = "Mo"
SET ^Settings("Auto2","Properties","Color") = "Green"
```
全局变量具有以下功能:
- 简单易用-全局变量和其他编程语言变量一样易于使用。
- 多维-可以使用任意数量的下标指定全局内节点的地址。
例如,在 `^Settings("Auto2","Properties","Color")`中,下标`Color`是全局设置中的第三级节点。
下标可以是整数、数字或字符串值,并且不需要是连续的。
- 稀疏-用于寻址全局节点的下标高度压缩,不需要连续的值。
- 高效-全局变量上的操作(插入、更新、删除、遍历和检索)都经过高度优化,可实现最高性能和并发性。还有用于特殊操作(如批量插入数据)的其他命令。有一组特殊的全局变量是为临时数据结构设计的(例如,用于对记录进行排序)。
- 可靠-InterSystems IRIS数据库提供了许多机制来确保存储在全局数据库中的数据的可靠性,包括逻辑级和物理级日志记录。执行数据库备份操作时,将备份存储在全局数据库中的数据。
- 分布式IRIS提供了多种方法来控制存储在全局数据库中的数据的物理位置。可以定义用于存储全局的物理数据库,或将全局的部分分布到多个数据库中。使用InterSystems IRIS的分布式数据库功能,可以在数据库和应用程序服务器系统网络中共享全局数据。此外,通过镜像技术,存储在一个系统上的全局数据库中的数据可以自动复制到另一个系统上。
- **并发-全局支持多个进程之间的并发访问。在单个节点(数组元素)中设置和检索值始终是原子的:不需要锁定即可保证可靠的并发访问。此外,InterSystems IRIS支持一组强大的锁定操作,可用于为涉及多个节点的更复杂情况提供并发性。使用对象或SQL访问时,会自动处理此并发。**
- **事务性-InterSystems IRIS提供定义事务边界的命令;可以启动、提交或回滚事务。在回滚的情况下,事务内对全局变量所做的所有修改都将被撤消;数据库的内容将恢复到事务前的状态。通过将各种InterSystems IRIS锁定操作与事务结合使用,可以使用全局变量执行传统的`ACID`事务。(`ACID`事务提供原子性、一致性、隔离性和持久性。)。使用对象或SQL访问时,事务会自动处理。**
注意:本文档中描述的全局变量不应与另一种类型的InterSystems IRIS数组变量混淆:进程私有全局变量。进程私有全局变量不是持久的;它们仅在创建它们程序期间持续。进程私有全局变量也不是并发的;它们只能由创建它们的进程访问。进程专用全局可以通过其多字符名称前缀:`^||`或`^|"^"|`轻松地与全局区分开来。
# 例如
一个简单的例子就可以展示全局变量的易用性和性能。下面的程序示例创建一个`10,000`个节点的数组(如果存在,则首先将其删除)并将其存储在数据库中。可以尝试这样做,以了解全局变量的性能:
```java
/// w ##class(PHA.TEST.Global).GlobalSimple()
ClassMethod GlobalSimple()
{
Set start = $ZH // get current time
Kill ^Test.Global
For i = 1:1:10000 {
Set ^Test.Global(i) = i
}
Set elap = $ZH - start // get elapsed time
Write "Time (seconds): ",elap
q ""
}
```
```java
DHC-APP> w ##class(PHA.TEST.Global).GlobalSimple()
Time (seconds): .00307
```
我们还可以看到迭代和读取数组中的值需要多长时间(确保首先运行上面的示例来构建数组):
-读取持久数组-
```java
/// w ##class(PHA.TEST.Global).ReadGlobalSimple()
ClassMethod ReadGlobalSimple()
{
Set start = $ZH // get current time
Set total = 0
Set count = 0
// get key and value for first node
Set i = $Order(^Test.Global(""),1,data)
While (i '= "") {
Set count = count + 1
Set total = total + data
// get key and value for next node
Set i = $Order(^Test.Global(i),1,data)
}
Set elap = $ZH - start // get elapsed time
Write "Nodes: ",count,!
Write "Total: ",total,!
Write "Time (seconds): ",elap,!
q ""
}
```
```java
DHC-APP>w ##class(PHA.TEST.Global).ReadGlobalSimple()
Nodes: 10000
Total: 50005000
Time (seconds): .001879
```
# 在应用程序中使用
在InterSystems IRIS应用程序中,全局变量有多种使用方式,包括:
- 作为对象和SQL引擎共享的底层存储机制。
- 作为用于为对象和SQL数据提供各种索引(包括位图索引)的机制。
- 作为用于执行不适合进程存储器的某些操作的工作空间。例如,当没有预先存在的索引可用于排序数据时,SQL引擎使用临时全局变量对数据进行排序。
- 用于在对象或SQL访问方面难以表达或效率低下的持久性对象或SQL表上执行专用操作。例如,可以定义一个方法(或存储过程或Web方法)来对表中保存的数据执行专门的分析。通过使用方法,这样的操作是完全封装的;调用者只需调用该方法。
- 实现特定于应用程序的自定义存储结构。许多应用程序需要存储难以用关系表示的数据。使用全局变量,可以定义自定义结构,并通过对象方法将其提供给外部客户端。
- 用于InterSystems IRIS系统使用的各种特殊用途的数据结构,例如配置数据、类定义、错误消息和可执行代码。
全局变量不受关系模型的限制。
它们提供了开发针对特定应用程序优化的定制结构的自由。
对于许多应用程序来说,明智地使用全局变量可能是提供性能的秘密武器,而这种性能是关系应用程序开发人员梦寐以求的。
无论应用程序是否直接使用全局变量,了解它们的操作都是有用的。
理解全局及其功能将帮助设计更高效的应用程序,并为确定应用程序的最佳部署配置提供帮助。
公告
Claire Zheng · 三月 7, 2021
亲爱的开发者,
最近我们收到很多类似“如何成为一个活跃(Active)、有贡献值的成员”的问题。
条件很简单!
1. 回答问题
我们有许多未得到回答的问题, 以及 还没有收到有效回答的问题. 非常欢迎您在这些问题上共享您的见解和回答,帮助其他社区成员成长!
2. 撰写文章,发布帖子
撰写您使用InterSystems技术的经验和心得:解决方案、开发心得、解决bug的小技巧、部署等等。
这里是一些 帖子示例 ,这些帖子都对我们的社区建设很有帮助。
除了中文社区外,我们还有英语社区、日语社区、葡语社区等等,我们也欢迎您将这些社区里的文章翻译成中文进行发布!
3. 在Open Exchange提交应用程序
通过Github、Gitlab或任何其他公共存储库,在Open Exchange上共享您的库、解决方案和工具。
如果您对社区有什么问题和建议,欢迎跟帖回复、畅所欲言!我们欢迎大家共同建设社区,使这个社区对中国使用InterSystems技术的开发者们越来越有用!
请新注册的同学们阅读这篇文章,多问问题发帖子/有效评论;
或者多回答问题,中英文都可以:
https://cn.community.intersystems.com/?filter=questions;
https://community.intersystems.com/?filter=questions
文章
姚 鑫 · 三月 5, 2021
# 第四章 标识符
# 标识符
标识符是SQL实体的名称,例如表、视图、列(字段)、模式、表别名、列别名、索引、存储过程、触发器或其他SQL实体。
标识符名称在其上下文中必须是唯一的;
例如,同一模式中的两个表或同一表中的两个字段不能具有相同的名称。
但是,不同模式中的两个表或不同表中的两个字段可以具有相同的名称。
在大多数情况下,相同的标识符名称可以用于不同类型的SQL实体;
例如,一个模式、该模式中的表以及该表中的字段都可以具有相同的名称,而不会产生冲突。
但是,同一个模式中的表和视图不能具有相同的名称。
InterSystems IRIS®数据平台SQL标识符遵循一组命名约定,根据标识符的使用,这可能会受到进一步的限制。
标识符不区分大小写。
标识符可以是简单标识符,也可以是分隔符。
InterSystems SQL默认支持简单标识符和分隔标识符。
# 简单标识符
简单标识符有以下语法:
```
simple-identifier ::= identifier-start { identifier-part }
identifier-start ::= letter | % | _
identifier-part ::= letter | number | _ | @ | # | $
```
## 命名约定
标识符`start`是SQL标识符的第一个字符。
它必须是下列之一:
- 大写或小写字母。
字母定义为通过ObjectScript `$ZNAME`函数验证的任何字符;
默认情况下,这些字母是大写字母A到Z (ASCII 65-90),小写字母a到z (ASCII 97-122),以及带有重音标记的字母(ASCII 192-255,不包括ASCII 215和247)。
InterSystems IRIS可以在SQL标识符中使用任何有效的Unicode(16位)字母字符。
简单的标识符是不区分大小写的(不过,请参见下面的内容)。
按照惯例,它们用首字母大写来表示。
日语区域设置不支持标识符中的重音拉丁字母字符。
日语标识符可能包含(除了日语字符之外)拉丁字母字符A-Z和a-z(65-90和97-122),以及希腊大写字母字符(913-929和931-937)。
- 一个下划线(`_`)。
- 百分号(`%`)。InterSystems IRIS以%字符开头的名称(以`%Z`或`%z`开头的除外)保留为系统元素,不应用作标识符。
标识符部分是SQL标识符的任何后续字符。这些剩余字符可能由零个或多个字符组成:
- 字母(包括Unicode字符)。
- 数字。数字被定义为数字0到9。
- 下划线(`_`)。
- At标志(`@`)。
- 井号(`#`)。
- 美元符号(`$`)。
一些符号字符也用作运算符。**在SQL中,`#`符号用作模运算符。在SQL中,下划线字符可以用来连接两个字符串;提供这种用法是为了与ObjectScript兼容,首选的SQL串联运算符是`||`。** 将符号解释为标识符字符总是优先于将其解释为运算符。任何关于符号字符作为运算符的正确解析的歧义都可以通过在运算符前后添加空格来解决。
简单标识符不能包含空格或非字母数字字符(上面指定的符号字符除外)。系统间SQL导入工具从导入的表名中删除空格。
注意:SQL游标名称不遵循标识符命名约定。
InterSystems SQL包含不能用作简单标识符的保留字。
有关这些保留词的列表,
要测试一个单词是否是保留单词,请使用`$SYSTEM.SQL.IsReservedWord()`方法。
但是,带分隔符的标识符可以与SQL保留字相同。
任何不遵循这些命名约定的标识符都必须在SQL语句中表示为带分隔符的标识符。
## 字母
**默认情况下,InterSystems SQL标识符不区分大小写。
InterSystems SQL通过将标识符转换为所有大写字母后比较它们来实现这一点。**
这对名称的实际使用情况没有影响。
(注意,SQL的其他实现可能会以不同的方式处理标识符的大小写敏感性。
因此,建议避免使用基于案例的标识符。)
**请注意,系统间SQL中的游标名称和密码是区分大小写的。**
## 测试有效标识符
InterSystems IRIS提供了`%SYSTEM.SQL`的`IsValidRegularIdentifier()`方法。它测试字符串是否是有效的标识符。它测试字符用法和保留字。它还执行200个字符的最大长度测试(这是用于避免错误输入的任意长度;这不是标识符验证)。以下对象脚本示例显示了此方法的使用:
```java
/// d ##class(PHA.TEST.SQL).Identifiers()
ClassMethod Identifiers()
{
WRITE !,$SYSTEM.SQL.IsValidRegularIdentifier("Fred")
WRITE !,$SYSTEM.SQL.IsValidRegularIdentifier("%Fred#123")
WRITE !,$SYSTEM.SQL.IsValidRegularIdentifier("%#$@_Fred")
WRITE !,$SYSTEM.SQL.IsValidRegularIdentifier("_1Fred")
WRITE !,$SYSTEM.SQL.IsValidRegularIdentifier("%#$")
WRITE !,$SYSTEM.SQL.IsValidRegularIdentifier("1Fred")
WRITE !,$SYSTEM.SQL.IsValidRegularIdentifier("Fr ed")
WRITE !,$SYSTEM.SQL.IsValidRegularIdentifier("%sqlupper")
}
```
```java
DHC-APP>d ##class(PHA.TEST.SQL).Identifiers()
1
1
1
1
1
0
0
0
```
前三个方法调用返回1,表示有效的标识符。第四个和第五个方法调用也返回1;这些是有效的标识符,尽管它们不能用作表名或字段名。最后三个方法调用返回0,表示标识符无效。其中两个是无效的,因为它们违反了字符规则——在这些情况下是以数字开头或包含空格。最后一次方法调用返回0,因为指定的字符串是保留字。请注意,这些规则测试是最低要求;它们不能证明标识符对所有的SQL使用都有效。
这个方法也可以作为存储过程从ODBC或JDBC调用:`%SYSTEM.SQL_IsValidRegularIdentifier("nnnn")`。
## 名称空间的名字
命名空间名称(也称为数据库名称)遵循标识符命名约定,并对标点字符和最大长度有额外的限制。
命名空间名称可以作为带分隔符的标识符,并且可以与SQL保留字相同。
但是,相同的命名空间名称标点限制适用于简单标识符和分隔标识符。
## 标识符和类实体名称
通过去除非字母数字字符,SQL表名、视图名、字段名、索引名、触发器名和过程名用于生成相应的持久类实体。
生成的类实体和全局变量的名称遵循这些规则。
注意:命名空间名称和SQL模式名称以及相应的包名称不遵循这些规则。
- 仅在包含标点字符方面不同的标识符是有效的。
因为类对象名称不能包含标点字符,InterSystems IRIS通过去掉所有标点字符来生成相应的唯一对象名称。
如果去掉标识符的标点字符会导致非唯一的类对象名称,InterSystems IRIS将最后一个字母数字字符替换为一个递增的字符后缀,从而创建一个唯一的名称。
对于表、视图、字段、触发器和过程类方法名,这是一个以0开头的整数后缀。
例如,`myname`和`my_name`生成`myname`和`mynam0`,添加我的`#name`生成`mynam1`。
如果生成的惟一名称的数量大于10 (`mynam9`),则通过替换以(`mynamA`)开头的大写字母后缀生成额外的名称。
因为表和视图共享相同的名称空间,所以表或视图的后缀计数器都是递增的。
对于索引名,这个后缀是一个大写字母,以`a`开头。例如,`myindex`和`my_index`生成`myindex`和`myindeA`。
如果定义了一个以后缀字符结束的名称(例如`my_name0`或`my_index`), InterSystems IRIS将通过递增到下一个未使用的后缀来处理惟一名称的生成。
- 第一个字符为标点字符,第二个字符为数字的标识符对于表名、视图名或过程名无效。
它们对字段名和索引名有效。
如果SQL字段名或索引名的第一个字符是标点字符(`%`或`_`),第二个字符是数字,InterSystems IRIS将追加小写的`“n”`作为相应属性名的第一个字符。
- 完全由标点字符组成的标识符,或以两个下划线字符(`__name`)开头的标识符,或包含两个井号(`nn##nn`)的标识符作为SQL实体名称通常是无效的,应该在所有上下文中避免使用。
可以将SQL标识符中的特定字符转换为相应对象标识符中的其他字符。
在允许的标识符字符规则不同的环境中,这有助于标识符的使用。
使用 `%SYSTEM.SQL`的`SetDDLIdentifierTranslations()`方法。
要确定当前设置,调用`$SYSTEM.SQL.CurrentSettings()`。
在DDL运行时将SQL标识符转换为对象标识符时,“From”字符串中的字符被转换为“to”字符串中的字符。
### 在类定义中指定SQL名称
定义投射SQL实体的持久化类时,每个SQL实体的名称与其对应的持久化类定义元素的名称相同。
要使SQL表、字段或索引名称不同,可以使用`SqlTableName`、`SqlFieldName`或`SqlName`(对于索引)关键字在类定义中指定SQL名称。
例如:
```
Property LName As %String [SqlFieldName = "Family#Name"];
```
```
Index NameIdx As %String [SqlName = "FullNameIndex"];
```
## 标识符长度注意事项
**SQL标识符的最大长度为128个字符。当InterSystems IRIS将SQL标识符映射到相应的对象实体时,它会创建最多96个字符的相应属性、方法、查询或索引名称。如果前96个字符的两个SQL标识符相同,InterSystems IRIS会将相应对象名称的第96个字符替换为整数(从0开始)以创建唯一名称。**
# 分隔标识符
分隔标识符的语法如下:
```java
delimited-identifier ::= " delimited-identifier-part { delimited-identifier-part } "
delimited-identifier-part ::= non-double-quote-character | double-quote-symbol
double-quote-symbol ::= ""
```
带分隔符的标识符是由分隔符字符括起来的唯一标识符。InterSystems SQL支持双引号(`“`)作为分隔符,分隔符一般用于避免简单标识符的命名限制。
请注意,InterSystems SQL使用单引号字符(`‘`)来分隔文字。因此,必须使用双引号字符(`“`)指定分隔标识符,必须使用单引号字符(`‘`)指定文字。例如,`’7‘`是数字文字`7`,但`”7“`是分隔标识符。当SQL语句用双引号括起来时(例如,在动态SQL中),该字符串中的双引号字符必须是双引号。
**SQL空字符串应始终指定为一对单引号字符`‘’`。启用分隔标识符支持时,一对双引号字符`“”`将被解析为无效的分隔标识符,并生成`SQLCODE-1`错误。**
## 分隔标识符有效名称
分隔的标识符必须是唯一的名称。带分隔符的标识符不区分大小写;按照惯例,标识符用首字母大写表示。
分隔标识符可以与SQL保留字相同。分隔标识符通常用于避免与SQL保留字的命名冲突。
分隔标识符几乎可以包含任何可打印字符,包括空格。大多数分隔的标识符名称不能包含以下字符:逗号(`,`)、句点(`.`)、插入符号(`^`)和两个字符的箭头序列(`->`);但是分隔的标识符角色名称和用户名可以包含这些字符。分隔的标识符类名可以包含句点(`.`)。任何分隔的标识符都不能以星号(`*`)开头。以下术语不能用作分隔标识符:`%vid`。违反这些命名约定会导致`SQLCODE-1`错误。
用作表、架构、列或索引名的分隔标识符必须能够转换为有效的类实体名称。因此,它必须至少包含一个字母数字字符。以数字(或标点符号后跟数字)开头的分隔标识符会生成带有字母`“n”`前缀的相应类实体名称。
以下示例显示了对列名和表名使用分隔标识符的查询:
```java
SELECT "My Field" FROM "My Table" WHERE "My Field" LIKE 'A%'
```
为表名指定分隔标识符时,必须分别分隔表名和架构名。因此,`“schema”`。`“tablename”`或`schema`。`“tablename”`是有效的标识符,但是`“schema.tablename”`不是有效的标识符。
## 禁用分隔标识符支持
默认情况下,启用对定界标识符的支持。
禁用分隔标识符支持时,双引号内的字符将被视为字符串文字。
可以使用带有`SUPPORT_DELIMITED_IDENTIFIERS`关键字的`SET OPTION`命令在系统范围内设置分隔标识符支持。
可以使用`%SYSTEM.SQL`类的`SetDelimitedIdentifiers()`方法在系统范围内设置分隔标识符支持。
若要确定当前设置,请调用`$SYSTEM.SQL.CurrentSettings()`。
# SQL保留字
SQL包含一长串不能用作标识符的保留字。 实用性很高的文章,👍
文章
Jingwei Wang · 九月 22, 2021
为什么要连接系统?
连接系统可以让一个系统处理来自非本系统的信息。例如,以下场景需要连接系统:
为了提高效率,最初设计为执行单一功能的系统需要集成。例如,您可以通过集成跟踪库存、订购材料、记录销售和控制运输的各个系统来提高效率。
系统合并后,在不同机构中执行相同功能的系统需要协同工作才能使统一的机构有效。
将系统连接在一起时,您可能会面临一些挑战,例如:
不同系统使用不同的通信协议:一个系统可能使用TCP,另一个系统使用SOAP,第三个系统使用REST。
不同系统使用不同格式或基于不同标准的不同消息。
需要保证消息成功传递到正确的系统,并能够检测和纠正故障。
必须监控传输消息的系统,如果一次消息过多,则为消息提供一个队列,并监控整体系统性能以确保没有任何障碍。
虽然可以编写自定义应用程序来连接系统,但开发一款InterSystems IRIS® 产品要容易得多,也快得多。
InterSystems IRIS 提供了一个框架,允许连接系统,并最大限度地减少或消除对自定义代码的需求。
Production介绍
InterSystems IRIS Production是一个集成框架,用于轻松连接系统和开发互操作性应用程序。产品Production提供包含各种消息格式和通信协议的内置连接。您可以轻松添加其他格式和协议,并通过编写代码或使用图形向导定义业务逻辑和消息转换。产品提供消息的持久存储,允许跟踪消息的路径并审核消息是否成功传递。一个Production由业务服务(BS)、业务流程(BP)和业务操作(BO)组成:
业务服务(BS)与外部系统连接并接收Production来自外部系统的消息。
业务流程(BP)允许您定义业务逻辑,包括路由和消息转换。
业务操作(BO)与外部系统连接并将消息发送给它们。
将系统连接在一起时,让所有系统互相理解它们的消息和文档是有挑战性的。例如,思考以下问题:
您有两个独立的系统:一个是从多个联网设备采集数据,另一个是跟踪损坏的设备和维修进程的工单系统。
当前程序依赖于人工干预来监控设备并启动维修进程。这导致了拖延情况且不可靠。
您的任务是将两个系统连接在一起:监控正在收集的数据并自动启动修复进程。您知道如何检测数据收集系统中的故障设备并知道如何启动维修,尽管两个系统所存储的数据代表同一项目,但是两个系统的存储数据格式并不兼容。
您还需要记录数据收集系统启动维修时的操作。
可以使用InterSystems IRIS 产品解决这个问题。它提供了一个定义接口的框架,该接口接收来自数据采集系统的消息,将消息转换为维修系统可以理解的消息,然后将消息发送到维修系统。它还存储消息路径。
下面以一个简单的Production作为示例
出于演示目的,本文档中的Production使用文件适配器(file adapter)并将外部系统表示为文件。由于处理外部系统的大部分工作是由InterSystems IRIS 提供的适配器完成的,因此开发一款可以连接到含有 REST、TCP、SOAP 或HTTP 的外部系统的Production的过程与使用文件适配器开发产品非常相似。
使用文件适配器(File Adaptor)创建Production
在本节中,您将使用入站文件适配器和出站文件适配器创建Production。可以使用 InterSystems IRIS 中内置的业务服务(BS)、业务流程(BP)和业务操作(BO),因此您无需下载任何代码。
尝试一下!使用文件适配器创建产品
想要尝试一下InterSystems IRIS 互操作性功能的在线视频演示吗?查看互操作行快速入门!
用前须知
要使用该程序,您需要一个正在运行的InterSystems IRIS 实例。您的选择包括多种类型的已授权的和免费的评估实例;该实例不需要由您正在工作的系统托管(尽管它们必须相互具有网络访问权限)。如果您还没有一个可以使用的实例,如何部署每种类型实例的有关信息,请参阅InterSystems IRIS Basics: Connecting an IDE中的部署 InterSystems IRIS。
关于如何用Visual Studio 连接到您的InterSystems IRIS 实例,请参考InterSystems IRIS 连接信息和.Net IDEs。
创建支持互操作的命名空间(Namespace)
为了创建一个production,必须有支持互操作的命名空间。如果您已经创建了启用互操作的命名空间, 则可以将其用于该production。要创建新的支持互操作的命名空间,请遵照以下流程(首次安装InterSystems IRIS 时
创建的命名空间不支持互操作):
在浏览器中为实例打开Management Portal (管理门户)。
选择系统管理 > 配置 > 系统配置 > 命名空间,进入命名空间页面。
在命名空间页面,选择新建命名空间 ;根据系统配置指南中“配置InterSystems IRIS”一章中,对于“Create/Modify a Namespace(创建/修改命名空间)”说明,确保选中
Enable namespace for interoperability productions(为互操作性产品启用命名空间)复选框。
点击靠近页面顶部的保存按键,然后在结果日志的结尾选择关闭。
创建含有业务服务 (BS)和业务操作(BO)的简单production
在这一步中,您将:
创建一个新的production。
在该production中添加一项业务服务(BS)和两项业务操作(BO)。
配置业务服务(BS)和业务操作(BO)。
现在,您应该创建在托管InterSystems IRIS实例的系统上运行此production所需的四个目录。具体处理方法取决于所用的实例类型,如下所示:
对于ICM 部署的实例,使用带有-machine 和-interactive 选项的 icmexec命令,打开正在运行该实例的容器的bash shell ,例如:
icm exec -command bash -machine MYIRIS-AM-TEST-0004 -interactive
然后,您可以在容器文件系统上创建目录。
对于任何容器化实例,无论是授权版还是社区版,请使用 docker exec -it container_name bash 命令打开该容器的bash shell (社区版的容器名称是try-iris )。然后在容器文件系统上创建4个目录
对于InterSystems Learning Labs(学习实验室),在集成IDE中使用命令行终端,在共享文件夹下创建新文件夹;您可以在/home/project/shared 路径下的Management Portal(管理门户)中浏览这些文件夹。
对于已安装的实例,在本地文件系统上创建4个目录。
本文本假定以下是Windows 系统上已安装实例的目录路径;替换您创建的实际目录的路径。
c:\Practice\In
c:\Practice\Out
c:\Practice\PDFsOut
c:\Practice\Work
在管理门户中,创建一个新的production:
选择Interoperability( 互操作性),如果出现提示,请选择一个支持互操作的命名空间。
选择Interoperability ( 互操作性)> 列表 > Production。
如果一个产品当前正在命名空间中运行,请打开它,然后选择停止。返回产品列表页面。
选择新建,创建一个新的产品。
指定包名称(例如 TEST)和production名称(例如 FileProd)。您将创建可用于任何目的的通用production。选择OK创建该产品。
向该产品添加一项业务服务(BS)和两项业务操作(BO):
选择服务旁边的加号符号以显示业务服务向导。
在服务类下拉菜单,选择EnsLib.File.PassthroughService 。
指定服务名FileService。
清空立即启用复选框。
选择确定。
对两项业务操作(BO)重复这些步骤。从选择操作旁边的 加号符号以显示业务操作向导开始。对这两项操作使用 EnsLib.File.Pa ssthroughOperation 类。将一项操作名称命名为WriteFileOp ,另一项命名为WritePDFsOp。
配置这项业务服务(BS)和两项业务操作(BO):
选择您在产品配置图中创建的业务服务(BS),并在设置选项卡:
a. 选择启用复选框。
在文件路径字段,输入c:\Practice\In。
在存档路径字段,输入c:\Practice\Work。
在工作路径字段,输入c:\Practice\Work。
在接收消息的目标名称字段,选择WriteFileOp。
其他字段为默认值。
选择应用。
为两项业务操作(BO)中的每一项指定设置。选择产品图中的操作,然后:
a. 选择启用复选框。
在文件路径字段,对于 WriteFileOp 操作输入c:\Practice\Out,对于 WritePDFsOp 操作输入 c:\Practice\PDFsOut。
其他字段为默认值。
选择应用。
启动Production & 跟踪消息
启动该production后,您将复制一个文件到 FileService 的导入目录。您能查看 WriteFileOp 的导出目录中的文件,并通过该production跟踪消息。请注意,运行这个production时不使用WritePDFsOp 操作。要启动production并跟踪消息:
通过选择开始启动产品。
将任一文件复制到c:\Practice\In 目录。如果该产品配置正确,应该会出现以下情况:
几秒钟后,文件从 c:\Practice\In 目录移动到 c:\Practice\Work 目录。文件名称规范将后附时间戳。例如, 如果原始文件是hello.txt,工作文件可能名称为hello.txt_2018-05-07_17.24.57.056 。
文件的新版本被写入c:\Practice\Out 目录。它还附加了一个时间戳。
产品图中的圆圈应保持绿色。如果圆圈变成红色,则表示产品中存在错误。遍历前面的步骤并确保这些目录存在。
在production配置页面选择FileService,选择消息选项卡。它列出了通过该产品的每条消息。选择转到消息查看器。
在消息查看器中选择一条消息,然后选择跟踪选项卡。它将显示从FileService 转到WriteFileOp 操作的消息。
选择正文选项卡,它将显示消息类型和消息中的字段:
请注意,消息类型是Ens.StreamContainer,其中一个字段是OriginalFilename。
将路由器添加到Production中
在本步骤中,将向产品添加路由业务流程和规则。然后,您将一个文件复制到导入目录,并查看显示消息通过路由器的跟踪。在Management Portal(管理门户)中:
选择Interoperability( 互操作性) >配置>Production进入Production 配置 页面,然后选择流程旁边的加号符号以显示业务流程向导。在向导中:
在业务流程类下拉菜单,选择EnsLib.MsgRouter.RoutingEngine。
选择自动创建规则复选框。
指定业务流程名称为FileRouter。
清空Enabled( 启用)复选框。
选择确定。
在对话框中选择OK以批准规则类名称
在Production配置页面选择FileRouter,然后在设置选项卡:
a. 选择启用复选框。
选择应用。
选择业务规则名称右侧的放大镜。这将启动规则编辑器,并显示在您创建业务流程时自动生成的规则。
在规则编辑器中,您将创建一条规则,将PDF 文件发送到WritePDFsOp 操作,并将所有其他文件发送到WriteFileOp 操作。规则如下所示
要创建此规则:
双击规则中的 constraint (约束)值。
在 源 字段输入FileService。
在消息类字段输入Ens.StreamContainer。
选择OK。
在 规则辅助中选择rule( 规则) 然后选择when。
选择 when 条件值,并在规则图上方的文本框内输入Document.OriginalFilename Contains ".pdf",然后选择确定。
选择图中的 when 子句,然后在规则辅助选择 send(发送)。
双击 target 值并选择WritePDFsOp 配置项。
选择图中的 when 子句,然后在规则辅助 选择 otherwise。
选择图中的 otherwise 子句,然后在规则辅助选择 send( 发送)。
双击 send 子句的 target 值并选择WriteFileOp 配置项。
选择保存。
返回到Production配置页面,选择FileService 并在 Settings 选项卡:
选择FileRouter 为接收消息的目标名称。
清空WriteFileOp 复选框。
然后选择应用。
您的productioin现已完成。FileService 将所有消息发送到FileRouter 业务流程(BP)。FileRouter 将根据规则将消息发送到WritePDFsOp 或WriteFileOp 操作。
如果你将hello.pdf 复制到c:\Practice\In 目录,它将被发送到 c:\Practice\PDFsOut 目录,但是,如果您复制test.txt 到c c:\Practice\In 目录,它将被发送到c:\Practice\Out 目录。您还可以查看消息跟踪,消息跟踪可以显示通过文件路由器的消息路径。例如,hello.pdf 的跟踪可能如下:
了解有关互操作性产品的更多信息
有关产品的更多信息,请参阅:
介绍互操作性production
开发产品production
配置production
制定业务规则
文章
Louis Lu · 一月 7, 2021
在 Caché 中处理 SOAP 请求时,有时需要通过直接访问(有时是编辑)所发送的 XML(即 SOAP 请求和随后的 SOAP 响应)来调试错误。 如果要调试 Caché Web 服务,使用 SoapUI (https://www.soapui.org/) 之类的工具手动创建和控制 SOAP 请求通常很有用,这样可以很容易地在 Caché Web 服务上看到调整的效果。
但是如果已经有 Web 服务(可能不是 Caché),并且想要调试相关的 Caché Web 客户端该怎么办? 您可能已将 SOAP 响应 XML 保存在文件中(例如 Caché SOAP 日志),您需要一个“虚拟”Web 服务将其发送到 Caché Web 客户端,就像实际的 Web 服务一样操作。
由于我经常在技术支持的过程中需要调试客户的 Caché Web 客户端,我创建了这样一个“虚拟”的Web 服务 – 见下文:
Class JSUtil.DummyWebService Extends %CSP.Page
{
/// Mimic a SOAP Web Service by sending the specified SOAP Response XML.
/// Typically this XML will be copied-and-pasted from a SOAP log.
Parameter CONTENTTYPE = "text/xml";
/// File containing the SOAP Response XML:
Parameter XMLFILENAME = "C:\data\soapresponse.txt";
ClassMethod OnPage() As %Status
{
set XML=""
set stream = ##class(%Stream.FileCharacter).%New()
set sc = stream.LinkToFile(..#XMLFILENAME)
while 'stream.AtEnd {
set XML = XML_stream.Read()
}
write XML
quit $$$OK
}
}
要使用 JSUtil.DummyWebService 类:
1.将参数 XMLFILENAME 的值更改为包含来自 Web 服务的 SOAP 响应的 XML 的位置。 通常,此文件可内容可通过手动剪切和粘贴 Caché SOAP 日志中的响应 XML 消息来创建。
2.使用 Studio 的“View Web Page”获取此 CSP 页面的 URL,它应显示响应的XML消息内容。
3.将上面的 URL 粘贴到 Caché Web 客户端的 LOCATION 参数中。
现在,当调用 Caché Web 客户端时,它将收到参数 XMLFILENAME 指向的 SOAP 请求 XML。
我已经多次使用这种方法来帮助调试 Caché Web 客户端。 参考以下示例:
SOAP 日志的“Web 客户端的输入”中包含以下错误:
ERROR #6203: Unexpected Element
(完整的 SOAP 日志可在此处找到:[_https://github.com/ISC-schulman/InterSystems/raw/master/soaplog.txt_](https://github.com/ISC-schulman/InterSystems/raw/master/soaplog.txt))
我们还有 Web 服务的 WSDL ([_https://github.com/ISC-schulman/InterSystems/raw/master/example.wsdl_](https://github.com/ISC-schulman/InterSystems/raw/master/example.wsdl)),但无法访问 Web 服务本身。 (虽然这对于 InterSystems 支持来说很常见,但不可否认,对于客户可能并不常见 – 这只是一个简单的示例,说明如何使用 DummyWebService。)
首先,使用 DummyWebService 重现错误:
1.使用 SOAP 向导从提供的 WSDL 生成 Web 客户端。 所有参数均使用默认值(尽管您可以指定包名称。)
2.查看 SOAP 日志,然后将 Web 服务响应的XML(“Input to Web client”)剪切并粘贴到文件中:
OK
3.通过 JSUtil.DummyWebService 中的参数 XMLFILENAME 指向此文件。
4.使用 Studio 的“Display Web Page”查看 DummyWebService – 它应显示步骤 2 中创建的文件内容。
5.将步骤 4 中的 URL 剪切并粘贴到步骤 1 中生成的 Web 客户端的 LOCATION 参数中。
6.调用 Web 客户端,例如
set client = ##class(MyWebService.RequestWSSoapHttpPort).%New()
do client.createAsynchronuosRequest("x")
quit
7. 验证(例如通过 SOAP 日志)是否发生相同错误,即“ERROR #6203: Unexpected Element”。
接下来我们解决这个错误。 这里会经历一些过程或反复试验,但同样只是为了说明如何使用 DummyWebService。
1.像之前一样使用 SOAP 向导和提供的 WSDL 生成 Web 客户端 – 指定不同的包名称以防止覆盖第一个 Web 客户端。 另外,参数全部采用默认值,除了一处:
在 SOAP 向导的步骤 3 中选择“对于文档样式的 Web 方法使用未包装的消息格式(Use unwrapped message format for document style web methods)”
2.重复上面的步骤 5 和 6。
3.验证(例如通过 SOAP 日志)Web 客户端错误是否已修正。
_(注意:使用“未包装的消息格式(unwrapped message format)”是解决 Web 客户端问题的常见解决方案 – 有关详细信息,请参见我们的文档中的“使用 SOAP 向导_”。)
**总结**
可以使用 DummyWebService 类将指定的 SOAP 响应(例如,从 SOAP 日志)发送到 Caché Web 客户端,以模拟 Web 服务的响应。
文章
姚 鑫 · 四月 12, 2021
# 第一章 SQL性能优化简介
InterSystems SQL支持几个特性来优化InterSystems IRIS®数据平台的SQL性能。
# 表定义优化
SQL性能从根本上取决于良好的数据架构。
将数据划分为多个表并在这些表之间建立关系对于高效的SQL是必不可少的。
描述了以下优化表定义的操作。
这些操作要求定义表,但不要求用数据填充表:
- 数据存储策略:可以选择使用`%Storage.Persistent`、`%Storage.SQL`或自定义存储来存储数据。
- 全局变量命名策略:可以使用`USEEXTENTSET`参数为数据和索引查找操作指定更短、更高效的散列全局名称。
- 索引:可以为一个表字段或一组字段定义索引。可以定义几种不同类型的索引:标准索引、位图索引、位图索引和位图范围索引。SQL优化使用定义的索引而不是数据值本身来访问查询、更新或删除操作的特定记录。
# 表数据优化
根据对表中典型数据的分析,可以执行以下操作来优化表访问:
- Tune Table:检查典型的表数据并生成`ExtentSize`(行数)、选择性(具有特定值的行的百分比)和`BlockCount`元数据。查询优化器使用此信息来确定最有效的查询执行计划。
- 选择性和异常值选择性:确定某个字段具有特定值的行的百分比,以及某个值是否为异常值,该值明显比该字段的其他值更常见。
# 查询优化
**在几乎所有情况下,用嵌入式SQL编写的查询的执行速度都比用动态SQL编写的查询快。还要注意,由于存在缓存查询,对于嵌入式SQL和动态SQL,重新执行查询的速度都比初始执行快得多。**
可以执行以下操作来优化特定查询的执行。这些查询优化使用现有的表定义和表数据优化:
- 运行时统计:用于衡量系统上查询执行的性能。
- 显示计划显示查询的执行计划。
- 缓存查询和文字替换:维护最近动态查询的缓存,允许重新执行查询,而不会重复准备查询的开销。
- SQL语句和冻结计划允许保留查询执行计划,从而允许在不降低现有查询性能的情况下更改表。
- 索引配置和使用:用于指定如何使用现有索引。
- 索引优化提示:`%ALLINDEX`、`%IGNOREINDEX`
- 联接优化提示:`%FIRSTTABLE`、`%FULL`、`%INORDER`、`%STARTTABLE`
- 子查询优化提示:`%NOFLATTEN`、`%NOMERGE`、`%NOREDUCE`、`%NOSVSO`
- 并行查询执行:`%Parallel`
- 联合优化: `UNION %PARALLEL`, `UNION/OR`
还可以通过使用数据分片来提高对大型数据库表的查询性能。
# 配置优化
默认情况下,内存和启动设置默认为自动配置,每个进程的最大内存默认为262144 kb。要优化在生产系统上运行的SQL,应该将默认值更改为手动配置,并增加每进程的最大内存设置。
# 分片
分片是跨多个系统对数据及其关联缓存进行分区。分片集群跨多个InterSystems IRIS实例(称为碎片数据服务器)水平(即按行)对大型数据库表进行分区,同时允许应用程序通过单个实例(称为碎片主数据服务器)透明地访问这些表。
必须将表定义为分片。分片表只能在分片环境中使用;非分片表可以在分片或非分片环境中使用。并不是所有的表都适合进行分片。分片环境中的最佳性能通常是通过组合使用分片表(通常非常大的表)和非分片表来实现的
# 快速命令
InterSystems SQL支持快速选择、快速插入和快速截断表。“快速”意味着这些SQL命令的标准调用是使用高效的内部代码执行的。这些快速操作“就是工作”;没有使用特殊语法,也没有提供优化选项。
通过ODBC或JDBC的`SELECT`查询支持快速选择。JDBC上的插入操作支持快速插入。对于不涉及参照完整性的截断表操作,支持快速截断表。
并不是所有的表都支持快速操作,也不是所有的命令语法都可以使用快速执行来执行。InterSystems SQL在可能的情况下执行快速执行;如果无法执行快速执行,InterSystems SQL将执行指定命令的标准执行。
文章
Johnny Wang · 十一月 21, 2021
当我和加州大学戴维斯分校健康中心的同事着手简化提供者对基因组数据报告的访问时,我们希望这些信息能帮助临床医生提供更好、更个性化的护理。 我们的基因组数据没有操作界面,既不可搜索,也不与患者图表相关联。 如果我们可以在 FHIR(快速医疗互操作性资源)连接器上利用SMART原则在平台之间实现单点登录,我们的护理团队就可以更早地获得数据,患者将能够更好地得到照顾,并在与癌症的斗争中取得积极成果。
而这也是正在实现的事情。 我们支持基因组数据报告的工作为临床医生带来了 50 个离散数据点,这意味着医生用于搜索报告的时间更少,也拥有了更多具有重要洞察力的离散数据,简化了对临床试验信息的访问,最终患者也得到了及时的护理。
但我们并没有停下脚步,这不过是迈向更广阔数字领域的第一步。在 InterSystems 的帮助下,我们拥有了规模越来越大、类型更多样的数据集。
回到本文的标题——什么是医疗数字领域的门户?它是某人(通常是患者)与您的医疗单位的每次虚拟来往的总和。根据研究公司 IDC 的数据,到 2023 年,65% 的患者都将会通过这样的门户和对应的医疗机构进行来往,但剩下的其他人呢?所以在加州大学戴维斯分校健康中心,我们决心建立一个欢迎所有人的数字门户——不仅是基因组数据供应商,还有患者、付款人和合作伙伴。
通过变得更加灵活和高效,我们不断推陈出新,提高整个健康中心的效率,并优化对患者的护理。 以下是我总结的为什么数字门户可以帮助每个医疗机构的观点:
1. 是时候加强互操作性工作了
在加州大学戴维斯分校健康中心,我们决定推动我们的数字门户战略,也因为我们不想被 FHIR 潮流所抛弃。随着苹果等公司的健康应用工具使用率的不断上升,基于SMART原则和FHIR构建的应用程序一直在不断提醒供应商们尽快去拿到多年来一直对第三方关闭的数据,而我们的数字门户成为了我们巧妙地驾驭 FHIR 潮流所需的工具和技术。 此外,很明显,《21世纪药物法案草案》将要求医疗系统支持更进一步的互操作性,以便患者访问其数据。
没有多少医疗机构为此制定了数字门户战略。 尽管我们花了数年时间从本土遗留系统和内部应用程序过渡到同类最佳技术,但互操作性描述了数据在内部移动,而不是外部移动。
我们本可以选择将付款人和合作伙伴直接连接到我们的 EHR,但这无法访问位于其他地方的数据。 对于我们的合作伙伴来说,这也可能意味着更高的成本和更大的难度,同时每个应用程序和合作伙伴连接都受制于各自的供应商。
现在,我们加州大学戴维斯分校健康中心使用首选的解决方案堆栈开发了自己的架构——InterSystems IRIS for Health™ 和 HealthShare® 处理了平台外存储的大量数据、连接的非 FHIR 应用程序,并使我们能够创建确保所有合作伙伴都能访问的规则。
在一年多一点的时间里,我们为 InterSystems API 管理器部署了一个开发端点,我们正在与几个合作伙伴合作开展试点项目,以将它们连接到我们的 API 库。 世界正在快速发展时,医疗行业也必须如此。
2. 你真的想用大量不同的技术去拼凑你的数字门户吗?
加州大学戴维斯分校健康中心的数字门户之所以能脱颖而出,是因为我们决心要打造围绕一个互操作性的先进中心。
大多数医疗系统采用联合模型,在一个桶中解决临床数据聚合以及与 FHIR、接口和研究相关的举措。 在加州大学戴维斯分校健康中心,我们有一个专门的团队和一个支持模型来推动整个组织内的数据交换。这意味着强大的灵活性。 例如,新冠病毒的来临颠覆了一切,许多医院不得不与三个甚至更多的供应商争吵,以适应对虚拟服务不断增长的需求。 而我们只用一个小组就快速完成了工作。
随着美国互操作性核心数据 (USCDI) 标准的实施,医疗系统必须能够访问电子健康信息,这些信息存在于医疗系统、数字生态系统的每个角落和缝隙中。 共享存在于 EHR 中的临床数据是不够的。宽阔的数字门户——通过一个入口点就可以进入——是我们最好的选择。
3. 走在时代的前沿
我知道并非所有医疗系统都拥有相同的资源,但任何人都可以适应的技术才是真正的创新。
医疗机构需要根据 USCDI 标准为患者数据的访问去开发解决方案。 如果您具备了这样的开发能力,为什么不多做一步——授权患者、付款人和合作伙伴都能够使用这种资源呢?
如果您这样做了,您会发现您已准备好应对围绕基因组学、远程患者监测以及未来的任何其他事物所带来的创新。
关于作者:Michael Marchant
Michael Marchant 在过去 25 年多的时间里一直在和复杂的技术打交道,他一直致力于整合数据,以引领医疗机构的发展。Michael 一直与应用程序供应商、提供商组织以及政府密切合作,领导团队并提供所需的解决方案、技术、工作流程,致力于内部以及当地乃至全国的互操作性推动。 Michael 目前担任加州大学戴维斯分校健康中心的健康信息交换和系统集成总监,他和他的团队为他的组织和社区解决了大量复杂的技术难题和互操作性层面的挑战。 Michael 热衷于推动将患者和患者的健康信息联系起来的技术,并帮助患者能够控制何人、何时以及何地可以访问这些信息。
点击查看原文
2021年12月8日——全球领导力峰会,立刻注册!
InterSystems 可以帮助您实现互操作性和数据集成目标。立刻联系我们!
文章
姚 鑫 · 三月 13, 2021
# 第九章 SQL查询数据库(二)
# 调用用户定义函数的查询
InterSystems SQL允许您在SQL查询中调用类方法。这为扩展SQL语法提供了强大的机制。
若要创建用户定义的函数,请在持久性InterSystems IRIS类中定义一个类方法。该方法必须具有文字(非对象)返回值。这必须是一个类方法,因为在SQL查询中将没有对象实例可以在其上调用实例方法。还必须将其定义为SQL存储过程。
例如,我们可以在`MyApp.Person`类中定义一个`Cube()`方法:
```java
Class MyApp.Person Extends %Persistent [DdlAllowed]
{
/// Find the Cube of a number
ClassMethod Cube(val As %Integer) As %Integer [SqlProc]
{
RETURN val * val * val
}
}
```
可以使用`CREATE FUNCTION`,`CREATE METHOD`或`CREATE PROCEDURE`语句创建SQL函数。
要调用SQL函数,请指定SQL过程的名称。可以在可能指定标量表达式的任何地方以SQL代码调用SQL函数。函数名称可以使用其架构名称进行限定,也可以不限定。不合格的函数名称采用用户提供的模式搜索路径或系统范围内的默认模式名称。函数名称可以是定界标识符。
SQL函数必须具有用括号括起来的参数列表。参数列表可以为空,但括号是强制性的。所有指定的参数均充当输入参数。不支持输出参数。
SQL函数必须返回一个值。
例如,以下SQL查询将用户定义的SQL函数作为方法调用,就像它是内置SQL函数一样:
```sql
SELECT %ID, Age, Sample.Person_Cube(Age) FROM Sample.Person
```
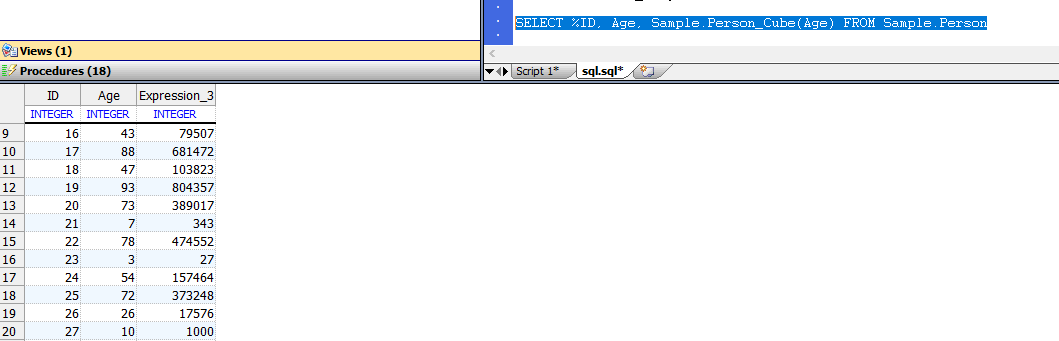
对于`Age`的每个值,此查询将调用`Cube()`方法并将其返回值放入结果中。
SQL函数可能是嵌套的。
如果找不到指定的功能,则InterSystems IRIS会发出`SQLCODE -359`错误。如果指定的函数名称不明确,则InterSystems IRIS会发出`SQLCODE -358`错误。
# 查询串行对象属性
使用默认存储(`%Storage.Persistent`)从类中映射为SQL的子表的串行对象属性也将在该类映射表中的单个列中映射。该列的值是串行对象属性的序列化值。该单列属性被映射为SQL `%List`字段。
例如,`Sample.Person`中的`Home`列定义为`Property Home As Sample.Address;`。它将映射到类`Sample.Address`扩展(`%SerialObject`),其中包含属性`Street`,`City`,`State`和`PostalCode`。
以下示例从各个串行对象列返回值:
```sql
SELECT TOP 4 Name,Home_Street,Home_City,Home_State,Home_PostalCode
FROM Sample.Person
```
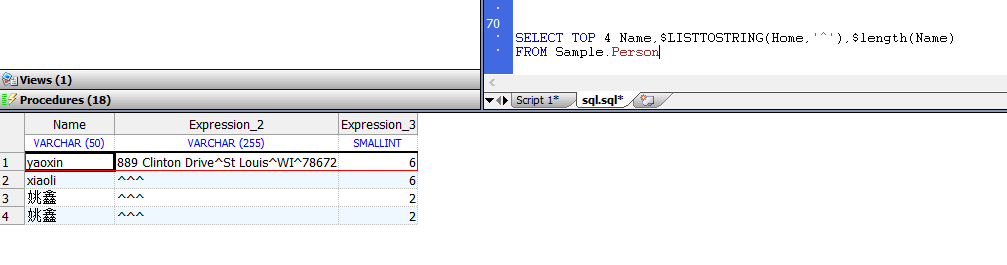
以下示例将所有串行对象列的值(按顺序)作为单个%List格式字符串返回,并将每一列的值作为%List的元素:
```sql
SELECT TOP 4 Name,$LISTTOSTRING(Home,'^'),$length(Name)
FROM Sample.Person
```
默认情况下,此“主页”列是隐藏的,并且不映射为`Sample.Person`的列。
# 查询集合
可以从SQL `WHERE`子句引用集合,如下所示:
```sql
WHERE FOR SOME %ELEMENT(collectionRef) [AS label] (predicate)
```
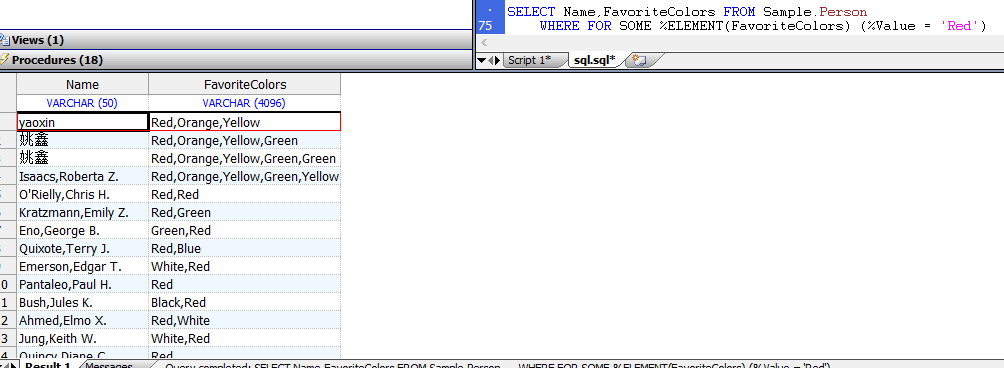
`FOR SOME%ELEMENT`子句可用于指定`STORAGEDEFAULT =“ list`”的列表集合和数组。谓词可以包含对伪列`%KEY`,`%VALUE`或两者的引用。一些示例应有助于阐明如何使用`FOR SOME%ELEMENT`子句。以下返回其最喜欢的颜色包括`“红色”`的每个人的名字和最喜欢的颜色的列表。
```sql
SELECT Name,FavoriteColors FROM Sample.Person
WHERE FOR SOME %ELEMENT(FavoriteColors) (%Value = 'Red')
```
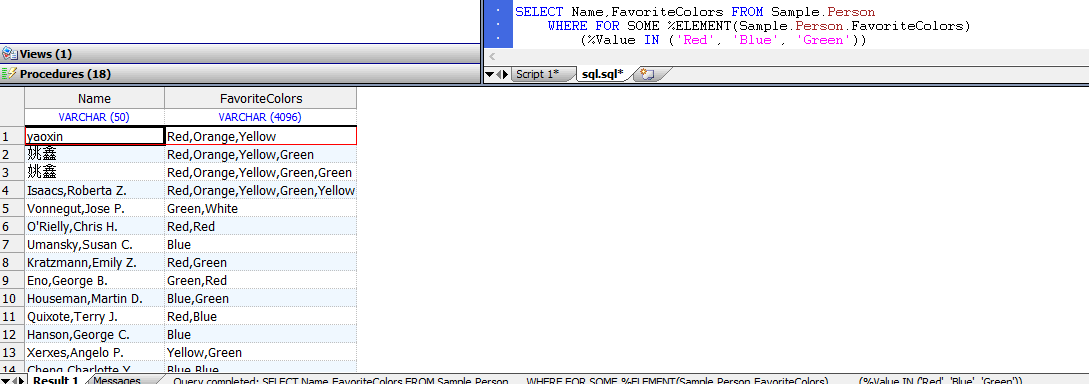
任何SQL谓词都可能出现在`%Value`(或`%Key`)之后,因此例如以下也是合法语法:
```sql
SELECT Name,FavoriteColors FROM Sample.Person
WHERE FOR SOME %ELEMENT(Sample.Person.FavoriteColors)
(%Value IN ('Red', 'Blue', 'Green'))
```
列表集合被认为是具有连续数字键1、2等的数组集合的特例。数组集合可以具有任意的非空键:
```sql
FOR SOME (children) (%Key = 'betty' AND %Value > 5)
```
除了内置列表和数组集合类型之外,还可以通过为任何属性提供`BuildValueArray()`类方法来创建通用集合。 `BuildValueArray()`类方法将属性的值转换为本地数组,其中数组的每个下标是一个`%KEY`,该值是对应的`%VALUE`。
除了可以在`%KEY`或`%VALUE`上进行简单选择之外,还可以在逻辑上连接两个集合,如以下示例所示:
```sql
FOR SOME %ELEMENT(flavors) AS f
(f.%VALUE IN ('Chocolate', 'Vanilla') AND
FOR SOME %ELEMENT(toppings) AS t
(t.%VALUE = 'Butterscotch' AND
f.%KEY = t.%KEY))
```
此示例有两个集合:`Favors`和`TOPING`,这两个集合通过键在位置上相关。该查询限定了将`巧克力`或`香草`指定为`口味元素`的行,并且还将`奶油糖果`列为相应的`配料`,其中通过`%key`建立对应关系。
可以使用`$SYSTEM.SQL`配置方法`GetCollectionProjection()`和`SetCollectionProjection()`来确定如果将集合映射为子表,则是否将集合映射为列。在编译或重新编译该类时,对该系统范围的设置所做的更改将对每个类生效。
## 使用说明和限制
- **`FOR SOME%ELEMENT`只能出现在`WHERE`子句中。**
- **`%KEY`和`/`或`%VALUE`只能出现在`FOR`谓词中。**
- **任何特定的`%KE`Y或`%VALUE`只能被引用一次。**
- **`%KEY`和`%VALUE`可能不会出现在外部联接中。**
- **`%KEY`和`%VALUE`可能不会出现在值表达式中(仅在谓词中)。**
# 调用文本搜索的查询
InterSystems IRIS支持所谓的`“自由文本搜索”`,包括支持:
- 通配符
- 填充物
- 多词搜索(也称为n-gram)
- 自动分类
- 词典管理
此功能使SQL能够支持全文索引,还使SQL能够索引和引用集合的单个元素,而无需将集合属性映射为子表。虽然支持集合索引和全文索引的底层机制密切相关,但文本检索具有许多特殊属性,因此为文本检索提供了特殊的类和SQL功能。
# 伪字段
InterSystems SQL查询支持以下伪字段值:
- **`%ID` —返回`RowID`字段值,而不管`RowID`字段的实际名称是什么。**
- `%TABLENAME` —返回在`FROM`子句中指定的现有表的限定名称。定义表时,使用限定的字母大小写返回合格的表名,而不是`FROM`子句中指定的字母大小写。如果`FROM`子句指定了不合格的表名,则`%TABLENAME`将返回合格的表名(`schema.table`),以及从用户提供的模式搜索路径或系统范围内的默认模式名称提供的模式名称。例如,如果`FROM`子句指定`mytable`,则`%TABLENAME`变量可能返回`SQLUser.MyTable`。
- `%CLASSNAME` —返回与`FROM`子句中指定的现有表相对应的合格类名称(`package.class`)。例如,如果`FROM`子句指定了`SQLUser.mytable`,则`%CLASSNAME`变量可能返回`User.MyTable`。
注意:请勿将`%CLASSNAME`伪字段值与`%ClassName()`实例方法混淆。它们返回不同的值。
伪字段变量只能为包含数据的表返回。
如果在`FROM`子句中指定了多个表,则必须使用表别名,如以下嵌入式SQL示例所示:
```java
/// d ##class(PHA.TEST.SQL).Query3()
ClassMethod Query3(val As %Integer) As %Integer [ SqlProc ]
{
&sql(SELECT P.Name,P.%ID,P.%TABLENAME,E.%TABLENAME
INTO :name,:rid,:ptname,:etname
FROM Sample.Person AS P,Sample.Employee AS E)
IF SQLCODEd ##class(PHA.TEST.SQL).Query3()
Sample.PersonPerson table Name is: Adams,Diane F.
Sample.PersonPerson table RowId is: 95
P alias TableName is: Sample.Person
E alias TableName is: Sample.Employee
```
为`%TABLE NAME`和`%CLASS NAME`列分配了默认的列名称`Literal N`,其中`n`是`SELECT`语句中伪字段变量的`select-item`位置。
# 查询元数据
可以使用Dynamic SQL返回有关查询的元数据,例如查询中指定的列数,查询中指定的列的名称(或别名)以及查询中指定的列的数据类型。
下面的ObjectScript Dynamic SQL示例为`Sample.Person`中的所有列返回列名和该列的ODBC数据类型的整数代码:
```java
/// d ##class(PHA.TEST.SQL).Query4()
ClassMethod Query4()
{
SET myquery="SELECT * FROM Sample.Person"
SET rset = ##class(%SQL.Statement).%New()
SET qStatus = rset.%Prepare(myquery)
IF qStatus'=1 {
WRITE "%Prepare failed:" DO $System.Status.DisplayError(qStatus) QUIT
}
SET x=rset.%Metadata.columns.Count()
WHILE x>0 {
SET column=rset.%Metadata.columns.GetAt(x)
WRITE !,x," ",column.colName," ",column.ODBCType
SET x=x-1
}
WRITE !,"end of columns"
}
```
```java
DHC-APP>d ##class(PHA.TEST.SQL).Query4()
15 Office_Zip 12
14 Office_Street 12
13 Office_State 12
12 Office_City 12
11 Home_Zip 12
10 Home_Street 12
9 Home_State 12
8 Home_City 12
7 Spouse 4
6 SSN 12
5 Name 12
4 FavoriteColors 12
3 DOB 9
2 Age 4
1 ID 4
end of columns
```
在此示例中,列以反向列顺序列出。请注意,包含列表结构化数据的`FavoriteColors`列返回的数据类型为`12(VARCHAR)`,因为ODBC将InterSystems IRIS列表数据类型值表示为以逗号分隔的值的字符串。
# 快速查询
InterSystems IRIS支持快速选择,这是一种内部优化,用于通过ODBC和JDBC快速执行查询。此优化将InterSystems全局变量映射到Java对象。它将全局节点(数据记录)的内容作为Java对象传递。收到这些Java对象后,它将从它们中提取所需的列值并生成结果集。 InterSystems IRIS会尽可能自动应用此优化。这种优化是自动的,用户看不见。当准备好查询时,InterSystems IRIS会将查询标记为使用快速选择机制执行还是使用标准查询机制执行。
如果查询仅引用字段,常量或引用字段和`/`或常量的表达式,则快速选择将应用于`%PARALLEL`查询和针对分片表的查询。
服务器和客户端都必须支持快速选择。要在客户端中启用或禁用“快速选择”,请在类实例的定义中使用“属性”,如下所示:
```java
Properties p = new Properties();
p.setProperty("FeatureOption","3"); / 1 is fast Select, 2 is fast Insert, 3 is both
```
由于性能上的差异,对于用户来说重要的是要知道什么情况限制了快速选择的应用。
表限制:无法使用快速选择来查询以下类型的表:
- 链接表
- 一个表,其主/数据映射具有多个节点
- 具有映射到同一数据位置的多个字段的表(仅可使用`%Storage.SQL`来实现)
字段限制:如果选择项列表中包含以下列,则无法使用“快速选择”执行查询。这些类型的列可以在表中定义,但是查询无法选择它们:
- 流字段(数据类型`%Stream.GlobalCharacter`或`%Stream.GlobalBinary`)
- 查询时计算的字段(计算的`COMPUTECODE`或瞬态)
- 是列表集合的字段(具有`LogicalToOdbc`转换)
- 一个执行`LogicalToOdbc`转换并且不是数据类型`%Date`,`%Time`或%PosixTime`的字段
- 覆盖了`LogicalToOdbc`转换代码的字段
- 执行`LogicalToStorage`转换的字段
- 地图数据输入使用检索码的字段
- 一个其地图数据条目具有定界符的字段(不是`%List`存储)
- 映射到一块嵌套存储的字段
索引限制:如果选择项目列表仅由`%ID`字段和`/`或均映射到同一索引的字段组成,则不使用快速选择。
如果使用“快速选择”执行查询,则在启用了`%System `/`%SQL` / `XDBCStatement`的情况下,在审计数据库的SELECT审计事件中会标记此事实。
## 查询和企业缓存协议Enterprise Cache Protocol (ECP)
使用企业缓存协议(ECP)的InterSystems IRIS实现(例如分布式缓存群集)可以同步查询结果。 ECP是一种分布式数据缓存体系结构,用于管理服务器系统的异构网络之间的数据分布和锁定。
如果ECP同步处于活动状态,则每次执行`SELECT`语句时,InterSystems IRIS都会将所有未决的ECP请求强制发送到数据服务器。完成后,这可以确保客户端缓存是同步的。此同步发生在查询的“打开”逻辑中。如果这是游标查询,则在`OPEN`游标执行中。
要激活ECP同步,请使用`%SYSTEM.SQL`类的`SetECPSync()`方法。若要确定当前设置,请调用`$SYSTEM.SQL.CurrentSettings()`。
文章
姚 鑫 · 四月 8, 2021
# 第二十章 用户、角色和权限
InterSystems IRIS®具有系统级安全性,以及一组与sql相关的额外安全性特性。
在数据库级保护之外,InterSystems SQL安全性提供了额外级别的安全功能。
SQL和系统级安全性之间的一些关键区别是:
- SQL保护比系统级保护更细粒度。可以为表、视图和存储过程定义特权。
- SQL权限既可以授予用户,也可以授予角色。
系统级权限只分配给角色。
- 持有SQL特权会隐式授予执行SQL操作所需的任何相关系统特权。
(相反,系统级特权并不意味着表级特权。)
InterSystems SQL在InterSystems IRIS数据平台上对ODBC、JDBC、Dynamic SQL和SQL Shell接口进行权限检查。
嵌入式SQL语句不执行特权检查;
假定使用嵌入式SQL的应用程序在使用嵌入式SQL语句之前会检查特权。
# SQL权限和系统权限
要通过特定于SQL的机制操作表或其他SQL实体,用户必须具有适当的SQL权限。
系统级权限不足。
用户可以直接被授予SQL权限,也可以属于具有SQL权限的角色。
注意:角色是由SQL和系统级安全共享的:单个角色可以包括系统和SQ权限。
下面的例子,以Windows机器上的InterSystems IRIS为例:
- 在用户名称空间中有一个名为`User.MyPerson`的持久化类。
这个类被投影到SQL中作为`SQLUser.MyPerson`表。
- 有一个名为`Test`的用户,他不属于任何角色(因此没有系统权限),并且拥有`SQLUser.MyPerson`表的所有权限(没有其他SQL权限)。
- 还有第二个用户,名为`test2`。此用户被分配给以下角色:`%DB_USER`(因此可以读取或写入用户数据库上的数据);`%SQL`(因此可以通过`%Service_BINDINGS`服务访问SQL);并且通过自定义角色具有使用控制台和`%Development`的权限。
如果测试用户尝试通过任何特定于SQL的机制(如使用ODBC的机制)在`SQLUser.MyPerson`表中读取或写入数据,则尝试将成功。这是因为InterSystems IRIS使测试用户成为`%SQL`角色(包括`%SERVICE_SQL:USE`权限)和`%DB_USER`角色的成员,因此该用户具有建立连接所需的权限;这在连接生成的审核事件(如`%SYSTEM/%Login/Login event`)中可见。(如果测试用户尝试使用终端对象机制,则这些尝试将失败,因为用户对这些机制没有足够的权限。)
如果`Test2`用户尝试通过任何特定于SQL的机制(如使用ODBC的机制)在`SQLUser.MyPerson`表中读取或写入数据,则该尝试将失败,因为该用户没有足够的权限访问该表。(如果`Test2`用户尝试使用对象机制查看终端中的相同数据,则尝试成功-因为该用户有足够的权限进行这种类型的连接。)
# 用户
InterSystems SQL用户与为InterSystems安全性定义的用户相同。可以使用SQL命令或管理门户定义用户。
- 在SQL中,可以使用`CREATE USER`语句创建用户。这只会创建一个用户名和用户密码。新创建的用户没有角色。必须使用`GRANT`语句为用户分配权限和角色。可以使用`ALTER USER`和`DROP USER`语句修改现有用户定义。
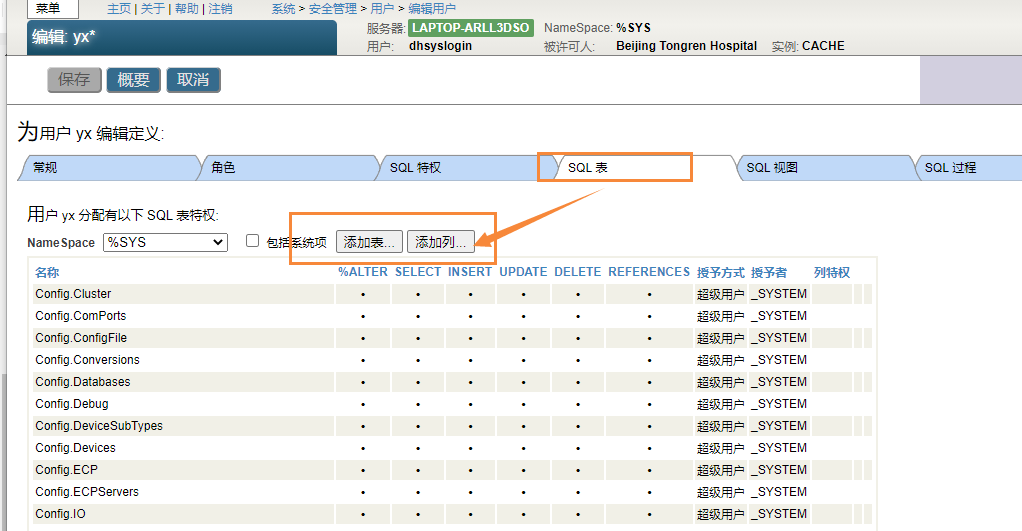
- 在管理门户中选择System Administration(系统管理),选择Security(安全性),然后选择Users(用户)。单击页面顶部的Create New User(创建新用户)按钮。这会将带到编辑用户页,可以在其中指定用户名、用户口令和其他参数。创建用户后,其他选项卡即可用,可以在其中指定用户拥有哪些角色、用户拥有哪些常规SQL权限、用户拥有哪些表级权限、哪些视图可用以及可以执行哪些存储过程。
如果用户具有SQL表权限或一般SQL权限,则在用户的角色选项卡上授予或撤消的角色不会影响用户通过基于SQL的服务(如ODBC)对表的访问。这是因为,在基于SQL的服务中,基于表的权限优先于基于资源的权限。
可以使用`%Library.SQLCatalogPriv`类查询列出:
- 所有用户`SQLUsers()`
- 授予指定用户`SQLUserPrivs(“username”)`的所有权限
- 授予指定用户`SQLUserSysPrivs(“username”)`的所有系统权限
- 授予指定用户`SQLUserRole(“username”)`的所有角色
以下示例列出了授予当前用户的权限:
```java
/// d ##class(PHA.TEST.SQL).Sqluser2()
ClassMethod Sqluser2()
{
SET statemt=##class(%SQL.Statement).%New()
SET cqStatus=statemt.%PrepareClassQuery("%Library.SQLCatalogPriv","SQLUserPrivs")
IF cqStatus'=1 {WRITE "%PrepareClassQuery failed:" DO $System.Status.DisplayError(cqStatus) QUIT}
SET rset=statemt.%Execute($USERNAME)
WRITE "Privileges for ",$USERNAME
DO rset.%Display()
}
```
## 架构形式的用户名
在某些情况下,用户名可以隐式用作SQL模式名称。如果用户名包含SQL标识符中禁止的字符,这可能会带来问题。例如,在多域配置中,用户名包含“@”字符。
根据分隔标识符配置参数的设置,InterSystems IRIS会以不同的方式处理此情况:
- 如果启用了分隔标识符的使用,则不会进行特殊处理。
- 如果禁用分隔标识符的使用,则会从用户名中删除所有禁用字符,以形成架构名称。例如,用户名`“Documentation@intersystems.com”`将成为模式名称`“Documentationintersystemscom”`。
这不会影响`SQL CURRENT_USER`函数返回的值。它始终与`$USERNAME`相同。
# 角色
将SQL权限分配给用户或角色。角色使能够为多个用户设置相同的权限。角色由SQL和系统级安全性共享:单个角色可以同时包括系统权限和SQL权限。
管理门户、系统管理、安全性、角色页提供了InterSystems IRIS实例的角色定义列表。要查看或更改特定角色的详细信息,请选择该角色的名称链接。在出现的编辑角色页面上,有关于角色权限以及哪些用户或角色拥有该权限的信息。
常规选项卡列出角色对系统间安全资源的权限。如果角色仅拥有SQL权限,则一般信息选项卡的资源表会将该角色的权限列为“未定义”。
SQL权限选项卡列出了角色对InterSystems SQL资源的权限,其中命名空间的下拉列表允许查看每个命名空间的资源。因为权限是按名称空间列出的,所以在特定名称空间中没有权限的角色的列表显示为`“None”`。
注:应该使用角色定义权限,并将特定用户与这些角色相关联。这有两个原因:
1. 与检查单个用户条目相比,SQL引擎通过检查相对较小的角色数据库来确定权限级别的效率要高得多。
2. 与具有多个单独用户设置的系统相比,使用少量角色集管理系统要容易得多。
例如,可以定义具有特定访问权限的名为`“ACCOUNTING”`的角色。随着 `Accounting Department`的发展,可以定义新用户并将其与会计角色相关联。如果需要修改`Accounting`权限,只需修改一次,系统会自动覆盖`Accounting Department`的所有成员。
一个角色可以担任其他角色。例如,会计角色可以拥有`BILLINGCLERK`角色。被授予会计角色的用户将同时拥有会计角色和`BILLINGCLERK`角色的权限。
还可以使用以下SQL命令定义用户和角色:`CREATE USER`、`CREATE ROLE`、`ALTER USER`、`GRANT`、`DROP USER`和`DROP ROLE`。
可以使用`%Library.SQLCatalogPriv`类查询列出:
- 所有角色`SQLRoles()`
- 授予指定角色`SQLRolePrivileges(“Rolename”)`的所有权限
- 授予指定角色`SQLRoleUser(“Rolename”)`的所有角色或用户
- 授予指定用户`SQLUserRole(“username”)`的所有角色
# SQL权限
将SQL权限分配给用户或角色。角色使能够为多个用户设置相同的权限。
InterSystems SQL支持两种类型的权限:管理权限和对象权限。
- 管理权限是特定于命名空间的。
管理权限包括创建、更改和删除对象类型,例如创建表所需的`%CREATE_TABLE`权限。不仅需要`%ALTER_TABLE`特权来更改表,还需要`%ALTER_TABLE`特权来创建或删除索引、创建或删除触发器以及运行`TUNE TABLE`。
管理权限还包括`%NOCHECK`、`%NOINDEX`、`%NOLOCK`和`%NOTRIGGER`,它们确定用户在执行`INSERT`、`UPDATE`、`INSERT`或`UPDATE`或`DELETE`时是否可以应用相应的关键字限制。用户需要分配`%NOTRIGGER`管理权限才能执行`TRUNCATE TABLE`。
- 对象权限特定于表、视图或存储过程。它们指定对特定命名SQL对象的访问类型(在SQL意义上:表、视图、列或存储过程)。如果用户是SQL对象的所有者(创建者),则会自动向该用户授予该对象的所有权限。
表级对象权限提供对表或视图的所有列中的数据的访问(`%ALTER`、`DELETE`、`SELECT`、`INSERT`、`UPDATE`、`EXECUTE`、`REFERENCES`),包括当前存在的列和任何后续添加的列。
列级对象权限仅提供对表或视图的指定列中的数据的访问权。不需要为具有系统定义的值(如`RowID`和`Identity`)的列分配列级权限。
存储过程对象权限允许将过程的`EXECUTE`权限分配给指定的用户或角色。
## 授予SQL权限
可以通过以下方式授予权限:
- 使用管理门户。从系统管理中选择安全性,然后选择用户或角色。选择所需的用户或角色,然后选择相应的选项卡:管理权限的SQL权限、对象权限的SQL表、SQL视图或SQL过程。
- 在SQL中,使用`GRANT`命令向指定用户或角色(或用户或角色列表)授予特定管理权限或对象权限。可以使用`REVOKE`命令删除权限。
- 在ObjectScript中,使用`$SYSTEM.SQL.Security.GrantPrivileve()`方法将特定对象权限授予指定用户(或用户列表)。
## 列出SQL权限
- 使用管理门户。从系统管理中选择安全性,然后选择用户或角色。选择所需的用户或角色,然后选择相应的选项卡:管理权限的SQL权限、对象权限的SQL表、SQL视图或SQL过程。
- 在SQL中,使用`%CHECKPRIV`命令确定当前用户是否具有特定的管理或对象权限。
- 在ObjectScript中,使用`$SYSTEM.SQL.Security.CheckPrivileve()`方法确定指定用户是否具有特定的对象权限。
## 审核权限错误
当InterSystems IRIS进程调用用户没有特权的SQL语句时,操作将失败,并生成`SQLCODE-99`错误。启用审核事件`%SYSTEM/%SQL/PrivilegeFailure`时,将在`Audit`数据库中为遇到的每个`SQLCODE-99`错误放置一条记录。默认情况下,此审核数据库选项处于禁用状态。 怎么使用sql查询用户的权限,包括表权限,视图权限