Our objective
In the last article, we talked about a few starters for Django. We learned how to begin the project, ensure we have all the requisites, and make a CRUD. However, today we are going a little further.
Sometimes we need to access more complex methods, so today, we will connect IRIS to a Python environment, build a few functions and display them on a webpage. It will be similar to the last discussion, but further enough for you to make something new, even though not enough to feel lost.
In this project, we will get information about the globals in IRIS to track their sizes to understand the cost of each namespace and table in MBs.
The Project
Every step here is available on my GitHub Repository, in the commits history.
Starters
We are going through a few steps like those in the last article, so this part should be familiar.
- Go to the desired directory on the terminal and type the following.
django-admin startproject globalSize
- Add the requirements.txt with the following text, and type
pip install -r requirements.txt
to ensure you have the requirements.
# Django itself
django>=4.2.1
# InterSystems IRIS driver for Django
django-iris==0.2.2
- In globalSize/settings.py, add IRIS on the DATABASES configurations:
DATABASES = {
	‘default’: {
		‘ENGINE’: ‘django_iris’,
		‘NAME’: ‘USER’,
		‘USER’: ‘_system’,
		‘PASSWORD’: ‘SYS’,
		‘HOST’: ‘localhost’,
		‘PORT’: 1972,
	}
}- Don’t forget to add a .gitignore and a .editorconfig. It is also convenient to have a linter of your preference, but it is beyond the scope of this article to discuss it.
Creating the app and model
We have created an app and a model in the last article, so this section should also be familiar, even though it is a different app and model.
- To create the app, type
python manage.py startapp globals
- In globals/models.py, create a model with the information you want to display about your globals:
class irisGlobal(models.Model):
	database = models.CharField(max_length=40)
	name = models.CharField(max_length=40)
	allocatedsize = models.FloatField()
	size = models.FloatField()


	def __str__(self):
return self.name- In settings.py, add the new app to the INSTALLED_APPS:
INSTALLED_APPS = [
	…,
	‘globals’,
]
Setting URLs and the home page
Again we are going through a few more steps very similar to the last article.
- In globalSize/urls.py, import the function include from django.urls and add a new path to globals.urls in urlpatterns.
from django.urls import path, include
urlpatterns = [
    …,
    path(‘globals/’, include(‘globals.urls’)),
]- Create the URLs for the app, adding the file globals/urls.py with the following text.
from django.urls import path
from .views import home
urlpatterns = [
	path(‘’, home),
]- Create the view we imported in the last step. On view.py add the function below.
def home(request):
return render(request, “index.html”)- Finally, add the file globals/templates/index.html and generate the front page as desired. Check the example below:
<!DOCTYPE html>
<html>
  <body>
    hello world!
  </body>
</html>
If you enter the commands below and follow the link http://127.0.0.1:8000/globals/ you will already have a page displaying “hello world!”.
python manage.py makemigrations
python manage.py migrate
python manage.py runserver
Displaying the globals in the admin and home pages
- In admin.py, import the model and register it.
from .models import irisGlobal
admin.site.register(irisGlobal)- Import the model in views.py and return it in the function.
from .models import irisGlobal
def home(request):
	globals = irisGlobal.objects.all()
	return render(request, “index.html”, {“globals”: globals})
- Now we can access the globals from the index.html as preferred. See the example below.
<h3>ID  -  DATABASE          /       GLOBAL       - Size / Allocated</h3>
<ul>
  {% for global in globals %}
  <li>
    {{ global.id }} - {{ global.database }}    {{ global.name  }}  -  {{ global.size  }}  /  {{ global.allocatedsize }}
  </li>
  {% endfor %}
</ul>
Retrieving data
Retrieving data
At this point, we have the project ready to be loaded with information. There is a good amount of ways this can be shaped, but I will use Python’s approach so we can learn a new solution that is possible to integrate with Django and IRIS.
We need a few methods to retrieve all the data. We can use InterSystems IRIS Cloud SQL with the DB-API driver to connect to the instance we want to analyze - it doesn’t have to be the same as where we connected Django.
Organizing it in a new folder that we can treat as a module is a good practice. To assure that, create the folder api in globals, add an __init__.py empty file so that Python recognizes it as a module, and start writing the file to contain the methods. We can call it methods.py.

Create the connection
To connect our Python environment to the InterSystems IRIS, we should follow a few steps described in the section “ObjectScript in Python Environment” of the previous article Python and IRIS in practice.
From now on is simple; we import iris, pass the address of the connection (the IRIS instance we want to analyze in the following format: host:port/namespace), a username, and a password to the iris.connect method and create Python’s IRIS. Have a look at the code below.
import intersystems_iris as iris
from django.db import connection as djangoconnection

# connection by iris
conn_params = djangoconnection.get_connection_params()
conn_params[“namespace”] = “%SYS”
connection = iris.connect(**conn_params)
irisPy = iris.createIRIS(connection)
Getting database directories
Since we want to retrieve the globals' sizes, we need (of course) their sizes, their names, and their addresses - as known as databases.
I will show a simplified version of the function but remember that verifying every step and connection, and throwing an Exception if something goes wrong is a good practice.
Just like we would do in ObjectScript, we need a SQL statement so we can prepare it, execute it, and retrieve a list containing all the database directories in its resultset. We can do all that easily with the functions “irisPy.classMethodSomething()”, where Something stands for the type the method should return, and irisObject.invoke(), where we can access anything from the irisObject referred. Take a look at the following example.
def getAllDatabaseDirectories():
    try:
	   # check the connection made in irisPy, and if it is set to %SYS namespace
	   databaseDirectoriesList = []
	   with connection.cursor() as cursor:
		cursor.execute(“SELECT DISTINCT %EXACT(Directory) FROM Config.Databases WHERE SectionHeader = ?”, [“Databases”,],)
		databaseDirectoriesList = [row[0] for row in cursor]

    except Exception as error:
        return str(error)

    return databaseDirectoriesList
The statement variable is set to an object generated by the method %New of the IRIS %SQL.Statement class. Then it is possible to invoke the method %Prepare from the object instantiated, with a query string as an argument. Next, we can invoke the %Execute and %Next methods to perform the query and loop through its result set, appending the desired information to a Python list for easy access.
It is easy to find every database directory in the Config.Databases table, located only in the %SYS namespace of every IRIS instance. Check it out in the Management Portal if you want, there is some more interesting information there.
Getting all globals from a database
This function is very similar to the previous one. However, we have a class query ready to use now. Once again we need a SQL statement, so we can prepare the DirectoryList query from the %SYS.GlobalQuery class. Next, we execute it with a database directory as an argument and retrieve a list containing all globals from that database.
def getGlobalsList(databaseDirectory: str):
    try:
        statement = irisPy.classMethodObject("%SQL.Statement", "%New")
        status = statement.invoke("%PrepareClassQuery", "%SYS.GlobalQuery","DirectoryList")

        result = statement.invoke("%Execute", databaseDirectory)

        globalList = []
        while (result.invoke("%Next")!=0):
            globalList.append(result.invoke("%Get", "Name"))

    except Exception as error:
        return str(error)

    return globalList
Getting globals sizes and allocated sizes
Finally, we can access the target information. Fortunately, IRIS has a built-in method to retrieve the size and allocated size if you provide a database and global pair.
def getGlobalSize(databaseDirectory: str, globalName: str):
    try:
        globalUsed = iris.IRISReference(0)
        globalAllocated = iris.IRISReference(0)
        status = irisPy.classMethodObject("%GlobalEdit", "GetGlobalSize", databaseDirectory, globalName, globalAllocated, globalUsed, 0)

    except Exception as error:
        return str(error)

    return (globalUsed.getValue(), globalAllocated.getValue())
This time, we need the IRISReference(0) function from the iris module to receive the sizes from the “GetGlobalSize” function by reference. Then, we can access the value with the method getValue().
Showing everything on the front page
Finally, we can use these functions to display the data on the front page. We already have a way through the information and a table, so we only need to populate it. I want to create an update button to do that.
First, we add a link to the index.html.
…
<body>
  <a href = "{% url 'update' %}">update</a>
…
</body>
Add the link to the urlpatterns list, in urls.py.
Add the link to the urlpatterns list, in urls.py.
from .views import home, update
urlpatterns = [
    path('', home),
    path('update', update, name="update"),
]
Then, create the view, in views.py.
from django.shortcuts import render, redirect
from .api.methods import *
def update(request):
    irisGlobal.objects.all().delete()
    databaseList = getAllDatabaseDirectories()

    for database in databaseList:
        globalList = getGlobalsList(database)

        for glob in globalList:
            used, allocated = getGlobalSize(database, glob)
            irisGlobal.objects.create(database=database, name=glob, size=used, allocatedsize=allocated)

    return redirect(home)
For this view, we must first import the redirect function from django.shortcuts, and the methods we just built.
It is a good idea to delete any previous data on the table so that eventually deleted globals will vanish. Since the global count is probably not gigantic, it is better to do it this way than to check each record to see whether it was deleted or needs an update.
Then, we get all the database directories so we can, for each database, check all the globals in it, and for each global, we can have their used and allocated size.
At this point, we have the Django model populated and ready to retrieve data, so we redirect to the home view.
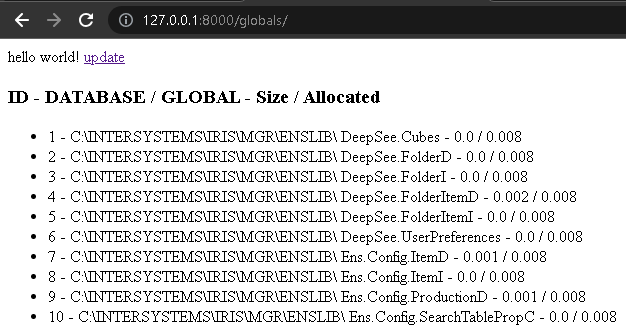
If you access http://127.0.0.1:8000/globals/ and click the update link we added, the page should reload and in a few seconds it will display the list of globals, with its databases, sizes, and allocated sizes, like the image below.
Adding some aggregation
You would be surprised to know how simple it is to add a few fast analysis options, such as a sum or count. It is not necessary to master Django to create a few dashboards on this page and after this section, you should be in a good place to start.
We already know that the view home is responsible to render the index. Up until now, we have generated the variable “globals”, containing all the data, and passed it to the index.html. We will do something similar but with aggregation functions. We will create a variable for each sum, use the aggregate() and Sum() methods, and add them to the context list argument of the render function. And of course, don’t forget to import Sum from django.db.models. Check the function below.
def home(request):
	globals = irisGlobal.objects.all()
	sumSize = globals.aggregate(Sum("size"))
	sumAllocated = globals.aggregate(Sum("allocatedsize"))
	return render(request, "index.html", {"globals": globals, "sumSize": sumSize, "sumAllocated":sumAllocated})
Now we can add it to the index.html file and add some paragraphs below the list (<ul> element). Inside those paragraphs, we can access the count of all globals, and the sums, as shown below.
…
  <p>showing results for {{globals.count}} globals</p>
  <p>total size: {{sumSize.size__sum}}</p>
  <p>total allocated size: {{sumAllocated.allocatedsize__sum}}</p>
 </body>
</html>
Reload the link and you should have the following.

The end... almost
In this article, we have learned about InterSystems IRIS storage of data, how to access it from Python, building an API, and using IRIS as a Cloud system, so we can keep track, and analyze it easily. We can see on the horizon some more complex queries, creating dashboards, automating the updates, and adding a notification system.
In the next article, I will take a step closer to this horizon, showing how to filter and order the data before displaying it, adding some client-side editable options, and to top it off, we can add a pinch of CSS to make it charming.
Would you like to see something I haven’t said yet? Please, contact me if you have any ideas or needs that you would like me to write about.
 Open Exchange
.png)

.png)
.png)
.png)
.png)
.png)
.png)
.png)
.png)
.png)
.png)
.png)
.png)
.png)
.png)
.png)
.png)
.png)
.png)
.png)